Grizzly G1023S Instruction Manual Download Page 9

G1023S/G1023S110 Heavy-Duty 10'' Table Saw

-7-

Common Definitions, Terms and Phrases

The following is a list of common definitions, terms and phrases used throughout this manual as they relate 
to this table saw and woodworking in general. It is important that you read and become familiar with them 
before assembling, adjusting or operating this machine. Your safety is 

VERY important to us at Grizzly! 

Arbor:  Metal  shaft  extending  from  the  drive 

mechanism,  to  which  the  cutting  blade  is 
attached.

Bevel Edge Cut: Tilting the saw arbor and blade 

to an angle between 0° and 45° to perform an 
angled cutting operation.

Blade Guard:  Metal  or  plastic  mechanism  that 

mounts over the saw blade to prevent acciden-
tal contact with the cutting edge.

Crosscut: Table saw operation in which the miter 

gauge is used to cut across the grain of a piece 
of wood.

Dado Blade:  Blade  or  set  of  blades  that  attach 

to the arbor and are used for cutting grooves 
and rabbets.

Dado Cut: Table saw operation that uses a dado 

blade  to  cut  a  flat  bottomed  groove  into  the 
face of wood stock.

Featherboard:  Safety  device  used  to  keep  a 

board  against  the  rip  fence  or  table.  Allows 
operator  to  keep  hands  away  from  the  saw 
blade.

Kerf:  The  resulting  cut  or  gap  made  by  a  saw 

blade.

Kickback:  A  condition  in  which  the  wood  is 

thrown back towards an operator at a high rate 
of speed. 

Miter Gauge:  A  component  that  controls  the 

wood  stock  movement  while  performing  a 
crosscut.  Allows  for  variation  of  angle  cuts 
such as miter cuts used on a picture frame.

Moulding Head: A  cutterhead  attached  to  the 

arbor.  Accepts  interchangeable  moulding 
knives  for  profile  cutting.  We  DO  NOT  rec-
ommend the use of

 a moulding head as they 

require advanced skills in their operation.

Parallel: Being an equal distance apart at every 

point.  i.e.  the  rip  fence  face  is  parallel  to  the 
side face of the saw blade.

Non-Thru Cut: A sawing operation that requires 

the  removal  of  the  blade  guard  and  splitter. 
Dado  and  rabbet  cuts  are  considered  Non-
Thru  Cuts  because  the  blade  does  not  pro-
trude  above  the  top  face  of  the  wood  stock. 
Always remember to reinstall the blade guard 
and splitter after performing a non-thru cut.

Perpendicular:  Intersecting  and  forming  right 

angles; at right angles to the vertical and hori-
zontal planes. i.e. the blade is perpendicular to 
the table surface.

Push Paddle: Safety aid used to push a piece of 

wood stock through a cutting operation. 

Push Stick:  Safety  aid  used  to  push  a  piece 

of  wood  stock  through  a  cutting  operation. 
Usually used when rip cutting.

Rabbet:  Cutting  operation  that  creates  an  L-

shaped  channel  along  the  edge  of  wood 
stock.

Splitter: Metal plate attached to the back of the 

blade  guard  that  maintains  the  kerf  opening 
in the wood when performing a cutting opera-
tion.

Standard Kerf: 

1

8

"  gap  made  with  a  standard 

blade.

Straightedge: A tool used to check the flatness, 

parallelness, or consistency of a surface(s).

Thru-Sawing:  A  sawing  operation  where  the 

wood  stock  thickness  is  completely  sawn 
through.  Proper  blade  height  usually  allows 

1

4

" of the top of the blade to extend above the 

wood stock.


Thin Kerf: 

3

32

" gap made with a thin kerf blade.

Rip Cut: A cut made along grain of the wood.
 

Sacrificial Fence:  A  piece  of  wood  attached  to 

the  face  of  the  rip  fence  that  is  designed  to 
extend the fence face away from the metal por-
tion of the fence. Used primarily when making 
rabbet cuts with a dado blade.

Summary of Contents for G1023S

Page 1: ...1023S G1023S110 INSTRUCTION MANUAL COPYRIGHT FEBRUARY 2002 BY GRIZZLY INDUSTRIAL INC WARNING NO PORTION OF THIS MANUAL MAY BE REPRODUCED IN ANY SHAPE OR FORM WITHOUT THE WRITTEN APPROVAL OF GRIZZLY IN...

Page 2: ...als are Lead from lead based paints Crystalline silica from bricks cement and other masonry products Arsenic and chromium from chemically treated lumber Your risk from these exposures varies depending...

Page 3: ...OR BRACE 17 GUARD BRACKET 17 HANDWHEEL 18 TABLE INSERT 18 SAW BLADE 19 BLADE GUARD SPLITTER 19 21 5 ADJUSTMENTS BLADE HEIGHT 22 BLADE TILT 22 MITER SLOT TO BLADE 23 24 BLADE ALIGNMENT 25 26 RIP FENCE...

Page 4: ...any flammable or noxious fumes may exist Keep work area well lighted For Your Own Safety Read Instruction Manual Before Operating This Equipment Indicates an imminently hazardous situation which if n...

Page 5: ...ETHERISKOFUNINTENTIONAL STARTING On machines with magnetic contact starting switches there is a risk of starting if the machine is bumped or jarred Always disconnect from power source before adjusting...

Page 6: ...aw OFF 10 PROVIDE adequate support to the rear and sides of the saw table for wide or long workpieces 11 AVOID awkward operations and hand positions where a sudden slip could cause your hand to move i...

Page 7: ...catalog Clamp the insert firmly in place with a piece of wood when creating slots Never hold the table insert with your hand while cutting new slots See Figure 2 for examples of zero clear ance table...

Page 8: ...therboards Easily made from scrap stock featherboards provide an added degree of protection against kickback To make a featherboard cut a 30 40 angle at one end of the board and make a num ber of end...

Page 9: ...ng knives for profile cutting We DO NOT rec ommend the use of a moulding head as they require advanced skills in their operation Parallel Being an equal distance apart at every point i e the rip fence...

Page 10: ...to modify an existing circuit by replacing the circuit breaker with one rated for a higher amperage SECTION 2 CIRCUIT REQUIREMENTS 110V Operation Model G1023S110 Only The Model G1023S110 motor is prew...

Page 11: ...stall a new circuit with wiring capable of handling an 18 amperage draw Do not attempt to modify an existing circuit by replacing the circuit breaker with one rated for a higher amperage Circuit Load...

Page 12: ...th your local municipality or a licensed electrician Grounding Extension Cords In the event of an electrical short grounding provides electric current a path of least resis tance to reduce the risk of...

Page 13: ...y review safety consider ations and cover general operating procedures It represents our effort to produce the best docu mentation possible If you have any comments regarding this manual please write...

Page 14: ...Save all containers and packing materi als until you are satisfied that your Model G1023 Series has arrived in good condi tion Freight company adjusters will want to inspect those materials in the eve...

Page 15: ...ies component layout The hardware bag should contain the following 1 3mm Allen Wrench 1 4mm Allen Wrench 1 Arbor Wrench 7 8 and 1 1 Combo Wrench 5 8 1 Blade Guard Support 1 Jam Nut 5 8 18 2 Phlp Hd Sc...

Page 16: ...e vent eye strain Electrical circuits should be dedicated or large enough to handle amper age requirements Outlets should be located near each machine so power or extension cords are clear of high tra...

Page 17: ...of the wing flush with the table top directly above the front bolt and tighten the front bolt The front edge of the extension wing should also be flush with the front edge of the table 4 Raise or lowe...

Page 18: ...om edge of the wing and retighten b If the wing tilts up stick layers of masking tape above each bolt near the top edge of the wing and retighten Allow the tape to extend above table surface and trim...

Page 19: ...otor Brace The motor brace shown in Figure 11 has been installed for shipping purposes Please remove this brace before continuing with assembly The bolts that secure the brace should be screwed back i...

Page 20: ...stall place the handwheel over the threads and screw the lock knob into the center Next insert the handle into the handwheel and tighten it as shown in Figure 14 Install the other handle onto the othe...

Page 21: ...me pre installed To install the blade 1 Remove the table insert to gain access to the arbor 2 Remove the nut and the outer arbor flange from the arbor 3 Place the blade on the arbor making sure that i...

Page 22: ...s properly aligned please skip ahead to the Table Insert instructions otherwise con tinue with the next step Figure 18 Guard in line with blade Figure 19 Improper splitter blade alignment Add washers...

Page 23: ...just as necessary and tighten all the bolts before use If the blade guard is properly aligned please skip ahead to Step 10 otherwise continue with the next step 6 If the splitter is positioned to the...

Page 24: ...adjust the 45 stop bolt on the right side of the front trunnion Use the 45 side of a combo square or a bevel gauge set at 45 Figure 22 Geared trunnion When preparing to operate your table saw you shou...

Page 25: ...he best results if the miter slot and the rip fence are adjusted paral lel to the blade If either of these are not exactly parallel your cuts and your finished work will be lower in quality but more i...

Page 26: ...small amount and then move on to each of the others tighten ing each down the same amount Continue to rotate through the bolts tightening them a little each time until they are all secure 13 Now reche...

Page 27: ...or mov ing the table and wings get assistance Figure 27 Trunnion mounting bolts To adjust the blade position by moving the arbor bracket 1 Disconnect plug from power source 2 Remove the table and wing...

Page 28: ...iter Gauge 2 Adjust the miter body until there is no space between the square and the blade Tighten the lock knob 3 With the stop link in the up position loosen the jam nut and adjust the stop screw u...

Page 29: ...arding the operation of this machine Keep loose clothing out of the way of machin ery and keep hair pulled back Wear safety glasses dur ing all operations on the shaper Failure to com ply may result i...

Page 30: ...pping blade Test Run 1 Face the table saw and stand to the left of the blade path 2 With one finger on the START button and one finger on the STOP button turn the saw on Be ready to turn the saw off i...

Page 31: ...pically have between 40 50 teeth an alternate top bevel and flat or alternate top bevel and raker tooth pro file The teeth are arranged in groups of five The gullets are small and shallow within the g...

Page 32: ...r fine furniture and cabi net making Wobble dadoes are inexpensive and easy to set up but leave a rough finish 7 Moulding Heads A moulding head is a cutterhead that attaches to the arbor and holds ind...

Page 33: ...he table and fence and push the workpiece fully past the blade When a small width is to be ripped and a push stick cannot be safely put between the blade and rip fence rip a larger piece to obtain the...

Page 34: ...Never use the fence as a stop in conjunction with your miter gauge 7 Reconnect the saw to the power source 8 Using a scrap as a test piece switch on the saw and take a pass over the dado blade 9 If t...

Page 35: ...ed with the other edge of the intended dado channel Be sure to keep the cuts within your marks otherwise your dado will be too large 6 Turn on the saw and make a second cut 7 Move toward the center of...

Page 36: ...ce so that the next cut will remove another portion of the wood stock between the inside edge of the rabbet and the edge of the wood 6 Turn on the saw and make a second cut 7 Continue to readjust the...

Page 37: ...1023 Series should be protected against rust and pit ting Wiping the machine clean after every use ensures that wood dust is not allowed to trap moisture against bare metal surfaces Tables can be kept...

Page 38: ...mount bolt 3 Check the V belt tension again Ensure that the motor pulley and arbor pulley are lined up To replace the V belts 1 Remove the blade 2 Adjust the arbor so it is up all the way and in the...

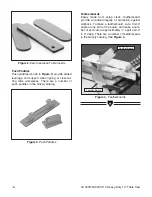
Page 39: ...G1023S G1023S110 Heavy Duty 10 Table Saw 37 1 1 2...

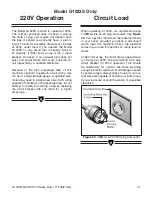
Page 40: ...38 G1023S G1023S110 Heavy Duty 10 Table Saw...

Page 41: ...a copy of our cur rent catalog for complete information regarding Grizzly s warranty and return policy If you need additional technical information relating to this machine or if you need general assi...

Page 42: ...ht Shipping 460 lbs Construction Table Precision Ground Cast Iron Stand Pre formed Steel Miter Gauge Cast Iron Steel Bar Trunnions Cast Iron Table Height 34 Size 27 Deep x 201 8 Wide Size w Extension...

Page 43: ...43 44A 45 47 48 48A 50 51 52 53A 54 55 38 9A 8B 10A 30 31 23 24 27 19 20 21 56A 57A 58 60 61 62 63 64 65 66 67A 68 69 70 71 72 79 80 1 80 2 80B 80D 81 82A 83 84A 84B 85A 85B 85C 85D 86 87A 88 89 91A...

Page 44: ...EVELED LEFT EXT WING V2 07 07 26 P1023S026 PHLP HD SCR 10 24 X 3 4 84B P1023S084B BEVELED RIGHT EXT WING V2 07 07 27 P1023S027 DOWEL PIN 85A P1023S085A LOCK WASHER 1 2 28A P1023S028A KEY 5 X 5 X 40 85...

Page 45: ...1023S510 COMPLETE BLADE GUARD ASSY 407A P1023S407A HEX NUT 10 24 511 P1023S511 PAWL 408A P1023S408A SET SCREW 10 24 X 3 4 512 P1023S512 ROLL PIN 4 X 22 409A P1023S409A SET SCREW 10 24 X 1 4 513 P1023S...

Page 46: ...ion is incorrect Table top too low 1 Hand wheel key is inserted too far 2 Bullets are wedged 3 Roll pin or setscrew in worm gear is contacting geared trunnion CORRECTIVE ACTION 1 Check power line for...

Page 47: ...aw 45 PUSH STICK MAKE FROM 1 2 OR 3 4 WOOD OR THICKNESS LESS THAN WIDTH OF MAT L TO BE CUT CAUTION USE ONLY GOOD STRONG WOOD OR PLYWOOD 1 2 GRID CUT HERE TO PUSH 1 2 WOOD CUT HERE TO PUSH 1 4 WOOD NOT...

Page 48: ...zly shall be tried in the State of Washington County of Whatcom We shall in no event be liable for death injuries to persons or property or for incidental contingent special or consequential damages a...

Page 49: ...merican Woodworker ___Practical Homeowner ___Cabinetmaker ___Shop Notes ___Family Handyman ___Today s Homeowner ___Fine Homebuilding ___WOOD ___Fine Woodworking ___Wooden Boat ___Home Handyman ___Wood...

Page 50: ...ED LINE GRIZZLY INDUSTRIAL INC P O BOX 2069 BELLINGHAM WA 98227 2069 TAPE ALONG EDGES PLEASE DO NOT STAPLE Name_______________________________ Street_______________________________ City______________S...

Page 51: ......

Page 52: ......

Reviews: