


-26-
Model G0920 (Mfd. Since 10/20)
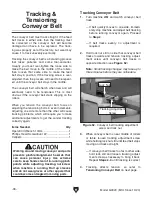
3. Turn machine ON and feed workpiece into
sander. SLOWLY lower sanding drum until
workpiece makes light contact with sanding
drum. This is correct height to begin sanding
workpiece. Tighten drum height lock knob to
secure setting.
NOTICE
It is imperative that drum height lock knob
is fully tightened before resuming sand-
ing process. Otherwise, sanding drum will
raise up under pressure from workpiece
and will not evenly sand it.
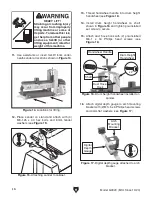
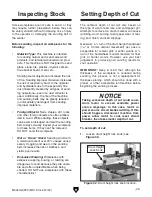
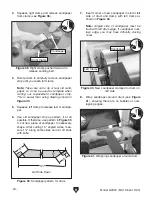
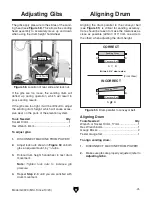
2. Rotate drum height handwheel (see Figure
33) until sanding drum is well above conveyor
table, then lower sanding drum, allowing a
gap between workpiece and sanding drum.
Note: When adjusting drum to sand thick-
er workpiece, raise and then lower drum
to remove backlash from adjustment
mechanism.
Sanding Drum
Drum Height
Handwheel
Conveyor
Table
Figure 33. Drum height components.
4. After initial pass, turn handwheel
1
⁄
4
turn (
1
⁄
64
"
or 0.4mm) or less; the maximum depth for
most sanding conditions.
Note: Each full turn of table elevation
handwheel raises conveyor table approxi-
mately 0.06" (
1
⁄
16
") or 1.5mm.
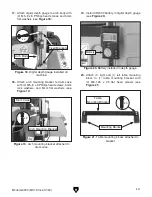
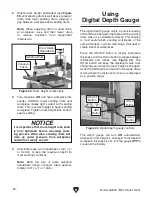
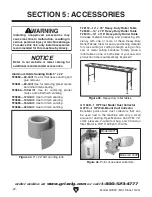
Using
Digital Depth Gauge
The digital depth gauge offers a precise reading
of the distance between the table and the sanding
drum when it is calibrated correctly. This reading
is most useful when sanding workpieces of the
same thickness, or when matching a thickness to
create identical workpieces.
Press the ON/OFF button to display workpiece
thickness, and the mm/in button to toggle between
millimeters and inches (see
Figure 34). The
HOLD button will keep the displayed value from
changing even when the drum height is changed,
while the ABS button will switch to Absolute Value
mode (where the distance from zero is displayed
as a positive value).
Figure 34. Digital depth gauge controls.
ON/OFF
Button
mm/in
Button
HOLD
Button
ABS
Button
The depth gauge will turn
ON automatically
whenever drum height is changed. Once desired
workpiece thickness is set, turn the gauge
OFF to
conserve the battery.
Summary of Contents for G0920
Page 60: ......


