Grizzly G0761 Owner'S Manual Download Page 13

Model G0761 (Mfd. Since 10/13)

-11-

Extension Cords

We  do  not  recommend  using  an  extension  cord 
with  this  machine.  If  you  must  use  an  extension 
cord, only use it if absolutely necessary and only 
on a temporary basis.

Extension  cords  cause  voltage  drop,  which  may 
damage electrical components and shorten motor 
life. Voltage drop increases as the extension cord 
size gets longer and the gauge size gets smaller 
(higher gauge numbers indicate smaller sizes).

Any extension cord used with this machine must 
contain  a  ground  wire,  match  the  required  plug 
and  receptacle,  and  meet  the  following  require-
ments:

Minimum Gauge Size ...........................14 AWG

Maximum Length (Shorter is Better).......50 ft.

Grounding Instructions

This  machine  MUST  be  grounded.  In  the  event 
of certain malfunctions or breakdowns, grounding 
reduces the risk of electric shock by providing a 
path of least resistance for electric current.

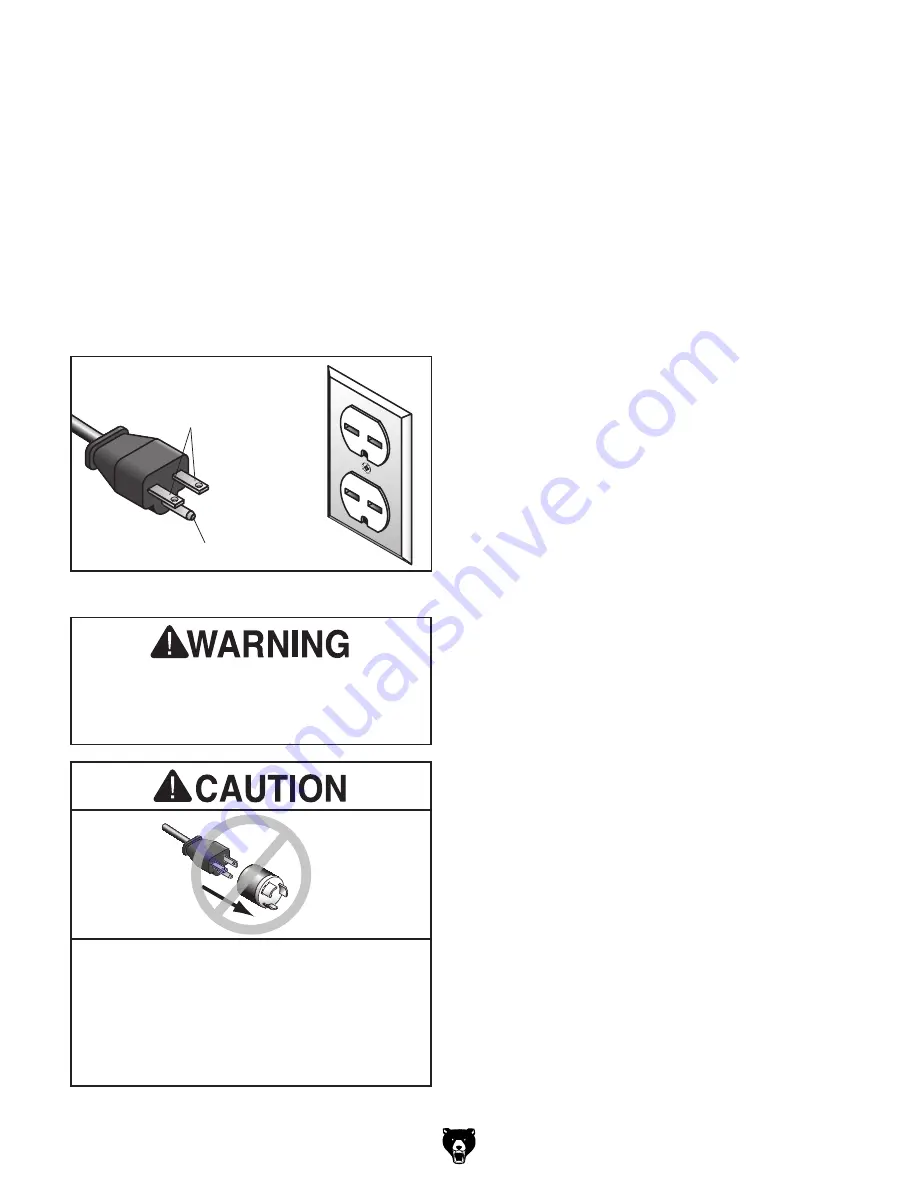
Figure 2. typical 6-15 plug and receptacle.

Grounding Prong

Current Carrying Prongs

6-15 PLUG

GROUNDED

6-15 RECEPTACLE

Improper connection of the equipment-grounding 
wire  can  result  in  a  risk  of  electric  shock.  The 
wire with green insulation (with or without yellow 
stripes) is the equipment-grounding wire. If repair 
or replacement of the power cord or plug is nec-
essary, do not connect the equipment-grounding 
wire to a live (current carrying) terminal.
 
Check with a qualified electrician or service per-
sonnel if you do not understand these grounding 
requirements, or if you are in doubt about whether 
the  tool  is  properly  grounded.  If  you  ever  notice 
that a cord or plug is damaged or worn, discon-
nect it from power, and immediately replace it with 
a new one.

Serious injury could occur if you connect 

the machine to power before completing the 

setup process. DO NOT connect to power 

until instructed later in this manual.

The power cord and plug specified under “Circuit 
Requirements  for  220V”  on  the  previous  page 
has an equipment-grounding wire and a ground-
ing  prong.  The  plug  must  only  be  inserted  into 
a  matching  receptacle  (outlet)  that  is  properly 
installed  and  grounded  in  accordance  with  all 
local codes and ordinances (see figure below).

No adapter should be used with the 

required plug. If the plug does not fit the 

available receptacle, or the machine must 

be reconnected for use on a different type 

of circuit, the reconnection must be made 

by a qualified electrician and comply with all 

local codes and ordinances.

Summary of Contents for G0761

Page 1: ...ING OWNER S Manual For models manufactured since 10 13 Copyright MAY 2014 By Grizzly Industrial Inc Warning No portion of this manual may be reproduced in any shape Or form without the written approval of Grizzly Industrial inc TS16056 printed IN CHINA V1 05 14 ...

Page 2: ...ng grinding tool integrity and the usage of personal protective equipment The manufacturer will not be held liable for injury or property damage from negligence improper training machine modifications or misuse Some dust created by power sanding sawing grinding drilling and other construction activities contains chemicals known to the State of California to cause cancer birth defects or other repr...

Page 3: ...Downfeed 21 Depth Stop 21 Headstock Movement 22 Raising Lowering Headstock 22 Tilting Headstock 22 Table Travel 23 Graduated Dials 23 X Axis Handwheel 23 Y Axis Handwheel 23 X Axis Power Feed 24 Installing Removing Tooling 24 Installing Tooling 25 Removing Tooling 25 Spindle Speed 26 Determining Spindle Speed 26 Setting Spindle Speed 26 Tapping Mode 27 SECTION 5 ACCESSORIES 28 SECTION 6 MAINTENANC...

Page 4: ...uracy We stand behind our machines If you have any questions or need help use the information below to contact us Before contacting please get the serial number and manufacture date of your machine This will help us help you faster Grizzly Technical Support 1203 Lycoming Mall Circle Muncy PA 17756 Phone 570 546 9663 Email techsupport grizzly com We want your feedback on this manual What did you li...

Page 5: ...Drawbar Cover Motor Z Axis Lock Y Axis Handwheel X Axis Power Feed Spindle Control Panel Fine Downfeed Handwheel Depth Stop Scale Power Feed Stop X Axis Table Locks Coarse Downfeed Handle X Axis Handwheel Table Downfeed Selector Knob Power Feed Stop Y Axis Table Lock Dovetail Column Headstock Tilt Scale Gearbox Levers Quill Lock ...

Page 6: ...pindle speed range D Spindle Speed Lever Selects one of three spindle speeds in the selected speed range E SPINDLE REVERSE Button Starts coun terclockwise spindle rotation as viewed from above The spindle must be completely stopped before this button is pushed F EMERGENCY STOP Button Cuts power to the spindle motor and remains depressed until reset Twist clockwise until it pops out to reset G STOP...

Page 7: ...cal Power Requirement 220V Single Phase 60Hz Prewired Voltage 220V Full Load Current Rating 8 6A Minimum Circuit Size 15A Power Cord Included Yes Power Cord Length 5 ft Power Cord Gauge 14 AWG Plug Included No Recommended Plug Type 6 15 Switch Type Control Panel w Magnetic Switch Protection Motors Main Type TEFC Capacitor Start Induction Horsepower 2 HP Phase Single Phase Amps 8 6A Speed 1720 RPM ...

Page 8: ...ds 6 Range of Vertical Spindle Speeds 90 1970 RPM Quill Diameter 3 in Drawbar Thread Size 7 16 20 Drawbar Length 17 3 4 in Spindle Bearings High Precision P5 Tapered Roller Bearing Construction Spindle Housing Quill Cast Iron Table Cast Iron Head Cast Iron Column Base Cast Iron Paint Type Finish Enamel Other Specifications Country Of Origin China Warranty 1 Year Serial Number Location ID Label Sou...

Page 9: ...oof DANGEROUS ENVIRONMENTS do not use machinery in areas that are wet cluttered or have poor lighting operating machinery in these areas greatly increases the risk of accidents and injury MENTAL ALERTNESS REQUIRED Full mental alertness is required for safe operation of machin ery never operate under the influence of drugs or alcohol when tired or when distracted For Your Own Safety Read Instructio...

Page 10: ...reduce accidental contact with moving parts or flying debris Make sure they are properly installed undamaged and working correctly FORCING MACHINERY do not force machine it will do the job safer and better at the rate for which it was designed NEVER STAND ON MACHINE serious injury may occur if machine is tipped or if the cutting tool is unintentionally contacted STABLE MACHINE unexpected movement ...

Page 11: ...cutter You can be severely cut or your fingers can be amputated by contacting the rotating cutter You can be blinded or struck with great force by broken cutting tools metal chips workpieces or adjustment tools thrown from the rotating spindle To reduce your risk of serious injury when operating this machine completely heed and understand the following SECURE WORKPIECE TO TABLE Clamp work piece to...

Page 12: ...erheating or fire may result especially if connected to an undersized circuit To reduce the risk of these hazards avoid over loading the machine during operation and make sure it is connected to a power supply circuit that meets the requirements in the following section Circuit Requirements for 220V This machine is prewired to operate on a 220V power supply circuit that has a verified ground and m...

Page 13: ...h green insulation with or without yellow stripes is the equipment grounding wire If repair or replacement of the power cord or plug is nec essary do not connect the equipment grounding wire to a live current carrying terminal Check with a qualified electrician or service per sonnel if you do not understand these grounding requirements or if you are in doubt about whether the tool is properly grou...

Page 14: ... Flat Head Screwdriver 2 1 Brass Hammer Page 16 1 Mineral Spirits Page 16 As Needed Needed for Setup Inventory The following is a list of items shipped with your machine Before beginning setup lay these items out and inventory them If any non proprietary parts are missing e g a nut or a washer we will gladly replace them or for the sake of expediency replacements can be obtained at your local hard...

Page 15: ...ic paint scraper optional Basic steps for removing rust preventative 1 put on safety glasses 2 Coat the rust preventative with a liberal amount of cleaner degreaser then let it soak for 5 10 minutes 3 Wipe off the surfaces if your cleaner degreas er is effective the rust preventative will wipe off easily if you have a plastic paint scraper scrape off as much as you can first then wipe off the rest...

Page 16: ... Environment The physical environment where the machine is operated is important for safe operation and lon gevity of machine components For best results operate this machine in a dry environment that is free from excessive moisture hazardous chemi cals airborne abrasives or extreme conditions Extreme conditions for this type of machinery are generally those where the ambient temperature range exc...

Page 17: ...low where the machine is secured directly to the workbench with lag screws and washers the base of this machine has mounting holes that allow it to be fastened to a workbench or other mounting surface to prevent it from moving during operation and causing accidental injury or damage the strongest mounting option is a through Mount see example below where holes are drilled all the way through the w...

Page 18: ...he assembly If you would like to use a different chuck in the future we recommend obtaining a new arbor Important DO NOT install the drill chuck and arbor into the spindle until AFTER the test run To join the drill chuck and arbor 1 Use mineral spirits to clean drill chuck and arbor mating surfaces especially the bore 2 Retract chuck jaws completely into chuck 3 Insert small end of arbor into chuc...

Page 19: ... are functioning properly if you find an unusual problem during the test run immediately stop the machine disconnect it from power and fix the problem BeFore operating the machine again the Troubleshooting table in the SERVICE section of this manual can help To test run the mill drill 1 Clear all setup tools away from machine 2 Connect machine to power supply Power lamp should light DO NOT start m...

Page 20: ...hould rotate clockwise 16 Continue to move spindle down until it bot toms out at depth stop spindle should momentarily stop then rotate counterclock wise 17 Use coarse downfeed lever to move spindle all the way up Spindle rotation should stop Congratulations The Test Run is complete Continue to the next subsection Spindle Bearing Break In EMERGENCY STOP Button Figure 12 Twisting EMERGENCY STOP but...

Page 21: ... ot highest 5 Change headstock oil refer to Lubrication on Page 31 for detailed instructions The spindle break in of the mill is now complete Inspections Adjustments The following adjustments were performed at the factory before the machine was shipped Gib Adjustments Page 37 Leadscrew Backlash Page 37 Be aware that these can change during the shipping process Pay careful attention to these adjust...

Page 22: ...ng operation so the machine controls components discussed later in this manual are easier to understand Due to the generic nature of this overview it is not intended to be an instructional guide To learn more about specific operations read this entire manual and seek additional training from expe rienced machine operators and do additional research outside of this manual by reading how to books tr...

Page 23: ...where within 0 5 This is useful when performing the same operation multiple times or with tapping operations Using Coarse Downfeed 1 Loosen quill lock lever 2 Loosen downfeed selector knob to engage coarse downfeed handles 3 Position depth stop with adjustment knob 4 Use coarse downfeed handles to raise and lower spindle Using Fine Downfeed 1 Loosen quill lock lever 2 Tighten downfeed selector kno...

Page 24: ...wn in Figure 15 to adjust headstock height 4 Tighten Z axis lock levers to secure setting Tilting Headstock 1 DISCONNECT MACHINE FROM POWER 2 Loosen the three locking hex nuts see Figures 16 17 3 Using scale shown in Figure 16 as a guide swivel headstock and retighten the three hex nuts to secure it Figure 14 Location of Z axis lock levers Lock Levers Figure 15 Z axis crank Z Axis Crank Figure 16 ...

Page 25: ...point Figure 19 Graduated dial and thumb screw Thumb Screw Graduated Dial X Axis Handwheel Tool Needed Qty Hex Wrench 5mm 1 To use the X axis handwheel 1 Loosen the two X axis table locks shown in Figure 20 Note When tightened table locks provide table rigidity in that path of table travel for increased precision 2 Position limit stops so they will not interfere with intended table travel 3 Adjust...

Page 26: ...odate tools with a tang It also has a drift key slot for tool removal C MT 3 MT 2 Spindle Sleeve Used with the R 8 MT 3 spindle sleeve for MT 2 tools and has a drift key slot for tool removal Cutting tools are sharp and can easily cause laceration injuries Always protect your hands with leather gloves or shop rags when handling cutting tools Figure 23 Tool and arbors included with Model G0761 A B ...

Page 27: ... until it is snug then use wrench to tighten it Note Do not overtighten drawbar Overtightening makes tool removal difficult and will damage arbor and threads 5 Re install drawbar cap Removing Tooling Tools Needed Qty Wrench 19mm 1 Brass Head or Dead Blow Hammer 1 To remove tooling 1 DISCONNECT MACHINE FROM POWER 2 Remove drawbar cap 3 Unthread drawbar from tooling one full rota tion Note Do not fu...

Page 28: ...e speed to use for any given operation but the two most important are the recommended cutting speed for the workpiece material and the diameter of the cutting tool as noted in the formula shown in Figure 25 Cutting speed typically defined in feet per minute FPM is the speed at which the edge of a tool moves across the material surface A recommended cutting speed is an ideal speed for cutting a typ...

Page 29: ... RPM lowest 4 Install tap 5 Adjust Z axis position of headstock so tap is just above workpiece 6 Rotate depth stop adjustment knob see Figure 27 to adjust depth stop for depth of hole 7 Apply tapping fluid to contact point on workpiece 8 Connect machine to power 9 Rotate themodeselectionswitchto TAPPING 10 Slowly lower spindle until tap begins thread ing into workpiece then release pressure on the...

Page 30: ...gh pressure pump Figure 31 High Pressure Oil Cans H7616 H7617 G7156 4 35 8 Precision Milling Vise G7154 5 41 2 Precision Milling Vise G7155 6 55 8 Precision Milling Vise Swiveling Milling Vises feature perfectly aligned precision ground jaws large Acme screws and easy to read 0 360 scales Figure 28 G7154 Precision Milling Vise G7066 5 Tilting Swiveling Milling Vise H7576 Precision Self Centering V...

Page 31: ...dened and precision ground spring collets for maximum holding power collet chuck spanner wrench and protective moulded case Figure 35 Model SB1349 South Bend 16 Pc R 8 Collet Set G1075 52 PC Clamping Kit This clamping kit includes 24 studs 6 step block pairs 6 T nuts 6 flange nuts 4 coupling nuts and 6 end hold downs The rack is slotted so it can be mounted close to the machine for easy access Fig...

Page 32: ...due build up around the moving parts Use a brush and shop vacuum to remove chips and debris from the working sur faces of the mill drill Never blow off the mill drill with compressed air as this will force metal chips deep into the mechanisms and may cause injury to yourself or bystanders Remove any rust build up from unpainted cast iron surfaces of your mill drill and treat with a non staining lu...

Page 33: ...CONNECT MACHINE FROM POWER 3 Remove fill plug see Figure 37 4 Place a 1 gallon or larger drain pan on table under headstock 5 Remove drain plug see Figure 38 from underneath headstock and allow oil to drain into pan Follow federal state and local require ments for proper disposal of used oil 6 Replace drain plug 7 Add oil until sight glass is halfway full then replace fill plug 8 Clean up any spil...

Page 34: ...the lubrication area continue pumping the oil can until the oil runs clear When finished wipe away the excess oil Figure 39 Location of handwheel ball oilers Ball Oilers Table Column Ways Lube Type Model T23962 or ISO 68 Equivalent Lube Amount Thin Coat Lubrication Frequency 8 hrs of Operation Using a 4mm hex wrench disconnect one side of the column way cover then move the table and headstock to a...

Page 35: ...own to evenly distribute the oil Table Leadscrews Lube Type Model T23962 or ISO 68 Equivalent Lube Amount Thin Coat Lubrication Frequency 40 hrs of Operation Move the table as necessary to access the entire length of the X and Y axis leadscrews see Figures 42 43 then use mineral spirits shop rags and a brush to clean them Use a 4mm hex wrench to remove the way cover from the base to access the Y a...

Page 36: ...leadscrew compo nents see Figure 44 When dry use a brush to apply a thin coat of grease to the teeth then raise lower the quill sev eral times to evenly distribute the grease Note Re apply oil to the quill outside smooth surface that may have been removed during the cleaning process Figure 45 Quill rack and pinion Pinion Rack Use shop rags a stiff brush and mineral spirits to clean away the grease...

Page 37: ...hine is undersized for the task or tooling is incorrect for the task 4 Motor has overheated 5 Motor wired incorrectly 6 Motor bearings are at fault 7 Motor is at fault 1 Decrease feed rate cutting speed 2 Use the correct cutter for the task 3 Use smaller or sharper tooling reduce feed rate or spindle speed use cutting fluid if possible 4 Clean off motor let cool and reduce workload 5 Ensure motor ...

Page 38: ... Tighten down table locks 2 Properly clamp workpiece on table or in vise 3 Set spindle speed correctly Page 26 or use a slower feed rate 4 Fully retract spindle and lower headstock This increases rigidity Table is hard to move 1 Table locks are tightened down 2 Chips have loaded up on ways 3 Ways are dry and need lubrication 4 Table limit stops are interfering 5 Gibs are too tight 1 Make sure tabl...

Page 39: ... tighten the opposing screw the same amount to move the gib while at the same time using the handwheels to move the table until you feel a slight drag in that path of movement Adjusting Leadscrew Backlash Leadscrew backlash is the amount of free play movement in the leadscrew when changing the direction of rotation before the attached device begins to move Leadscrews must have a certain amount of ...

Page 40: ...er gloves and safety glasses when adjusting the return spring tension To adjust the return spring tension 1 DISCONNECT MACHINE FROM POWER 2 Wipe off any oil on spring cover so it does not slip when you hold it during adjustments 3 Mark slot on cover that engages roll pin this is the factory setting 4 Put on heavy leather gloves to protect your hands from lacerations if spring uncoils dur ing next ...

Page 41: ...nt at the time of printing but may not match your machine If you find this to be the case use the wiring diagram inside the motor junction box CAPACITORS INVERTERS Some capacitors and power inverters store an electrical charge for up to 10 minutes after being disconnected from the power source To reduce the risk of being shocked wait at least this long before working on capacitors EXPERIENCING DIF...

Page 42: ...5L3 2T1 4T2 6T3 A2 KM1 Contactor Siemens 3TB41 24V 0 110 220 Transformer Mach Tool Elec JBK5 63VA 0 24 TC X2 X1 Drilling Milling Tapping Switch 3 4 NO 4 3 NO Emegency Stop 2 1 NC Spindle Stop 2 1 NC PE Ground Component Legend Minger AD62 22D S Minger LA125H BE101C Minger LA125H BE102C 12 14 13 9 8 5 1 4 Spindle Reverse 4 3 NO G PE 1 1 4 4 4 8 8 5 4 7 7 7 7 7 7 4 2 6 3 3 2 0 5 5 5 5 5 6 6 12 12 10 ...

Page 43: ...Model G0761 Mfd Since 10 13 41 READ ELECTRICAL SAFETY ON PAGE 39 Electrical Box Control Panel Wiring Figure 50 Electrical box wiring Figure 49 Control panel wiring ...

Page 44: ...ches Wiring Ground PE V2 V1 U2 U1 U2 V1 V2 Z1 W1 Z2 W2 U1 220V Motor Tapping Switches Start Capacitor 150 MFD 250 VAC COM NC NO COM NC NO 5 12 10 10 6 Run Capacitor 20 MFD 450 VAC Figure 52 Tapping switch wiring Figure 51 Motor wiring To Electrical Box Page 40 To Electrical Box Page 40 ...

Page 45: ...2 63 64 65 66 67 68 69 70 71 72 73 74 75 76 77 78 79 80 81 82 83 84 85 86 87 88 89 90 91 92 93 94 95 96 97 98 99 100 101 102 103 104 105 106 107 108 109 110 111 112 112 113 113 114 115 116 117 118 119 120 121 122 Headstock SECTION 9 PARTS Please Note We do our best to stock replacement parts whenever possible but we cannot guarantee that all parts shown here are available for purchase Call 800 523...

Page 46: ...1 5 X 8 68 P0761068 SPANNER NUT M30 1 5 16 P0761016 SET SCREW M10 1 5 X 10 DOG PT 69 P0761069 RUBBER SEAL 90 X 75 X 6 17 P0761017 KEY 6 X 6 X 28 70 P0761070 CAP SCREW M4 7 X 8 18 P0761018 OIL FILL PLUG 3 8 ZG 71 P0761071 ROLL PIN 3 X 18 19 P0761019 CASTING PLUG 72 P0761072 CAP SCREW M8 1 25 X 30 20 P0761020 SHIFT LEVER 73 P0761073 SPACER 21 P0761021 ROLL PIN 3 X 18 74 P0761074 SPINDLE END SEAL 22 ...

Page 47: ...X 8 X 20 115 P0761115 SHAFT SEAL 12 X 22 X 8 103 P0761103 CAP SCREW M5 8 X 20 116 P0761116 SPEED SHIFT SHAFT RH 104 P0761104 ROLL PIN 3 X 15 117 P0761117 SPEED SHIFT FORK RH 105 P0761105 LOCK LEVER SHAFT 118 P0761118 SPEED SHIFT ROCKER ARM RH 106 P0761106 INNER LOCK PLUNGER 119 P0761119 DRAWBAR ASSEMBLY 7 16 20 X 17 3 4 107 P0761107 OUTER LOCK PLUNGER 120 P0761120 ELECTRICAL CABINET 108 P0761108 A...

Page 48: ...18 218 219 219 219 220 220 220 221 221 221 222 222 222 223 224 225 226 227 228 229 230 231 231 231 233 234 235 236 237 238 239 240 241 289 242 242 242 244 244 244 245 245 246 248 249 249 252 254 255 256 256 257 257 258 259 260 261 261 262 262 263 264 265 265 266 267 268 271 272 273 274 274 1 274 2 274 3 274 4 274 5 275 276 277 278 279 280 281 282 284 283 283 285 286 287 287 288 ...

Page 49: ...P0761272 FLAT WASHER 14MM 222 P0761222 ADJUSTMENT HANDLE M8 1 25 273 P0761273 HEX NUT M14 2 223 P0761223 LOCK WASHER 16MM 274 P0761274 POWER FEED ASSY ALIGN AS 235 224 P0761224 FLAT WASHER 16MM 274 1 P0761274 1 MOUNTING BRACKET 2 PC 225 P0761225 CAP SCREW M16 2 X 60 274 2 P0761274 2 CONTROL HANDLE 226 P0761226 HEADSTOCK MOUNT FLAT WASHER 12MM 274 3 P0761274 3 SPEED CONTROL KNOB 227 P0761227 CAP SC...

Page 50: ...K5 63VA 0 220V 313 P0761313 TAPPING SWITCH JUCHE LXW16 16 51C 307 P0761307 CONTACTOR SIEMENS 3TB41 24V 314 P0761314 ELECTRICAL BOX MOUNTING BOARD Electrical Box Ground Plate Spindle Forward Power Lamp 4 3 NO Control Panel Timer Omron H3Y 2 A1 1L1 13NO 21NC 31NC 43NO 14NO 22NC 32NC 44NO 3L2 5L3 2T1 4T2 6T3 A2 KM2 Contactor Siemens 3TB41 29V A1 1L1 13NO 21NC 31NC 43NO 14NO 22NC 32NC 44NO 3L2 5L3 2T1...

Page 51: ...1404 HEX NUT M12 1 75 412 P0761412 HEX WRENCH 5MM 405 P0761405 DRILL CHUCK B16 1 13MM W CHUCK KEY 413 P0761413 HEX WRENCH 4MM 405 1 P0761405 1 DRILL CHUCK KEY 8MM STD 11 SD 16MM 414 P0761414 HEX WRENCH 3MM 406 P0761406 SPINDLE SLEEVE MT 3 MT 2 415 P0761415 WRENCH 17 X 19MM OPEN ENDS 407 P0761407 DRILL CHUCK ARBOR R8 B16 416 P0761416 WRENCH 22 X 24MM OPEN ENDS 408 P0761408 SPINDLE SLEEVE R8 MT 3 40...

Page 52: ...6 STOP OIL WARNING LABEL 503 P0761503 GRIZZLY GREEN TOUCH UP PAINT 507 P0761507 ELECTRICITY LABEL 504 P0761504 GRIZZLY COM LABEL 508 P0761508 CONTROL PANEL LABEL Safety labels help reduce the risk of serious injury caused by machine hazards If any label comes off or becomes unreadable the owner of this machine MUST replace it in the original location before resuming operations For replacements con...

Page 53: ... metalworker ____ 0 2 Years ____ 2 8 Years ____ 8 20 Years ____20 Years 6 How many of your machines or tools are Grizzly ____ 0 2 ____ 3 5 ____ 6 9 ____10 7 Do you think your machine represents a good value _____Yes _____No 8 Would you recommend Grizzly Industrial to a friend _____Yes _____No 9 Would you allow us to use your name as a reference for Grizzly customers in your area Note We never use ...

Page 54: ...D LINE FOLD ALONG DOTTED LINE GRIZZLY INDUSTRIAL INC P O BOX 2069 BELLINGHAM WA 98227 2069 Place Stamp Here Name_______________________________ Street_______________________________ City______________State______Zip______ Send a Grizzly Catalog to a friend ...

Page 55: ... shall be tried in the State of Washington County of Whatcom We shall in no event be liable for death injuries to persons or property or for incidental contingent special or consequential damages arising from the use of our products To take advantage of this warranty contact us by mail or phone and give us all the details We will then issue you a Return Number which must be clearly posted on the o...

Page 56: ......

Reviews: