background image

Model G0726 (Mfg. Since 7/11)

-43-

H5802—NT40 to MT#2 Sleeve

H5803—NT40 to MT#3 Sleeve

H8139—NT40 to R8 Adapter

Figure 60. NT40 Sleeves and Adapter.

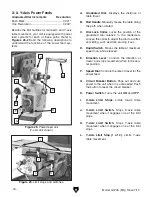
G5758—5" x 7" Tilt Table

G5759—7" x 10" Tilt Table
Set your work at any angle from –45° to +45° with 
these sturdy Tilt Tables. Heavy-duty construction 
includes  T-slots,  two  locking  screws,  and  preci-
sion base with a scale.

Figure 57. Tilt Table.

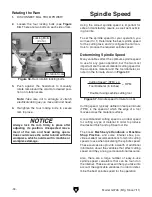
G5641—1-2-3 Blocks

G5642—2-4-6 Blocks
These blocks are extremely handy for layout and 
set  up  work.  Matched  blocks  are  hardened  and 
precision  ground  so  all  six  sides  are  square  to 
within  0.0003".  These  blocks  also  feature  five 
tapped holes and 18 untapped holes for clamping. 
Sold in pairs. G5641 tapped holes are 

3

8

"-16, and 

overall size is 1" x 2" x 3". G5642 tapped holes are 

5

8

" 11, and overall size is 2" x 4" x 6".

Figure 58. 1-2-3 and 4-5-6 Blocks.

G5678— Steel Parallel Sets 

3

16

" Thickness

G5678— Steel Parallel Sets 

1

2

" Thickness

These  ground  and  hardness  sets  feature  four 
pairs  of  6"  long  parallels  which  are  accurate 
to  within  0.0003"  in  parallelism  and  0.0002"  in 
height.

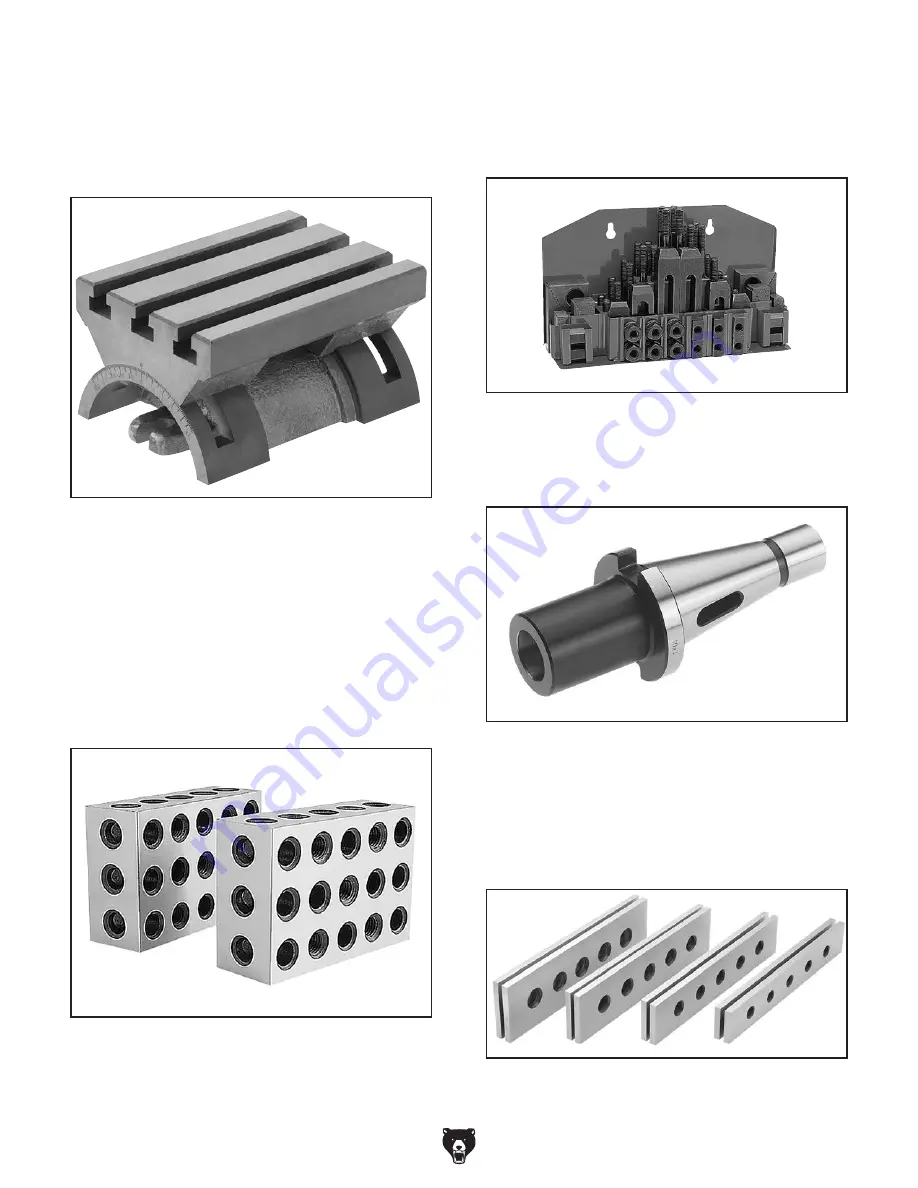
G1076—52-PC. Clamping Kit for 

5

8

" T-Slots

This clamping kit includes 24 studs, 6 step block 
pairs, 6 T-nuts, 6 flange nuts, 4 coupling nuts, and 
6 end hold-downs. The rack is slotted so it can be 
mounted close to the machine for easy access.

Figure 59. G1076 52-PC. Clamping Kit.

Figure 61. Steel parallel sets.

order online at


www.grizzly.com


or call


1-800-523-4777

Summary of Contents for G0726

Page 1: ...L READOUT OWNER S MANUAL For models manufactured since 7 11 COPYRIGHT MAY 2012 BY GRIZZLY INDUSTRIAL INC WARNING NO PORTION OF THIS MANUAL MAY BE REPRODUCED IN ANY SHAPE OR FORM WITHOUT THE WRITTEN APPROVAL OF GRIZZLY INDUSTRIAL INC TS14438 PRINTED IN CHINA ...

Page 2: ...ng grinding tool integrity and the usage of personal protective equipment The manufacturer will not be held liable for injury or property damage from negligence improper training machine modifications or misuse Some dust created by power sanding sawing grinding drilling and other construction activities contains chemicals known to the State of California to cause cancer birth defects or other repr...

Page 3: ...Lamp Coolant Valve 28 Spindle Brake Lever 28 Table Movement 29 Digital Readout 29 Locks 29 X Y Axis Power Feeds 30 Z Axis Crank Power Feed 31 Head Movement 32 Tilting the Head 32 Rotating the Head 33 Ram Movement 33 Moving Ram Back Forth 33 Rotating the Ram 34 Spindle Speed 34 Determining Spindle Speed 34 Adjusting Spindle Speed 35 Spindle Downfeed 36 Downfeed Controls 36 Coarse Downfeed 37 Fine D...

Page 4: ...6 Electrical Cabinet Wiring Diagram 57 Motor Wiring Diagram 58 SECTION 9 PARTS 59 Base Machine 59 X Y Axis Leadscrews 62 Downfeed System 63 Headstock 66 One Shot Oiler 69 Accessories 70 Electrical Cabinet 71 Machine Labels Front 72 Machine Labels Right Side 73 WARRANTY RETURNS 77 ...

Page 5: ... you have any questions or need help use the information below to contact us Before contacting please get the serial number and manufacture date of your machine This will help us help you faster Grizzly Technical Support 1203 Lycoming Mall Circle Muncy PA 17756 Phone 570 546 9663 Email techsupport grizzly com We want your feedback on this manual What did you like about it Where could it be improve...

Page 6: ...Readout G Control Panel refer Page 28 for details H X Axis Ball Handle I X Axis Power Feed J Z Axis Limit Switch K Y Axis Ball Handle L Splash Pan M Y Axis Power Feed N Z Axis Crank Handle O Table Lock P X Axis Limit Stop Q X Axis Limit Switch R Table S Halogen Work Light T Fine Auto Downfeed Controls refer to Page 36 for details U Spindle Brake A B C D J L M N P O R Q E F G T U S I H K ...

Page 7: ...ical Cabinet E Master Power Switch F Coolant Pump Reservoir Access G Y Axis Limit Switch H Y Axis Limit Stop I Y Axis Digital Readout Scale Cover J X Axis Digital Readout Scale Cover To reduce your risk of serious injury read this entire manual BEFORE using machine I J A B C G F H E D ...

Page 8: ...6 Model G0726 Mfg Since 7 11 A Auto Downfeed Rate Selector B Quill C Spindle NT40 D Saddle Lock E Z AXIS Crank Safety Switch F Knee G One Shot Oiler H Z Axis Motor I Coolant Return Hose A B C D E F G H I ...

Page 9: ...pping Dimensions Type Wood Crate Content Machine Weight 3750 lbs Length x Width x Height 70 x 75 x 91 in Must Ship Upright Yes Electrical Power Requirement 220V 3 Phase 60 Hz Prewired Voltage 220V Full Load Current Rating 15 7A Minimum Circuit Size 20A Connection Type Cord Plug Power Cord Included No Recommended Power Cord S Type 4 Wire 12 AWG 300 VAC Plug Included No Recommended Plug Type 15 20 S...

Page 10: ... 54 in Table Width 12 in Table Thickness 4 in Number of T Slots 3 T Slot Size 5 8 in T Slots Centers 2 1 2 in Number of Longitudinal Feeds Variable X Axis Table Power Feed Rate 0 13 34 FPM X Y Axis Travel per Handwheel Revolution 0 200 in Z Axis Travel per Handwheel Revolution 0 100 in Spindle Info Spindle Taper NT 40 Number of Vertical Spindle Speeds Variable Range of Vertical Spindle Speeds 50 3...

Page 11: ...of DANGEROUS ENVIRONMENTS Do not use machinery in areas that are wet cluttered or have poor lighting Operating machinery in these areas greatly increases the risk of accidents and injury MENTAL ALERTNESS REQUIRED Full mental alertness is required for safe operation of machin ery Never operate under the influence of drugs or alcohol when tired or when distracted For Your Own Safety Read Instruction...

Page 12: ...oving parts or flying debris Make sure they are properly installed undamaged and working correctly FORCING MAChINERY Do not force machine It will do the job safer and better at the rate for which it was designed NEVER sTANd ON MAChINE Serious injury may occur if machine is tipped or if the cutting tool is unintentionally contacted sTABLE MAChINE Unexpected movement dur ing operation greatly increa...

Page 13: ...ect spindle speed for the operation Allow the spindle to gain full speed before beginning the cut CHIP CLEANUP Chips from the operation are sharp and hot Touching them can cause burns or cuts Using compressed air to clear chips could cause them to fly into your eyes and may drive them deep into the working parts of the machine Use a brush or vacuum to clear away chips and debris from machine or wo...

Page 14: ...re may result especially if connected to an undersized circuit To reduce the risk of these hazards avoid over loading the machine during operation and make sure it is connected to a power supply circuit that meets the requirements in the following section Circuit Requirements for 220V This machine is prewired to operate on a 220V power supply circuit that has a verified ground and meets the follow...

Page 15: ...nsulation with or without yellow stripes is the equipment grounding wire If repair or replacement of the power cord or plug is nec essary do not connect the equipment grounding wire to a live current carrying terminal Check with a qualified electrician or service per sonnel if you do not understand these grounding requirements or if you are in doubt about whether the tool is properly grounded If y...

Page 16: ...ess Your machine was carefully packaged for safe transportation Remove the packaging materials from around your machine and inspect it If you discover any damage please call us immediately at 570 546 9663 for advice Save the containers and all packing materials for possible inspection by the carrier or its agent Otherwise filing a freight claim can be difficult When you are completely satisfied wi...

Page 17: ...led at the factory Description Figure 2 Qty A Front Way Cover 1 B Rear Way Cover 1 C Drawbar 5 8 11 x 11 1 D Fine Downfeed Handle 1 E Ball Handles X Axis 2 F Ball Handle Y Axis 1 G Auto Downfeed Direction Pin 1 H Toolbox 1 I Ball Handle Handles 3 J Bottle for Oil 1 K Z Axis Crank 1 L Hex Wrench Set 1 5 10mm 1 M Coarse Downfeed Handle 1 N Screwdrivers Slotted 2 Phillips 2 1 Each O Wrench 18 x 21mm ...

Page 18: ...g rust preventative 1 Put on safety glasses 2 Coat the rust preventative with a liberal amount of cleaner degreaser then let it soak for 5 10 minutes 3 Wipe off the surfaces If your cleaner degreas er is effective the rust preventative will wipe off easily If you have a plastic paint scraper scrape off as much as you can first then wipe off the rest with the rag 4 Repeat Steps 2 3 as necessary unt...

Page 19: ...cal Environment The physical environment where the machine is operated is important for safe operation and lon gevity of machine components For best results operate this machine in a dry environment that is free from excessive moisture hazardous chemi cals airborne abrasives or extreme conditions Extreme conditions for this type of machinery are generally those where the ambient temperature range ...

Page 20: ...ding between straps and mill to protect ram and ways and to keep from cutting lifting straps 3 Unbolt mill from shipping pallet 4 With your assistants steadying the mill to keep it from swaying lift mill a couple of inches If mill tips to one side lower it to the ground and adjust ram or table to balance load Make sure to re tighten lock levers and bolts before lifting mill again If mill lifts eve...

Page 21: ...ulting in a machine that runs slightly quieter and feels more solid If the machine will be installed in a commercial or workplace setting or if it is permanently connect ed hardwired to the power supply local codes may require that it be anchored to the floor If not required by any local codes fastening the machine to the floor is an optional step If you choose not to do this with your machine we ...

Page 22: ...handles into small end of the ball handles and tighten them with 14mm wrench 3 Remove cap screw and spacer from Z axis leadscrew end slide crank onto shaft as shown in Figure 10 then re install cap screw and spacer 4 Move table all the way forward then attach rear way cover with the four pre installed cap screws as shown in Figure 11 Figure 10 Z axis crank installed Z Axis Crank Cap Screw Spacer F...

Page 23: ...ith the pre installed hose clamp as shown in Figure 14 9 Tug coolant return hose to make sure that it is securely attached If it is not repeat Step 8 until it is 10 Loosen hose clamp cap screw on base see Figure 14 slide other end of coolant return hose underneath it then re tighten cap screw 11 Install coarse downfeed lever and fine downfeed handwheel as shown in Figure 15 Note Make sure pins on ...

Page 24: ... hole in bot tom of electrical cabinet see Figure 17 then pull incoming power cord through strain relief 3 Connect incoming hot wires to the bottom of the first three terminal bar connectors shown in Figure 17 then connect incoming ground wire to grounding bar refer to the Electrical Cabinet Wiring Diagram on Page 57 for additional details 4 Leave slack in the wires inside cabinet tight en strain ...

Page 25: ...cate mill as instructed in Lubrication on Page 45 4 Fill coolant reservoir refer to Coolant on Page 48 for detailed instructions 5 Make sure speed range selector is in the low position refer to Adjusting Spindle Speed on Page 35 for detailed instructions 6 Turn MASTER POWER SWITCH located on the electrical cabinet door ON to enable power to the control panel POWER LAMP should illuminate see Figure...

Page 26: ...dle rotation 10 Verify that machine is operating correctly When operating correctly machine runs smoothly with little or no vibration or rub bing noises Investigate and correct strange or unusu al noises or vibrations before operating machine further Always stop machine and disconnect it from power before investigat ing or correcting potential problems 11 Rotate SPINDLE SWITCH to the STOP posi tio...

Page 27: ...e position and to the right The table should begin moving in the opposite direc tion 8 Confirm table stops moving again when limit stop presses against limit switch plunger 9 Move directional lever to neutral middle position and flip power switch to OFF down position 10 Test run Y axis power feed in the same man ner Congratulations The Test Run is complete Continue with the next page to perform th...

Page 28: ...tments 6 Turn the spindle switch to OFF position wait for the spindle to come to a complete stop then move the spindle speed range selector to the HIGH position and start forward spindle rotation 7 Set the spindle speed at approximately 2150 RPM then repeat Steps 4 5 8 Stop spindle rotation The spindle break in is now complete and the machine is ready for operation Do not leave the mill unattended...

Page 29: ...ury when using this machine read and understand this entire manual before operating NOTICE If you have never used this type of machine or equipment before WE STRONGLY REC OMMEND that you read books review industry trade magazines or get formal training before beginning any projects Regardless of the content in this section Grizzly Industrial will not be held liable for accidents caused by lack of ...

Page 30: ...ble all electrical compo nents after resetting the emergency STOP button Emergency STOP Button Cuts power to all mill components Twist clockwise until it pops out to reset it and enable operations Work Lamp Coolant Valve Work Lamp Illuminates the work area with a halogen light bulb that is controlled by the switch on the handle Coolant Valve The lever on the coolant valve controls the flow of cool...

Page 31: ...ational instructions regard ing the many functions of this unit Figure 25 Digital readout Locks Use the X Y and Z axis locks shown in Figures 26 27 to hold the table in position when increased rigidity is needed Note Remember to loosen the appropriate locks when table movement is needed in that direction Always keep the table locked in place unless controlled movement is required for your operatio...

Page 32: ...fer ent setting such as when zeroing it out D Rapid Switch Moves the table at maximum speed only while pressed E Direction Lever Controls the direction of travel and stops movement when in the cen ter position F Speed Dial Controls the rate of travel for the power feed G Circuit Breaker Button Pops out and cuts power to the unit when it is overloaded Push the button to reset the circuit breaker H ...

Page 33: ...shed using power feed position the direction lever to the center OFF position then use power switch to turn unit OFF Stay clear of the spinning ball handles when using the power feeds to prevent entangle ment injuries Z Axis Crank Power Feed Graduated Dial Increments Resolution Each Mark 0 001 One Revolution 0 100 When the vertical crank handle is engaged for manual operation the safety switch bel...

Page 34: ...rn tilting bolt clockwise to tilt head back and counterclockwise to tilt it forward 4 Re tighten locking bolts to secure head in place Figure 31 Head tilted back 30 Figure 32 Head tilted to the left 45 Figure 33 Head tilting controls Locking Bolts Scale Tilting Bolt The head is heavy When tilting or rotating the head get help to support the weight as you use the controls When the head has been til...

Page 35: ...g the tilt or rotation Unexpected movement of the head during operations could cause the cutter to bind with the workpiece which could result machine or workpiece damage Ram Movement The ram moves back and forth horizontally and rotates 360 around the column Tools Needed Qty Wrench 17mm 1 Wrench 19mm 1 Moving Ram Back Forth 1 DISCONNECT MILL FROM POWER 2 Loosen the two locking bolts shown in Figur...

Page 36: ... Spindle Speed Many variables affect the optimum spindle speed to use for any given operation but the two most important are the recommended cutting speed for the workpiece material and the tool diameter as noted in the formula shown in Figure 37 Cutting speed typically defined in feet per minute FPM is the speed at which the edge of a tool moves across the material surface A recommended cutting s...

Page 37: ...t locking pin and move selector see Figure 39 Note Move handle to the forward position for high range or move it to the rear position for low range As you move selector handle it may be necessary to rotate the spindle by hand to engage gears 4 Start spindle rotation then rotate variable speed handwheel until desired spindle speed is displayed in speed readout window on head shown in Figure 40 Note...

Page 38: ... Engages the fine auto downfeed gears E Downfeed Scale Used with the quill dog shows the depth of spindle downfeed in inches F Quill Lock Lever Secures the quill in place for increased stability during operations G Downfeed Stop Locking Wheel Sets the depth of spindle downfeed The stop is threaded into position then the locking wheel is used to secure it in place H Coarse Downfeed Lever Manually c...

Page 39: ...lower and more controlled method of spindle movement To use the fine downfeed 1 Make sure spindle is completely stopped 2 Pull downfeed selector knob out then rotate it clockwise until knob pin seats in the forward manual disengaged detent see Figure 42 Note It may be necessary to turn the spindle by hand as you move the selector to enable the gears to mesh 3 Set auto downfeed direction pin in the...

Page 40: ...o downfeed direction pin in cen ter of handwheel for desired direction of spin dle travel If necessary rock fine downfeed handwheel back and forth to move pin all the way in or out Note The direction pin has three positions see Figure 45 1 In for one downfeed direction 2 middle for neutral or no move ment and 3 out for the reverse direction The direction of spindle travel for in and out positions ...

Page 41: ... lever out to the left and it locks in place which will start auto downfeed spindle travel ALWAYS start spindle rotation before chang ing the auto downfeed rate to avoid the risk of gear damage Upper 0 003 in rev Middle 0 0015 in rev Lower 0 008 in rev Rates given in inches of travel per revolution of the spindle Figure 46 Positions of auto downfeed rate selector Spindle Brake Your mill is equippe...

Page 42: ...ng cutting tools 4 While holding the tool in place insert the drawbar through the top of the spindle as shown in Figure 49 then thread it into the tool Figure 49 Drawbar inserted through the top of the spindle 5 Only tighten the drawbar into the tool holder until it is snug Note Over tightening the drawbar could make removing the tool holder from the spindle difficult Unloading Tooling 1 DISCONNEC...

Page 43: ...ted by complete instructions Specifications Motor 220V 7 5 maximum amper age draw 2100 RPM and 240 ft lbs Figure 50 H8368 electric power drawbar H5791 NT40 Quick Change Collet Set This self ejecting system offers quick change outs and precise rigid control This set comes supplied with an NT40 collet chuck wrench and fitted plas tic case NT40 collets are sized 1 8 1 4 3 8 1 2 5 8 3 4 7 8 and 1 Figu...

Page 44: ...ill shanks these pre cision NT40 end mill holders fit any NT40 taper Figure 54 NT40 End Mill Holder T10063 Milling Vise 125 16 x 69 16 T10064 Milling Vise 171 8 x 83 4 Ultra precise in flatness parallelism and ver ticality Anti lift mechanism ensures the workpiece does not lift when jaws are tightened Ductile iron body Flame hardened vise bed and jaws Sealed bearing system 8200 lbs of clamping pre...

Page 45: ...ive tapped holes and 18 untapped holes for clamping Sold in pairs G5641 tapped holes are 3 8 16 and overall size is 1 x 2 x 3 G5642 tapped holes are 5 8 11 and overall size is 2 x 4 x 6 Figure 58 1 2 3 and 4 5 6 Blocks G5678 Steel Parallel Sets 3 16 Thickness G5678 Steel Parallel Sets 1 2 Thickness These ground and hardness sets feature four pairs of 6 long parallels which are accurate to within 0...

Page 46: ... in braking speed or efficiency Coolant not flowing correctly Any other unsafe condition Before Beginning Operations Make sure the electric cabinet door is closed and properly latched Turn the spindle direction switch to the OFF position to prevent high speed spindle start up when connected to power Move the downfeed selector to the manual position to prevent the spindle from unexpect edly downfee...

Page 47: ...re exposed to water soluble coolant Typically a thin film of way oil is all that is necessary for protec tion Lubrication The mill has numerous moving metal to metal contacts that require regular and proper lubrica tion to ensure efficient and long lasting operation Other than the lubrication points covered in this section all other bearings are internally lubricated and sealed at the factory Simp...

Page 48: ...mately 1 2 Quart The one shot oiler is connected to a series of tubes that carry the lubricant to wear points along the table saddle knee ways and the lead screws After using the oiler pump handle shown in Figure 63 move the table through all paths of movement to evenly distribute the lubricant Use the sight glass on the front of the oiler to know when to re fill the reservoir Figure 63 One shot o...

Page 49: ...raduated dial ring from end of leadscrew Figure 67 Power feed gears and key Brass Bevel Gear Drive Gear Key 5 Brush a light coat of grease on bevel gear teeth and smaller drive gear 6 Replace leadscrew alignment key then align bevel gear keyway with key as you slide gear onto leadscrew and mesh its teeth with drive gear 7 Replace graduated dial ring into position and secure it with knurled retaini...

Page 50: ...sooner if it develops an unpleasant odor However be sure to follow the coolant manufacturer s instructions when checking adding or changing coolant The coolant reservoir holds approximately 6 7 gallons 22 27 liters of fluid Checking Adding Coolant Tool Needed Qty Phillips Screwdriver 1 To check add coolant 1 DISCONNECT MILL FROM POWER 2 Remove coolant reservoir access panel on rear of the column a...

Page 51: ...d for any period of time Doing this will help prevent the development of rust and corrosion and ensure the mill remains in good condition for later use Note When taking the mill out of storage repeat the Test Run and the Spindle Break In To prepare the mill for storage 1 DISCONNECT MILL FROM POWER 2 Lubricate mill as directed in Lubrication beginning on Page 45 3 Clean out coolant reservoir as dir...

Page 52: ...earings are at fault 9 Motor has overheated 10 Motor is at fault 1 Use smaller sharper tooling reduce the feed rate reduce the spindle RPM use coolant 2 Eliminate workpiece binding use vise or clamps as required for workpiece alignment control 3 Use sharp and correct cutting tool for the operation 4 Replace broken or slipping gears 5 Correct motor wiring connections 6 Test for good contacts correc...

Page 53: ...on make sure mill vise is tight to table 3 Secure tooling replace if damaged 4 Use correct spindle RPM and feed rate 5 Properly adjust gibs see Page 52 Table hard to move 1 Locks are tightened down 2 Chips have loaded up on the ways 3 Ways are dry and in need of lubrication 4 Gibs are too tight 1 Fully loosen locks needed for movement 2 Frequently clean away chips that load up during operations 3 ...

Page 54: ... BEFORE ADJUSTING THE GIBS Make sure all table and knee locks are loose and that the table is centered on the saddle Then loosen one gib adjustment screw and tighten the other the same amount to move the gib Use the handwheels crank to move the table knee until you feel a slight drag in that path of movement Note It may be necessary to remove small parts such as way wipers and covers to access the...

Page 55: ... bracket see Figure 73 Figure 73 Power feed secured to bearing bracket Cap Screws Front Cover Bearing Bracket 5 Carefully slide power feed unit off leadscrew and lay it aside then remove front cover from the table 6 Loosen the two cap screws on leadscrew nut shown in Figure 74 then rotate adjustment plate in small increments 7 Re install key and ball handle onto leadscrew then test backlash by roc...

Page 56: ...cator Holder mounted on quill spindle 1 Precision Parallel Block 1 Note A precision ground plate can be substituted for the parallel block The farther the indicator point can be placed from the spindle axis the more accurate the alignment measurements will be To tram the spindle to the table 1 DISCONNECT MILL FROM POWER 2 Prepare mill by performing the following tasks Stone table to remove all nic...

Page 57: ... Tip Keep one of the rotation lock bolts snug so that the head does not move loosely while you adjust it in small amounts 8 Re tighten rotation lock bolts Note It is a good idea to repeat Steps 6 7 again in case the head moved slightly during the process of re tightening lock bolts 9 Place parallel block directly under spindle and across width of the table as illustrated in Figure 79 Parallel Bloc...

Page 58: ...nt at the time of printing but may not match your machine If you find this to be the case use the wiring diagram inside the motor junction box CAPACITORS INVERTERS Some capacitors and power inverters store an electrical charge for up to 10 minutes after being disconnected from the power source To reduce the risk of being shocked wait at least this long before working on capacitors EXPERIENCING DIF...

Page 59: ...Model G0726 Mfg Since 7 11 57 READ ELECTRICAL SAFETY ON PAGE 56 Electrical Cabinet Wiring Diagram ...

Page 60: ... 58 Model G0726 Mfg Since 7 11 READ ELECTRICAL SAFETY ON PAGE 56 Motor Wiring Diagram Main Motor Knee Elevation Motor Coolant Pump Control Panel ...

Page 61: ...52 53 54 55 56 57 58 60 61 62 64 65 74 75 76 77 79 80 81 82 83 84 85 86 87 88 89 90 91 92 93 94 95 96 98 102 103 104 105 118 120 123 124 125 126 127 128 129 130 131 134 135 136 137 138 139 140 141 142 144 64 146 147A 147 1 147 2 147 3 147 4 147 5 148 149 150 151 158 152 153 154 155 156 157 Base Machine SECTION 9 PARTS ...

Page 62: ...URRET 44 P0726044 SADDLE WAY WIPER 125 P0726125 RAM CLAMP BAR 46 P0726046 TABLE LOCK PLUNGER 126 P0726126 RAM CLAMP UNTAPPED 47 P0726047 TABLE LOCK BOLT 127 P0726127 RAM CLAMP TAPPED 48 P0726048 TABLE LOCK HANDLE 128 P0726128 ROLL PIN 49 P0726049 SADDLE GIB 129 P0726129 LOCKING HEX BOLT M12 1 75 50 P0726050 SADDLE WIPER PLATE 130 P0726130 GIB ADJUSTMENT SCREW 51 PS08M PHLP HD SCR M5 8 X 12 131 P07...

Page 63: ...5 P0726155 E STOP BUTTON SHSMAO Y090 LAY37 151 PS09M PHLP HD SCR M5 8 X 10 156 P0726156 ON BUTTON SHSMAO Y090 LAY37 152 P0726152 UP BUTTON SHSMAO Y090 LAY37 157 P0726157 DOWN BUTTON SHSMAO Y090 LAY37 153 P0726153 PUMP SWITCH SHSMAO Y090 LAY37 158 P0726158 SPINDLE SWITCH YK AC3 200 500V 154 P0726154 POWER LIGHT SHUANGKE AD56 22DS ...

Page 64: ...20 205 P0726205 DIAL HOLDER 222 P0726222 LEADSCREW NUT BRACKET 206 PCAP04M CAP SCREW M6 1 X 10 223 P0726223 Y AXIS LEADSCREW NUT B 207 P0726207 BEARING RETAINER RING 224 P0726224 Y AXIS LEADSCREW NUT F 208 P204 20 BALL BEARING 204 20 226 P0726226 BALL HANDLE 209 PRP05M ROLL PIN 5 X 30 227 P0726227 Y AXIS LEADSCREW 210 PCAP61M CAP SCREW M10 1 5 X 20 228 P0726228 BEARING BRACKET 211 P0726211 LEFT BE...

Page 65: ... 372 373 374 375 376 377 378 379 380 381 388 389 390 392 393 395 396 397 398 399 382 383 384 385 386 387 394 400 401 403 404 405 406 407 408 409 410 413 417 418 419 420 421 423 424 425 427 428 429 430 431 432 433 434 435 436 437 438 440 441 442 444 445 446 448 449 451 453 455 456457 458 459 460 461 462 463 464 465 466 469 470 471 472 475 476 477 478 480 481 482 486 487 488 489 490 491 492 414 415 ...

Page 66: ...P02M CAP SCREW M6 1 X 20 348 P0726348 FEED REVERSE BEVEL GEAR 408 PSS02M SET SCREW M6 1 X 6 350 P0726350 FEED REVERSE CLUTCH 409 PK39M KEY 3 X 3 X 10 351 P0726351 FEED REVERSE BEVEL GEAR 410 P0726410 FEED REVERSE KNOB ROD 352 P0726352 BUSHING 413 P0726413 HANDWHEEL CLUTCH 355 P0726355 REVERSE CLUTCH ROD 414 PSTB002M STEEL BALL 8MM 356 PRP61M ROLL PIN 3 X 12 415 P0726415 COMPRESSION SPRING 357 P072...

Page 67: ...6455 T BOLT 480 P0726480 QUILL PINION 456 P0726456 LOWER CLAMPING BOLT SPACER 481 PSS11M SET SCREW M6 1 X 16 457 P0726457 CLAMPING BOLT LOCK 482 P0726482 HEAD CASTING SCREW 458 PS17M PHLP HD SCR M4 7 X 6 483 P0726483 REVERSE TRIP BALL LEVER 459 P0726459 SCALE 484 P0726484 FEED REVERSE TRIP PLUNGER 460 P0726460 QUILL LEADSCREW LOCK SCREW 485 P0726485 REVERSE TRIP BALL LEVER SCREW 461 P0726461 QUILL...

Page 68: ...26 527 528 529 530 531 533 534 535 536 537 538 539 540 541 543 545 545 546 547 617 548 549 550 551 552 554 555 556 557 558 559 560 561 556 562 562 563 511 564 565 566 567 568 570 570 571 572 573 574 575 576 577 578 579 580 582 583 556 584 585 587 588 589 590 591 592 593 594 595 596 597 598 599 600 601 602 537 604 605 606 607 609 610 611 612 613 614 615 616 ...

Page 69: ...E RING 520 PS03M PHLP HD SCR M6 1 X 8 577 P0726577 SPLINE SHAFT 521 P0726521 BRAKE SHOE 2 PC SET 578 P0726578 SPACER 523 P6012ZZ BALL BEARING 6012ZZ 579 PK34M KEY 5 X 5 X 20 525 P0726525 LOWER SPINDLE PULLEY 580 PK70M KEY 8 X 8 X 12 526 P0726526 UPPER SPINDLE PULLEY 582 P0726582 BEARING HOUSING 527 PR56M EXT RETAINING RING 45MM 583 P0726583 CLUTCH GEAR SHAFT 528 P6012ZZ BALL BEARING 6012ZZ 584 P07...

Page 70: ...9 P0726609 HEADSTOCK FRONT COVER ALUMINUM 614 P0726614 SPEED CHANGE INDICATOR PLATE 610 PCAP07M CAP SCREW M6 1 X 30 615 PCAP26M CAP SCREW M6 1 X 12 611 PCAP01M CAP SCREW M6 1 X 16 616 PN40 ACORN NUT 5 16 18 612 P0726612 BRASS SLEEVE 617 P0726617 BRAKE PIVOT ARM 613 P0726613 SPEED CHANGE DIAL ...

Page 71: ...SCRIPTION REF PART DESCRIPTION 701 P0726701 ONE SHOT OILER 706 P0726706 OIL DISTRIBUTOR CPS3 702 P0726702 ALUMINUM PIPE 707 P0726707 STEEL FLEXIBLE TUBE 703 P0726703 OIL DISTRIBUTOR CPS4 708 P0726708 OIL DISTRIBUTOR A8 704 P0726704 DISTRIBUTOR HEX BOLT 709 P0726709 OIL DISTRIBUTOR CPS5 705 P0726705 OIL DISTRIBUTOR A4 ...

Page 72: ... SCALE 816 P0726816 DIGITAL READOUT MANUAL 806 P0726806 OIL BOTTLE 817 P0726817 X AXIS DRO SCALE COVER 807 PWR1719 WRENCH 17 X 19 CLOSED ENDS 818 P0726818 Y AXIS DRO SCALE COVER 808 P0726808 WRENCH 18 X 21 CLOSED ENDS 819 P0726819 COOLANT RETURN HOSE W CLAMP 809 PSDP2 SCREWDRIVER PHILLIPS 2 820 P0726820 HALOGEN WORK LIGHT ASSY 810 PSDF2 SCREWDRIVER STANDARD 2 821 P0726821 RUBBER WAY COVER 811 PAW0...

Page 73: ...INAL BAR 1 POST 860 P0726860 CIRCUIT BREAKER DELIXI DZ47 63C16 854 P0726854 MASTER POWER SWITCH TAYEE LW42B32M 861 P0726861 CIRCUIT BREAKER DELIXI DZ47 63C4 855 P0726855 CONTACTOR SCHN LC1E09 01 24V 862 P0726862 TRANSFORMER XINTE JBK3 400VA 220 320V 856 P0726856 CONTACTOR SCHN LC1E09 10 24V 863 P0726863 GROUND BUS BAR 8 POST 857 P0726857 CONTACTOR STOP SWITCH SRK F4 20 864 P0726864 CONTACTOR SCHN ...

Page 74: ...LABEL 906 PLABEL 55 ENTANGLEMENT HAZARD LABEL 903 PLABEL 14A ELECTRICITY LABEL 907 PLABEL 50C BIO HAZARD LABEL 904 P0726904 SPEED CHANGE LABEL PLATE Safety labels help reduce the risk of serious injury caused by machine hazards If any label comes off or becomes unreadable the owner of this machine MUST replace it in the original location before resuming operations For replacements contact 800 523 ...

Page 75: ...e REF PART DESCRIPTION REF PART DESCRIPTION 908 PLABEL 63 DISCONNECT POWER LABEL 912 PPAINT 1 GRIZZLY GREEN TOUCH UP PAINT 909 PLABEL 14A ELECTRICITY LABEL 913 PLABEL 50B BIO HAZARD LABEL 910 P0726910 TRAINED PERSONNEL LABEL 914 P0726914 220V 3 PH LABEL 911 P0726911 MACHINE ID LABEL ...

Page 76: ......

Page 77: ... metalworker ____ 0 2 Years ____ 2 8 Years ____ 8 20 Years ____20 Years 6 How many of your machines or tools are Grizzly ____ 0 2 ____ 3 5 ____ 6 9 ____10 7 Do you think your machine represents a good value _____Yes _____No 8 Would you recommend Grizzly Industrial to a friend _____Yes _____No 9 Would you allow us to use your name as a reference for Grizzly customers in your area Note We never use ...

Page 78: ...D LINE FOLD ALONG DOTTED LINE GRIZZLY INDUSTRIAL INC P O BOX 2069 BELLINGHAM WA 98227 2069 Place Stamp Here Name_______________________________ Street_______________________________ City______________State______Zip______ Send a Grizzly Catalog to a friend ...

Page 79: ... shall be tried in the State of Washington County of Whatcom We shall in no event be liable for death injuries to persons or property or for incidental contingent special or consequential damages arising from the use of our products To take advantage of this warranty contact us by mail or phone and give us all the details We will then issue you a Return Number which must be clearly posted on the o...

Page 80: ......

Reviews: