


Model G0726 (Mfg. Since 7/11)
-21-
5. Move table all the way back toward the col-
umn, then attach front way cover with the
five pre-installed cap screws, as shown in
Figure 12.
6. Raise knee with Z-axis crank, remove the
four pre-installed cap screws from both sides
of column (see
Figure 13).
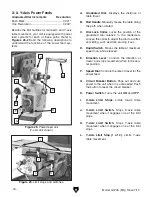
Figure 13. Splash pan installed.
Splash Pan
Cap Screws
(2 of 4)
7. Slide splash pan onto machine base, then
secure it in place with cap screws removed
in
Step 6.
Figure 12. Front way cover installed.
Cap Screws
8. Attach one end of coolant return hose to table
connector with the pre-installed hose clamp,
as shown in
Figure 14.
9. Tug coolant return hose to make sure that it
is securely attached. If it is not, repeat
Step 8
until it is.
10. Loosen hose clamp cap screw on base
(see
Figure 14), slide other end of coolant
return hose underneath it, then re-tighten cap
screw.
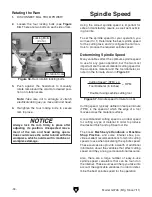
11. Install coarse downfeed lever and fine
downfeed handwheel, as shown in
Figure 15.
Note: Make sure pins on the back of these
devices are fully seated in the hubs.
12. Thread auto-downfeed direction pin into hub
of fine downfeed handwheel (see
Figure 15).
Figure 14. Coolant return hose attached to table.
Hose
Clamps
Coolant
Return Hose
Figure 15. Downfeed controls installed.
Auto-Downfeed
Direction Pin
Fine Downfeed
Handwheel
Coarse
Downfeed Lever
Cap
Screw