


-38-
Model G0700 (Mfd. Since 5/14)
Also, if setup correctly the rip fence can be used
as a stop block for making repeat cuts of the same
width.
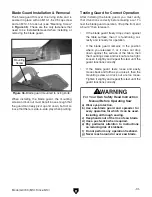
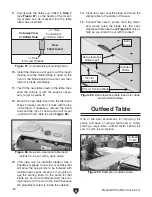
Figure 55 shows the proper fence position
in relation to the blade when using the fence as a
stop block.
The Model G0700 can crosscut with the fence in
the forward or rear position, although it is easier
to load large workpieces with the miter fence
mounted in the forward position (see
Figure 53).
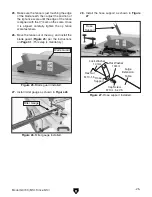
Mounting the miter fence in the rear position (see
Figure 54) gives greater stability for crosscutting
smaller panels.
Crosscutting
Figure 53. Crosscutting with miter fence in the
forward position.
Figure 54. Crosscutting with miter fence in the
rear position.
To perform a crosscutting operation:
1. Install the miter fence in either of the two
positions shown in
Figures 53–54.
2. Adjust the fence angle to 0˚, using the angle
scale on the miter gauge. If the cut requires
extreme precision, adjust the miter fence as
described in
Squaring Miter Fence to Blade
on
Page 65.
3. Adjust the miter fence so it does not extend
into the cutting path of the blade.
4. Set the flip stop to the desired width-of-cut.
5. Load the workpiece onto the table saw. The
set up should look similar to
Figure 47.
6. Adjust the height of the main blade
approximately
1
⁄
8
"–
1
⁄
4
" above the top of the
workpiece.
7. Take all the necessary safety precautions,
then perform the cutting operation.
Figure 55. Correct rip fence position when using
it as a cut-off gauge.
Rip Fence
Front Edge
of Blade
Leading Edge
of Rip Fence
Summary of Contents for G0700
Page 17: ...Model G0700 Mfd Since 5 14 15 Hardware Recognition Chart...
Page 85: ......


