


-2-
G0501 Manual Update
Figure 3.
Clear blade shield installed.
6.
Remove the cap screws under the blade
guard and a cap screw at the front.
7.
Position the clear blade shield guide holes
under the blade guard arm (
Figure 3
)
and secure the shield with the cap screws
removed in
Step 6
.
Note:
Overtightening cap screws may crack
the blade shield.
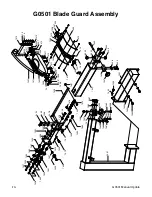
Installing Blade
Guard Assembly
The blade guard assembly parts have changed,
but the location is still the same. Refer to the
photographs in the manual for the installation
location.
To install the blade guard:
1.
Remove the four bolts and lock washers from
the side of the motor cabinet.
2.
Position the lower support arm (
Figure 1
)
over the holes in the motor cabinet and
secure the arm with the bolts and lock wash-
ers removed in
Step 1
.
Figure 2.
Holes for securing the swing arm.
Figure 1.
Support arms.
5.
Remove the cap screws in the end of the
upper support arm (
Figure 1
), thread them
through the holes in the swing arm (
Figure
2
), and secure the swing arm to the upper
support.
Note:
Get assistance holding the swing arm
while securing it to the support.
Upper
Support Arm
Lower Support
Arm
3.
Unthread the two bolts and lock washers
from the upper support arm.
4.
Position the upper support arm over the holes
in the lower support arm and secure the arm
with the bolts and lock washers removed in
Step 3
.
Cap Screws
The blade guard MUST be installed on this
table saw before operating it. Table saws are
dangerous machines that can quickly cause
serious injury if the blade guard is not used.