background image

Microprocessor Controller for DOAS

37

®

The expansion board is an I/O module than can be used to monitor additional statuses or provide commands from 
large board controller. It allows the user to view and control:

• 

6 Universal Inputs (Digital Input*, 
NTC, 0/1VDC, 0/10VDC, 0/20mA, 
4/20mA, 0/5VDC) 
*Only dry to ground contacts 
can be utilized for digital inputs. 
Applying voltage will result in 
damage to the I/O expansion board.

• 

4 Analog Outputs (VDC)

• 

6 Digital Outputs

The inputs and outputs can be 
monitored and controlled by the Building 
Management System. Reference Points 
List for detailed point information.

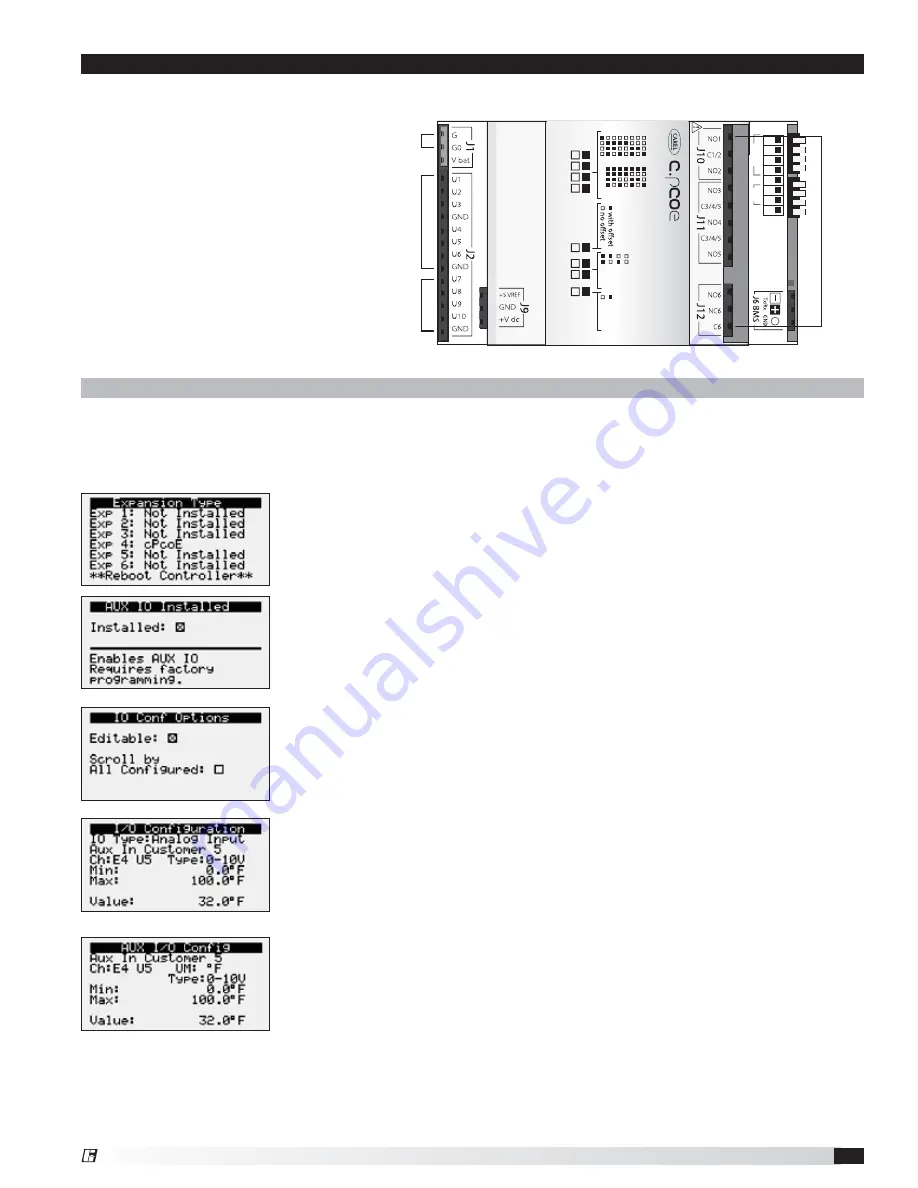
In order for the controller to communicate with the c.pCOe, several parameters must be adjusted. If you have 
a c.pCOe installed from the factory, the controller is already set up for communication with the main controller. 
The factory password is required for expansion board and I/O configuration updates. Consult factory for I/O 
configuration changes. 

Appendix: I/O Expansion Board (c.pCOe) Quick Start

Setup

1

2

3

4

5

6

7

8

9

10

11

12

13

14

15

19.2 K

9.6 K

38.4 K

57.6 K

CAREL

M

odbus

ON

OFF

A

d

dr

ess

Ex

t.

Pr

ot

Baud

A

ddr
ess

Ex

t
Baud

Pr

ot

24 VAC 

Power

Digital 

Outputs

Universal 

Inputs

Analog 

Outputs

Configuring the I/O Type

 - In order to edit and configure the I/O configuration of 

the unit, go to Ctrl Variables/Advanced/I/O Configuration. The user must enable 
the Editable option for configuring I/O points. If configuring a new I/O point, ‘Scroll 
by All Configured’ must be deselected to view all I/O options.

Enabling the pCOe in the Main Controller.

 - To enable the c.pCOe expansion 

I/O module, go to Ctrl Variables/Advanced/Unit Config. User will have to enter 
the Factory Password to make any edits at this point. Consult factory for factory 
password and configuring the expansion board. The expansion board must be 
enabled to configure spare I/O points. Once enabled, the user must reboot the 
controller. See screens to the left for expansion board enable points.

Change or Update the I/O Point

 - Once the editable option is selected, the 

user must scroll to the I/O Configuration Menu. At this menu the desired I/O 
type can be selected. Once selected the user can configure the desired channel 
at the expansion board. The channel will have an ‘E’ designation for expansion 
board. Aux In Customer 1–6, Aux Analog Out 1-4, and Aux Digital Out 1-6 will be 
allocated for the I/O expansion board. See example to the left.

Viewing c.PCOe Auxiliary Values

 – Once the expansion board I/O is configured, 

the user can view and/or change the I/O type by navigating to Ctrl Variables/Aux 
I/O Config.

Summary of Contents for c.pCOe

Page 1: ...clock allowing the user to set occupancy schedules for each day of the week The controller option also has morning warm up and cool down capability for improved comfort at the time of occupancy Alarm...

Page 2: ...Example of Web User Interface 13 Main Menu 14 Unit Status Overview 15 17 Unit Enable 18 Menus Control Variables Temp Control 18 20 Dehumidification 20 21 Refrigeration 22 Damper Control 22 23 Energy...

Page 3: ...hutdown Tempering outputs immediately revert back to their off value while Dampers remain open and fans continue to run until The supply air temperature falls below the soft shutdown enable setpoint m...

Page 4: ...he unit is enabled when the room temperature is greater than the unoccupied cooling setpoint plus differential 80 F 5 F The supply air temperature setpoint will be set to the supply minimum reset limi...

Page 5: ...is wired to the controller Supply fan speed needs to be set during test and balance of the unit If equipped with BMS communications the user can also directly command the supply fan speed Optional Spa...

Page 6: ...ir stream Stop Wheel When economizer mode is enabled and there is a signal for cooling the wheel will stop rotating to allow free cooling Modulate Wheel When economizer mode is enabled and there is a...

Page 7: ...Supply and Exhaust Air Proving Alarm Microprocessor controller monitors proving switch on each blower and displays an alarm in case of blower failure Sensor Alarm Microprocessor controller will send a...

Page 8: ...alog Output 24VAC for Analog Outputs Outdoor Relative Humidity Sensor Duct Pressure Sensor Building Pressure Sensor Room RH After Cold Coil Temperature Sensor CO2 Sensor Sensor B1 B2 B3 Commons Supply...

Page 9: ...Outputs Outdoor Relative Humidity Sensor Supply Fan VFD Output Outdoor Air Damper Output Refrigerant Pressure Circuit A Supply Discharge Air Temperature Sensor B1 B2 B3 Commons After Cold Coil Temper...

Page 10: ...4 VAC Power Heating Output Exhaust Fan VFD Output Energy Recovery Output Space Temperature Mixed Air Temperature Exhaust Air Temperature Space Static Pressure Supply Air Duct Static Pressure Space Set...

Page 11: ...s Address Switches 24 VAC High Speed Fan 24 VAC Ignition Controller pCOe High Turndown Furnace Low Speed Pressure Switch Main Gas Valve Small Manifold Main Gas Valve Large Manifold Ignition Controller...

Page 12: ...navigate menus screens Press after entering a variable to decrease the current value Virtual keypad display on web interface only These two buttons on the virtual keypad display are used to simulate t...

Page 13: ...graphic monitoring points and active setpoint adjustment Alarm Shows current and cleared alarms Unit Display Mimics the unit controller display Allows the user full access to the controller without p...

Page 14: ...pressure Heating Dehumidi cation Static pressure Refrigeration Compressor Control Alarm History Pressure Control Clear History Damper Control Export History Energy Recovery Fan Control Supply Fan Con...

Page 15: ...STATUS Displays real time conditions from sensors located in the unit and building space if equipped with space mounted sensors Controller output conditions can also be viewed from this screen To vie...

Page 16: ...set calculation SUPPLY SETPOINT Displays current supply temperature and supply temperature setpoint to be achieved ECONOMIZER RAMP The economizer ramp screen will be active if the unit is configured f...

Page 17: ...dew point Available during unoccupied mode HGRH RAMP OUTPUT This screen will display overall hot gas reheat status which includes active setpoint supply air discharge temperature hot gas reheat enabl...

Page 18: ...a constant value e g 72 F Reference Temperature Setpoint screen for setpoint adjustment Space Reset The controller will reset the supply air temperature set point to maintain the room temperature set...

Page 19: ...he reset control mode The heat cool deadband allows for separate cooling and heating setpoints when the reset control mode is set for space reset or return air reset SUPPLY SETPOINTS Cooling and heati...

Page 20: ...e dew point Inside RH and inside dew point Inside RH and inside dew point or outside dew point Available during unoccupied mode There must be a constant call for dehumidification for the duration of t...

Page 21: ...e unit is allowed to dehumidify 1 Temperature over Dehumidification Determines when the unit is allowed to dehumidify based on the space return air temperatures a Temperature If temperature is set as...

Page 22: ...with a DCV CO2 and an economizer sequence the OA damper set point will react to an economizer demand even if the CO2 set point is satisfied Likewise if economizer is not available but CO2 is above se...

Page 23: ...the economizer enthalpy setpoint Comparative Dry Bulb Economizing is allowed when outside temperature is less than the space or return temperature Comparative Enthalpy Economizing is allowed when out...

Page 24: ...t mode if the outside air temperature is below this temperature setting Max Active Time and Min Off Time will be available if the frost control method was provided as timed exhaust or cycle wheel THIS...

Page 25: ...Pressure Fan speed is determined by building pressure control loop CO2 Fan speed is determined by CO2 control loop Single Zone VAV The supply fan is modulated in addition to the supply air temperatur...

Page 26: ...r to the VFD 25 Speed Min speed 100 Speed Max speed Possible Setpoint Sources Local The fan speed will be constant set from screen e g 100 BMS The BMS can directly control the fan speed requires BMS c...

Page 27: ...n unoccupancy mode Schedule Allows the user to set an occupancy schedule for each individual day of the week THIS SCREEN DISPLAYS UNOCCUPIED START ENABLE MODES This screen only appears if unit is prov...

Page 28: ...w buttons to turn the unit on or off THIS SCREEN ALLOWS THE USER TO OVERRIDE OCCUPANCY CONTROL When manual override is set to enable use the arrow buttons to change occupancy control THIS SCREEN ALLOW...

Page 29: ...RATION This screen only appears if the unit is equipped with DX cooling When manual override is set to enable use the arrow buttons to turn individual compressor requests on or off THIS SCREEN ALLOWS...

Page 30: ...tory The Network Settings Menus allows the user to view and modify network settings The service password 9998 is required to make changes Control Variables Advanced Network Settings THIS SCREEN ALLOWS...

Page 31: ...o accept adjusted value 4 Once desired parameters have been entered enable the Save Settings option and press the enter button 5 Reboot the controller by cycling power to the unit Allow several minute...

Page 32: ...bles Advanced Backup Restore screen 3 Press the Up or Down arrow buttons to navigate to the Backup Settings screen 4 Press the Enter and Up or Down arrow buttons to select the backup location internal...

Page 33: ...ons to ll the Restore checkbox This action restores the backup le If there is an error during the process the speci c error is displayed on this screen 8 Cycle power to the controller From internal me...

Page 34: ...w and modify controller input and output points THIS SCREEN ALLOWS THE USER TO VIEW AND CHANGE THE EXHAUST FAN CONTROL TYPE Reference control variables for possible exhaust fan control methods THIS SC...

Page 35: ...AL Descriptions IG no flame 3 try AL Indicates a furnace failure to light or properly sense flame after 3 trials Alarm only IG combustion fan high pressure switch failure Indicates a call for high spe...

Page 36: ...lay Type Backlit LED with lighted buttons Installation The remote display connects to the unit mounted controller through a six wire RJ25 or RJ12 telephone cable straight When ordered from the factory...

Page 37: ...og Outputs Configuring the I O Type In order to edit and configure the I O configuration of the unit go to Ctrl Variables Advanced I O Configuration The user must enable the Editable option for config...

Page 38: ...o provides the functionality to average up to 4 temperature readings through the microprocessor The room thermostat is shipped loose with installation by others and is a Modbus connected device Room t...

Page 39: ...operating properly Red indicates that there is a problem with the unit Network LED Flashing Red Slowly indicates that there has been no communications for 60 seconds Flashing Green Slowly indicates th...

Page 40: ...ut of measured airflow Dual airflow probe averaging Modbus connectivity Display and Navigation The LCD screen will by default show the current airflow that is being measured To enter the menu to set u...

Page 41: ...oWrite 0 1 30355 Input 2 Space_Static_ Pressure_Analog_Input Space Static Pressure 94 AI ReadCOV_ NoWrite 0 01 30365 Input 2 Supply_Duct_Static_ Pressure_Analog_Input Supply Duct Static Pressure 95 AI...

Page 42: ...Economizer_Temp_ Enable_Setpoint Economizer Ambient Temp Enable Setpoint Allow Econ when OAT Spt 16 AV ReadCOV_ Commandable 0 40031 Holding 2 Economizer_Enthalpy_ Enable_Setpoint Economizer Enthalpy...

Page 43: ...l 136 AV ReadCOV_ Commandable 0 1 40089 Holding 2 Outside_Air_Damper_ Minimum_Setpoint Outside Air Damper Minimum Setpoint 137 AV ReadCOV_ Commandable 1 40091 Holding 2 Aux_BMS_Analog_ Output_1 BMS Co...

Page 44: ...ReadCOV_ NoWrite 1 30023 Input 2 Head_Pressure_ Control_Ramp_2_ Ramp Head Pressure Control Ramp 2 52 AV ReadCOV_ NoWrite 1 30025 Input 2 Heating_Ramp Heating Ramp 60 AV ReadCOV_ NoWrite 1 30041 Input...

Page 45: ...Analog Output 235 AV ReadCOV_ NoWrite 0 1 30523 Input 2 Hot_Water_Valve_1_ Analog_Output Hot Water Valve 1 Analog Output 236 AV ReadCOV_ NoWrite 0 1 30525 Input 2 Mod_Gas_Furnace_1_ Analog_Output Mod...

Page 46: ...y Command True Unoccupied False Occupied Unoccupy Occupy 3 BV Read_ Commandable 0 4 Coil Reset_All_Alarms Alarm Reset Command Reset Normal 4 BV Read_ Commandable 0 5 Coil Outside_RH_Source_ BMS Outsid...

Page 47: ...ve 29 BV ReadCOV_ NoWrite 0 10015 Discrete Dehumidification_ Mode_Enabled Indicates that the unit is dehumidifying Active Inactive 31 BV ReadCOV_ NoWrite 0 10017 Discrete Manual_Override_ Active Indic...

Page 48: ...Board_2_ Alarm Active Expansion Board 2 Alarm 0 Normal 1 Alarm Alarm Normal 435 BV ReadCOV_ NoWrite 0 10385 Discrete Expansion_Board_3_ Alarm Active Expansion Board 3 Alarm 0 Normal 1 Alarm Alarm Norm...

Page 49: ...EVD_1 Active EVD EEPROM Alarm 0 Normal 1 Alarm Alarm Normal 594 BV ReadCOV_ NoWrite 0 10544 Discrete Al_EEV_A_EVD_1 Active ExV Motor Alarm Valve 1 0 Normal 1 Alarm Alarm Normal 595 BV ReadCOV_ NoWrite...

Page 50: ...COV_ NoWrite 0 10679 Discrete Binary Values Commandable Aux_BMS_Digital_ Output_1 BMS Commanded auxilary digital output Active Inactive 207 BV ReadCOV_ Commandable 0 24 Coil Aux_BMS_Digital_ Output_2...

Page 51: ...Exhaust Fan Speed Remote Command Analog Input value 143 AI ReadCOV_ NoWrite 1 30455 Input 2 Supply_Fan_Speed_ Analog_Input Supply Fan Speed Remote Command Analog Input value 155 AI ReadCOV_ NoWrite 1...

Page 52: ..._Alarm Active Comp Circ A Low Pressure Alarm 0 Normal 1 Alarm Alarm Normal 396 BV ReadCOV_ NoWrite 0 10347 Discrete Comp_Circ_B_High_ Pressure_Alarm Active Comp Circ B High Pressure Alarm 0 Normal 1 A...

Page 53: ...ER FURNACE CONTROL CENTER OPTIONAL OPTIONAL OPTIONAL OPTIONAL OPTIONAL ROOM THERMOSTAT 1 ROOM THERMOSTAT 2 ROOM THERMOSTAT 3 ROOM THERMOSTAT 4 OPTIONAL OPTIONAL OPTIONAL OPTIONAL SHIELDED NETB GND PWR...

Page 54: ...__________ _________________________________________________ _________________________________________________ Date ___________________Time _____________ AM PM Notes __________________________________...

Page 55: ...__________ _________________________________________________ _________________________________________________ Date ___________________Time _____________ AM PM Notes __________________________________...

Page 56: ...warranties are located on greenheck com within the product area tabs and in the Library under Warranties Phone 715 359 6171 Fax 715 355 2399 Parts 800 355 5354 E mail gfcinfo greenheck com Website ww...

Reviews: