❏
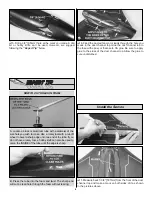
1. Glue the wing tips to the wing using foam-safe CA glue
or epoxy. Be careful when gluing the tips as any excess will be
difficult to clean up from the foam wing. Do not use alcohol to
clean away epoxy. Alcohol will remove the paint from the foam.
Use tape to hold the tips in place while the glue cures. Make
sure to test the tape to insure it will not remove the finish. When
the glue has cured, apply a fillet of glue along the top of the
wing at the wing tips and let it cure undisturbed.
❏
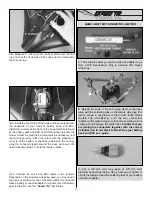
2. After your model is assembled, the only way to remove the
ducted fan unit for repair or replacement is to cut it out from the
bottom. Because of this, we suggest marking the location of the
ducted fan unit on the underside of the fuse. You can do this by
pushing T-pins through the inside of the fuse along the edges of
the fan housing. The holes left on the underside of the fuse from
the T-pins can be connected with a drawn line for future
reference. If at any time you need to remove the fan unit, use a
hobby knife to cut along the holes left by the T-pins to extract the
unit out of the bottom of the fuse.
❏
3. Mix up approximately 3/8 oz [11g] of epoxy to glue the
ducted fan unit into the fuse duct channel. Coat the recessed
area in the fuse where the fan unit will be installed with a thin
coat of epoxy. Press the fan unit into place and wipe away any
excess epoxy with a dry paper towel.
❏
4. Make a mark 5-1/4" [133mm] from the front in the center
of the duct channel top.
Install the Wing Tips & Ducted Fan Unit
ASSEMBLE THE AIRPLANE
Before building the model, please follow the assembly and
break-in instructions that can be found in the manual that
accompanies the ducted fan unit. If you plan to substitute
a brushless motor into the ducted fan unit, do so before
gluing the unit into the aircraft. The EDF manual includes
information about brushless motor usage.
BEFORE YOU BEGIN
7


