GREAT PLANES Matt Chapman Cap 580 Instruction Manual Download Page 22

For reassurance and to keep an eye on other traffic, it is a
good idea to have an assistant on the flight line with you. Tell
him to remind you to throttle back once the plane gets to a
comfortable altitude. While full throttle is usually desirable for
takeoff, The Cap 580 does not require full throttle for
anything other than vertical maneuvers. You will find that it
will perform rolls, snaps, inverted flight, knife edge and level
flight at approximately half throttle

Take it easy with the Cap 580 for the first few flights, gradually
getting acquainted with it as you gain confidence. Adjust the
trims to maintain straight and level flight. After flying around
for a while, and while still at a safe altitude with plenty of fuel,
practice slow flight and execute practice landing approaches
by reducing the throttle to see how the model handles at
slower speeds. Add power to see how she climbs as well.
Continue to fly around, executing various maneuvers and
making mental notes (or having your assistant write them
down) of what trim or C.G. changes may be required to fine
tune the model so it flies the way you like. Mind your fuel
level, but use this first flight to become familiar with your
model before landing.

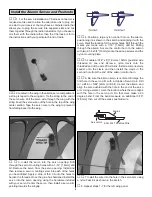
To initiate a landing approach, lower the throttle while on the
downwind leg. Allow the nose of the model to pitch downward
to gradually bleed off altitude. Continue to lose altitude, but
maintain airspeed by keeping the nose down as you turn onto
the crosswind leg. Make your final turn toward the runway (into
the wind) keeping the nose down to maintain airspeed and
control. Level the attitude when the model reaches the runway
threshold, modulating the throttle as necessary to maintain

your glide path and airspeed. If you are going to overshoot,
smoothly advance the throttle (always ready on the right
rudder to counteract torque) and climb out to make another
attempt. When you’re ready to make your landing flare and the
model is a foot or so off the deck, smoothly increase up
elevator until it gently touches down. Once the model is on the
runway and has lost flying speed, hold up elevator to place the
tail on the ground, regaining tail wheel control.

One final note about flying your model. Have a goal or flight
plan in mind for every  flight. This can be learning a new
maneuver(s), improving a maneuver(s) you already know, or
learning how the model behaves in certain conditions (such
as on high or low rates). This is not necessarily to improve
your skills (

though it is never a bad idea!), but more

importantly so you do not surprise yourself by impulsively
attempting a maneuver and suddenly finding that you’ve run
out of time, altitude or airspeed. Every maneuver should be
deliberate, not impulsive. For example, if you’re going to do
a loop, check your altitude, mind the wind direction
(anticipating rudder corrections that will be required to
maintain heading), remember to throttle back at the top, and
make certain you are on the desired rates (high/low rates).
A flight plan greatly reduces the chances of crashing your
model just because of poor planning and impulsive moves.
Remember to think.

Have a ball!

But always stay in control and fly in a safe manner.

GOOD LUCK AND GREAT FLYING!

Landing

Flight

22

ALSO AVAILABLE FROM GREAT PLANES

First in affordability and features.

Look at the price, the features and the performance of the 4YF, and
you’ll see why it's the most popular 4-channel around for flight and
surface use. Its FM technology is complemented with NiCds, a charger,
easy access trims and a dual-conversion, 7-channel R127DF receiver.
Two LEDs instantly show battery power status. The trainer system
features a spring-loaded toggle switch instead of a button, so it's easy
to hold "on", and automatically turns "off" when you release it. The
trainer jack features a micro-pin connector port, for less clutter with the
optional cord. Includes four S3004 servos. 1-year warranty. 72 & 75MHz.

Futaba

®

4YF 4-Channel FM Radio FUTJ40**

Summary of Contents for Matt Chapman Cap 580

Page 1: ...ediately in new and unused condition to the place of purchase To make a warranty claim send the defective part or item to Hobby Services at the address below Hobby Services 3002 N Apollo Dr Suite 1 Ch...

Page 2: ...ft corner of the page We urge you to join the AMA Academy of Model Aeronautics and a local R C club The AMA is the governing body of model aviation and membership is required to fly at AMA clubs Thoug...

Page 3: ...Remember Take your time and follow the instructions to end up with a well built model that is straight and true Four channel radio Four 54 oz in servos and one 30 oz in servo One 6 150mm servo extens...

Page 4: ...udy photos in following steps to get another view of the same parts The CAP 580 is factory covered with Top Flite MonoKote film Should repairs ever be required MonoKote can be patched with additional...

Page 5: ...ron 15 Right Wing with Aileron 16 Wing Joiners Kit Contents Photographed 5 32 x 1 1 4 Axles 2 Brass EZ Connector 2 4 40 Blind Nuts 4 6 32 Blind Nuts 4 8 32 Blind Nuts 4 Axle Nuts 2 1 4 20 Blind Nuts 2...

Page 6: ...ices and shipping and handling charges will apply Illinois and Nevada residents will also be charged sales tax If ordering via fax include a Visa or MasterCard number and expiration date for payment M...

Page 7: ...have one use a high speed rotary tool to drill the holes 2 Use a sharp 11 blade to cut a strip of covering from the hinge slots in the wing and aileron 3 Cut eight 3 4 x 1 19mm x 25mm hinges from the...

Page 8: ...r the servo then install a servo arm pointing towards the wingtip 4 Position a large nylon control horn on the aileron positioning it as shown in the sketch and aligning it with the servo Mark the loc...

Page 9: ...d measure the dihedral The distance from the top of the bench to the center of the wing as measured at the wing tip should be approximately 3 3 8 86mm Block the wing tip up while the glue hardens Note...

Page 10: ...drill bit drill from the top of the wing through the wing bolt holes drilling through the wing bolt plate 6 Mount the wing to the fuselage with two 1 4 20 nylon wing bolts 1 Test fit the stab into the...

Page 11: ...selage Make sure it is perpendicular to the stab 8 Locate the tail wheel wire assembly Insert the wire into the tail wheel bracket as shown 9 Bend the wire 90 degrees Once the wire is bent cut the wir...

Page 12: ...k of the fuselage 2 Cut the landing gear axles to a length of 1 3 16 30mm 3 File a flat spot on the end of the axles A high speed rotary tool works well for this also 4 Install an aluminum spacer it l...

Page 13: ...s 9 Place the tray into the fuselage The front tongue on the tray extends forward to hold the fuel tank in position Drill a 1 16 1 6mm hole through the holes on each side of the tray Then screw a 2 x...

Page 14: ...install your servo 15 Install a brass screw lock connector and nylon retainer to the servo arm Slide it onto the pushrod wire center the servo and install the servo arm onto the servo Then install the...

Page 15: ...e ailerons Mark the location for the screw holes Drill through the marks you made with a 1 16 1 6mm drill bit drilling through the elevator Secure the control horn to the aileron with two 2 56 x 5 8 1...

Page 16: ...s wire 10 Be sure the elevator servo is centered Enlarge the first hole in the servo arm with a Hobbico Servo Horn Drill or a 48 or 5 64 2mm drill bit Center the elevators and align the wire pushrod w...

Page 17: ...he trims If necessary remove the servo arms from the servos and reposition them so they are centered Reinstall the screws that hold on the servo arms 2 With the transmitter and receiver still on check...

Page 18: ...manently hold it in place Over time fuel and exhaust residue may soften the adhesive and cause the weight to fall off Use 2 sheet metal screws RTV silicone or epoxy to permanently hold the weight in p...

Page 19: ...ngine manufacturer s instructions to break in the engine After break in confirm that the engine idles reliably transitions smoothly and rapidly to full power and maintains full power indefinitely Afte...

Page 20: ...y 400 feet within 3 miles of an airport without notifying the airport operator I will give right of way and avoid flying in the proximity of full scale aircraft Where necessary an observer shall be ut...

Page 21: ...on the runway Hold up elevator to keep the tail wheel on the ground If necessary adjust the tail wheel so the model will roll straight down the runway If you need to calm your nerves before the maide...

Page 22: ...another attempt When you re ready to make your landing flare and the model is a foot or so off the deck smoothly increase up elevator until it gently touches down Once the model is on the runway and h...

Page 23: ...turing quality controls and tight tolerances in design and tooling give Power Point props true constant pitch throughout the entire blade diameter This combined with lower rotational mass provides gre...

Page 24: ...____________ Where Purchased _________________________ Date Construction Started __________________ Date Construction Finished _________________ Finished Weight __________________________ Date of Firs...

Reviews: