2 6
7 . A R M S S e t t i n g [ A R M S ]
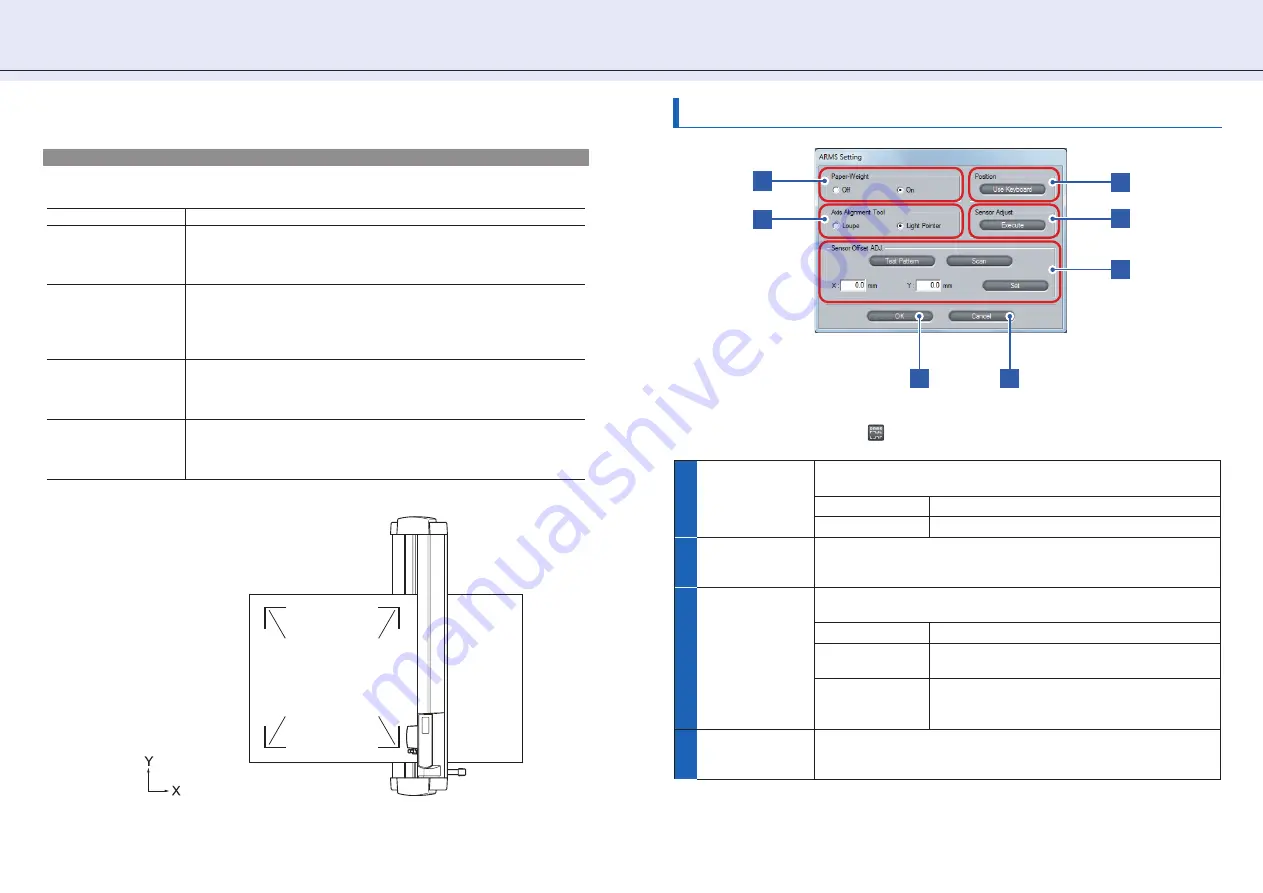
In the [ARMS Setting] screen, you set detailed conditions to use the ARMS functions.
In the main screen (
¨
page 9), click
[ARMS] to open the [ARMS Setting] screen.
Adjustment by Using Registration Marks
The plotter reads the registration marks to perform alignment of the origin point, adjustment of the vertical distance,
and correction of the distortion. Depending on the number of marks, the adjustment method may differ.
Mark Scan Mode
Adjustment to be done
2points
Adjusts the horizontal distance and the tilt. Registration marks at lower left and
lower right are read and the distance between these two marks is adjusted so as
to be the same distance as you set in the [X] of [Mark Distance] (
¨
"Registration
Marks Setting" on page 24).
3points
Adjusts the vertical and horizontal distance and the tilt. Registration marks at
lower left + lower right and lower left + upper left are read and the distances
between each pair of the marks are adjusted so as to be the same distances as
you set in the [X] and [Y] of [Mark Distance] (
¨
"Registration Marks Setting" on
page 24).
4points
Registration marks at lower left, lower right, upper left, and upper left are read
and are adjusted to the registration mark positions calculated from the distances
you set in the [X] and [Y] of [Mark Distance] (
¨
"Registration Marks Setting" on
page 24).
Area (segment area
adjustment)
For a long image, like one whose length in the feed direction is more than 2
m, corrects the distortion produced during the printing process. By using the
intermediate registration marks as boundaries, the image is divided in the feed
direction into several areas and 4points adjustment is performed.
<For rear loading/sheet>
Upper left
Lower left
Lower right
Upper right
Settings in the [ ARMS Setting] Screen
1
Paper-Weight
Set whether to hold down the media with the paper-weight when the
sensor reads the registration marks.
Off
The paper-weight will not be used.
On
The paper-weight will be used.
2
Axis Alignment
Tool
Set the tool that is used for manual axis alignment. Select from [Loupe]
and [Light Pointer].
¨
Axis Alignment (page 27)
3
Position
(Use Keyboard)
Click this key and then use the keyboard to move the tool to the position
at which the you want to cut the test pattern.
Up/down/left/right
Press one of the [
←↑↓→
] keys on the keyboard.
High-speed
movement
Press the [Ctrl] key and one of the [
←↑↓→
] keys on
the keyboard at the same time.
Skew
Press the up/down arrow key and the left/right
arrow key at the same time. For example, [
←
] and
[
↑
] or [
↓
] and [
→
].
4
Sensor Adjust
Automatically adjusts the scanning level of the sensor that scans
registration marks. Click [Execute] to start the automatic adjustment.
¨
Sensor Adjust (page 27)
6
7
3
4
5
1
2


