2 5
7 . A R M S S e t t i n g [ A R M S ]
Settings in the [ Registration Mark Settings] Screen
What is Registration Mark
A registration mark is a mark to align positions to cut the printed image properly. Set marks around the image
before printing it. The plotter uses a registration mark sensor to read the marks and corrects the position or
distortion of the image before performing cutting. For proper reading of the registration marks, ensure that the
printed image does not go into or around the marks.
Mark Auto Scan
This is a function to scan and read the registration marks automatically when the cutting starts. Registration marks
within a certain area from the current position of the tool to the center of the media are detected. However, marks
may not be detected if there is no mark near the area. In such case, turn [Mark Auto Scan] off*, move the tool
above the fi rst registration mark (Registration Mark located at the position painted with green on the drawing in
main screen of the controller), and then click [Read Marks].
* If you start the controller from the Start menu, registration marks can be read by using [Read Marks], regardless
the setting in [Mark Auto Scan].
CAUTION
To perform a segment area adjustment (
¨
"Adjustment by Using Registration Marks" on page 26), the direction
where the intermediate registrations placed must be the same as the feed direction. So, load the media
accordingly. Intermediate registration marks that are in the moving direction of the cutter blade cannot be read.
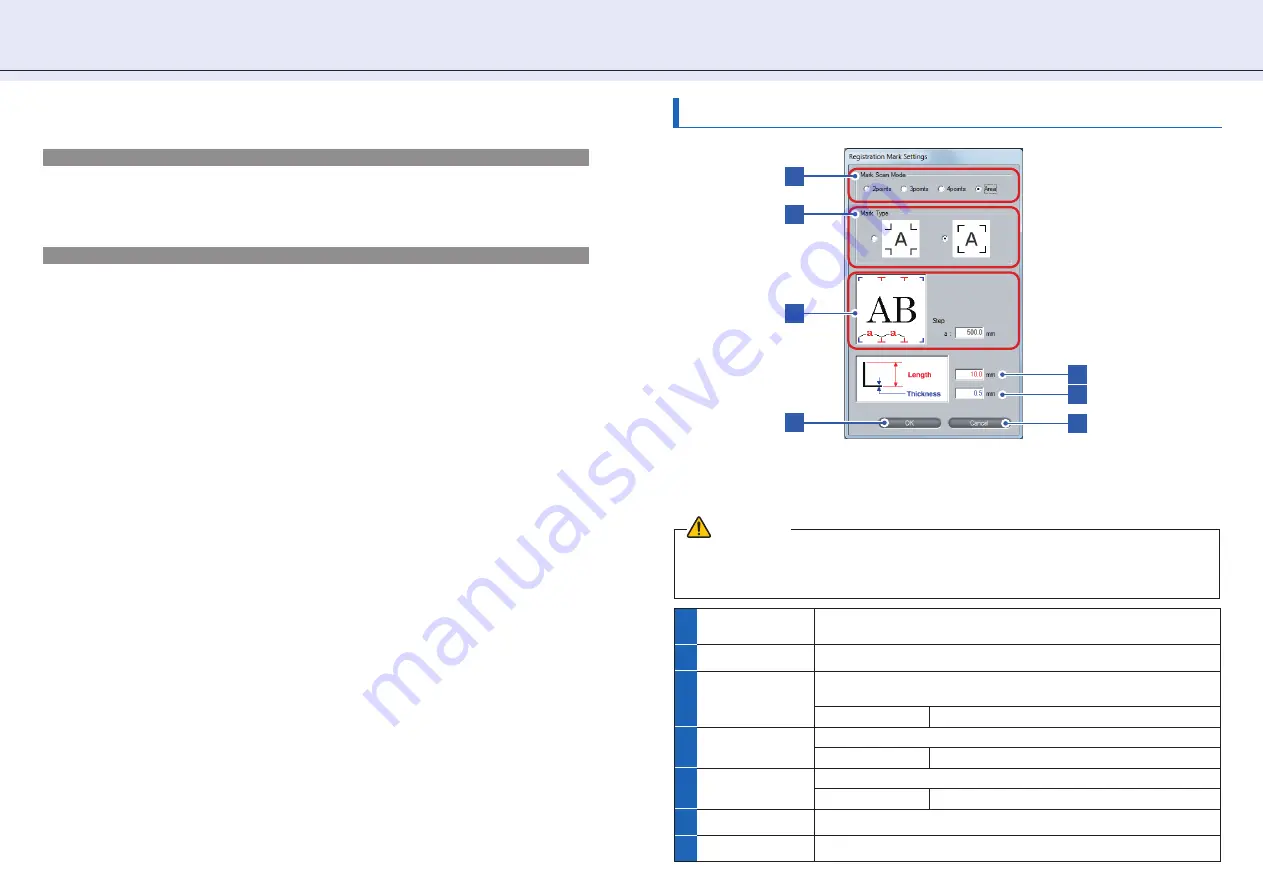
In the main screen (
¨
page 9), click [RM Settings to open the [Registration Mark Settings] screen.
In this screen, you set detailed conditions necessary to read registration marks, including the number
and the shape of the mark.
4
5
7
1
2
3
3
1
Mark Scan Mode
Set the number of registration marks to scan.
¨
Adjustment by Using Registration Marks (page 26)
2
Mark Type
Select the shape of the registration mark.
3
Step
When [Area] is set in [Mark Scan Mode], specify the distance by which
each intermediate registration mark is placed.
Setting range
100.0 mm to 10000.0 mm
4
Length
Specify the length of the registration mark from the corner to the end.
Setting range
5.0 mm to 20.0 mm
5
Thickness
Specify the thickness of the registration mark.
Setting range
0.3 mm to 1.0 mm
6
OK
Saves the settings and closes the [Registration Mark Settings] screen.
7
Cancel
Cancels the settings and closes the [Registration Mark Settings] screen.


