GrandTec Grand iFalcon Quick Manual Download Page 22


34

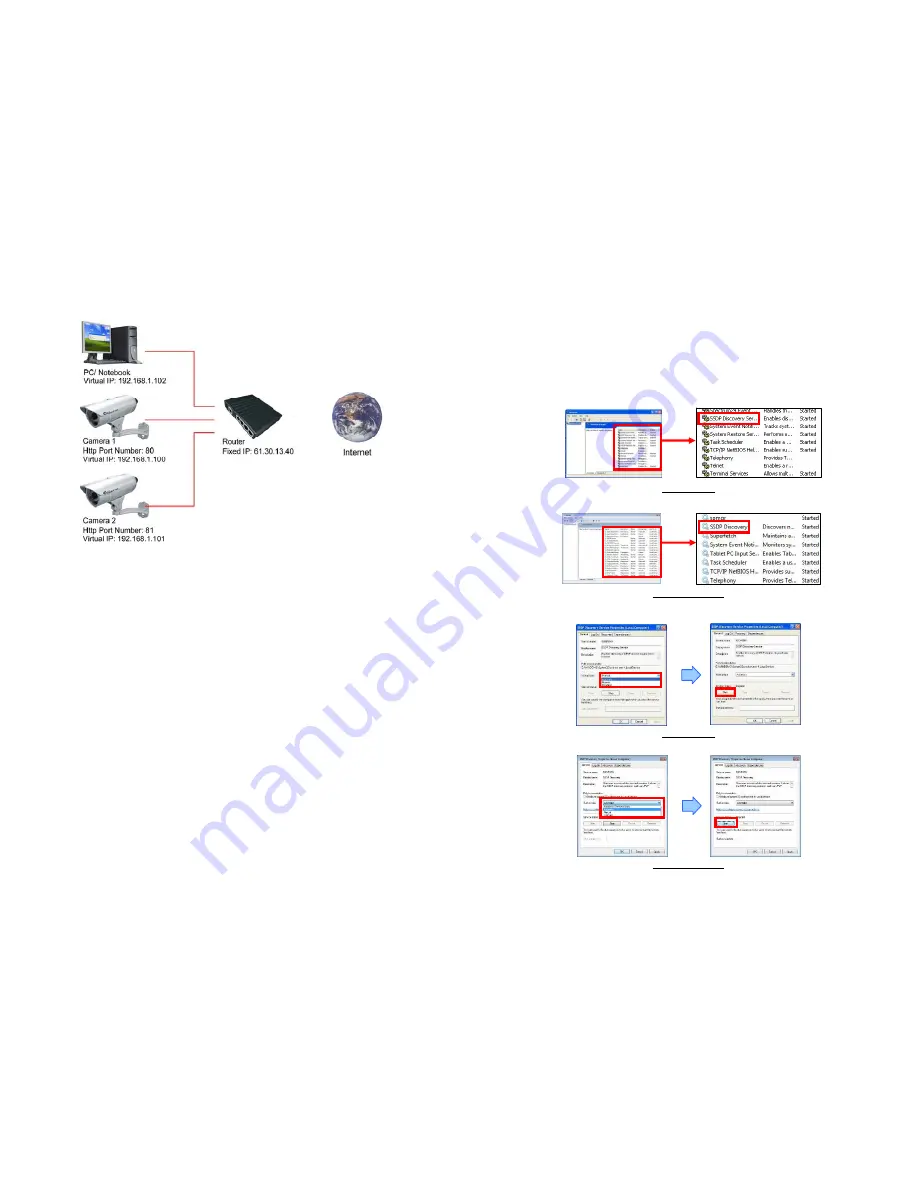
9. Connecting Multiple Cameras to a Router


Step 1: 

Assign a local IP Address and Http Ports for your cameras (confirm the cameras settings 

corresponding to your network settings; you must use the same gateway and Subnet Mask). 


Step 2:

 Set up the router to open the ports of cameras for remote access the cameras via internet (refer 

to your router’s user manual for how to open up ports). 


Step 3:

 Accessing your cameras. 

- Access on local network 

Enter “http:// 192.168.1.100” to access the camera 1;   

Enter “http:// 192.168.1.101” to access the camera 2. 

- Access from the internet 

Enter “http:// 61.30.13.40:80” to access the camera 1; 

Enter “http:// 61.30.13.40:81” to access the camera 2. 


35

10. Using UPnP to Connect to the Camera


„


Confirm the UPnP function of the video sever has been enabled (refer to section 8.14). 

„


Follow the steps below to enable SSDP and UPnP in Windows XP/ Vista/ 7. 

Step1:

 Open the 

Services 

window. 

Windows XP/ Vista: 

“Start” 

 “Setting” 

 “Control Panel” 

 “Administrative Tools” 

 “Services”. 

Windows 7: 

“Start” 

 “Control Panel” 

 “Administrative Tools” 

 “Services”. 

Step2:

 In the 

Services

 window, double-click the service 

SSDP Discovery


Windows XP 


Windows Vista/ 7 

Step3: 

Select 

Automatic

 in the 

Startup type

 item, and click 

Start

 to enable the service. 


Windows XP 


Windows Vista/ 7 

Summary of Contents for Grand iFalcon

Page 1: ...the Install Mega Pixel IP Camera Viewer to install the surveillance software Step3 Press the Install IPCam Setup to install the IPCam Setup program Step4 The shortcut icons Mega Pixel IP Camera Viewer...

Page 2: ...ion Confirm that the camera is already connected to the network Step1 Double click on IPCam Setup s execution file on the desktop and the following screen will appear Step2 Click the Auto Detect butto...

Page 3: ...the same Net Mask ex 255 255 255 0 and Gateway 192 168 2 254 You can use any IP address between 192 168 2 1 254 but make sure that the IP Address has never been used or is used by another IP addressab...

Page 4: ...nstallation 6 6 3 Internet Browser Settings 10 7 Network Installation 11 8 Using the Built In Web for Configuration 14 8 1 Language Select 14 8 2 Display 15 8 3 Video Settings 16 8 4 Network Settings...

Page 5: ...user manual IP Detect Tool Surveillance software 2 Introduction The Grand iFalcon IP Cam is a 1 3 mega pixel IP66 rated outdoor network camera with built in 24 infrared LEDs The Grand iFalcon IP Cam...

Page 6: ...to 10 100Mbps Ethernet Supports TCP IP HTTP FTP SMTP DHCP PPPoE DDNS UPnP NTP service Multi Languages OSD English French Portuguese German Italian Netherland Spanish Russian Japanese Traditional Chine...

Page 7: ...to fix the bracket to the side of the network camera Step3 Use the screw to fix the network camera to the wall mount bracket NOTE If the screw cannot be tightened please re tighten the screws on the o...

Page 8: ...n click Finish to complete the installation 7 Step2 Press the Install Mega Pixel IP Camera Viewer to install the surveillance software Step3 Press the Install IPCam Setup to install the IPCam Setup pr...

Page 9: ...then click OK to open the Command Prompt window Windows 7 Vista Click Start and type cmd in the Start Search box don t press Enter In the list of programs right click cmd and then click Run as admini...

Page 10: ...Security Tab and click on the Custom Level Set to Prompt on the Download unsigned ActiveX controls and Initialize and script ActiveX controls not marked as safe items Windows XP Windows Vista Windows...

Page 11: ...formation Assign IP Address Netmask Subnet Mask and Gateway Default Gateway for the network camera You must use the same Net Mask ex 255 255 255 0 and Gateway 192 168 2 254 You can use any IP address...

Page 12: ...op of the Menu List The network camera supports multi languages English Chinese Tri Italian Russian French Japanese Spanish Portuguese Netherlands and German 15 8 2 Display User can view the video by...

Page 13: ...the easier the video is vague CMOS Freq Select the frequency of the CMOS sensor Please accord to the frequency of the power system 50Hz or 60 Hz to determine this value Vflip Vertically rotate the vid...

Page 14: ...enter the IP adress enter the user name and password 19 8 4 Network Settings User can configure the network setting by clicking the Network in the Menu List The details of network setting should appe...

Page 15: ...k service that provides the domain name resolution for dynamic IP address After creating an alias on the service provider s web site user might use this alias to access network camera on the Internet...

Page 16: ...e after the configurations are successfully saved 23 8 8 FTP Settings The network camera supports a build in FTP client for uploading image or video When the motion detection function see 8 11 Motion...

Page 17: ...o User could draw this area by using the x and y coordinates Motion Detection On Off Enable Disable this detection area The lower this value the easier the motion detection is triggered Sensitivity De...

Page 18: ...the video stream For further configure this function please click on the Authen in the Menu List Authentication On Off Enable Disable video authentication Number of Connections User might specify the...

Page 19: ...CP Save button Save and apply the configuration 29 8 14 UPnP Services The network camera supports UPnP function Using this function user could find network camera by just one click on My Network Place...

Page 20: ...d save it in the hard disk Step 2 Log in the network camera Click on the Upgrade in the Menu List Step 3 Click on the Browser button in the Main Display area and a dialogue box will pop up for the use...

Page 21: ...lect which kind of configuration or ALL for all configurations to reset Step 3 Click on OK button for resetting the configuration 33 8 18 Reboot the Camera User could reboot network camera via the bro...

Page 22: ...ccess the camera 2 Access from the internet Enter http 61 30 13 40 80 to access the camera 1 Enter http 61 30 13 40 81 to access the camera 2 35 10 Using UPnP to Connect to the Camera Confirm the UPnP...

Page 23: ...rver directly 37 11 Surveillance Software 11 1 Using the Mega Pixel IP Camera Viewer Double click on Mega Pixel IP Camera Viewer s execution file on Windows Desktop or in the Mega Pixel IP Camera View...

Page 24: ...rmat 2 File Press the Folder button to select the folder which stores the snapshots or recording files NOTE Press the OK button to save and apply the configuration 39 11 1 3 2 Record All Channels Pres...

Page 25: ...nd restart again If the video is unstable after some high CPU resource programs CPU usage may come to 100 and all the resources are taken In that case the system may run in slower mode than ever Pleas...

Page 26: ...tive and Thresdhold most sensitive 1 2 254 least sensitive items can be adjusted Set the Motion Area Click and hold down the right mouse button in the video window and move the mouse to select motion...

Page 27: ...ocus ring until the image is clear and then tighten the fixed ring 45 12 2 Hardware Reset If you forget your password you must reset the network camera to the default settings Step1 Open the lens cove...

Page 28: ...ng the metal plate out Step2 Take the old silica gel out Tear down the aluminum foil vacuum bag and take out the silica gel Use the double sided adhesive tape to attach the silica gel to the inside of...

Page 29: ...nternet Explorer If the version number lower than 5 you need to upgrade it Can t connect externally can work locally 1 This might be caused by the firewall protection Check the internet firewall with...

Reviews: