background image


52 

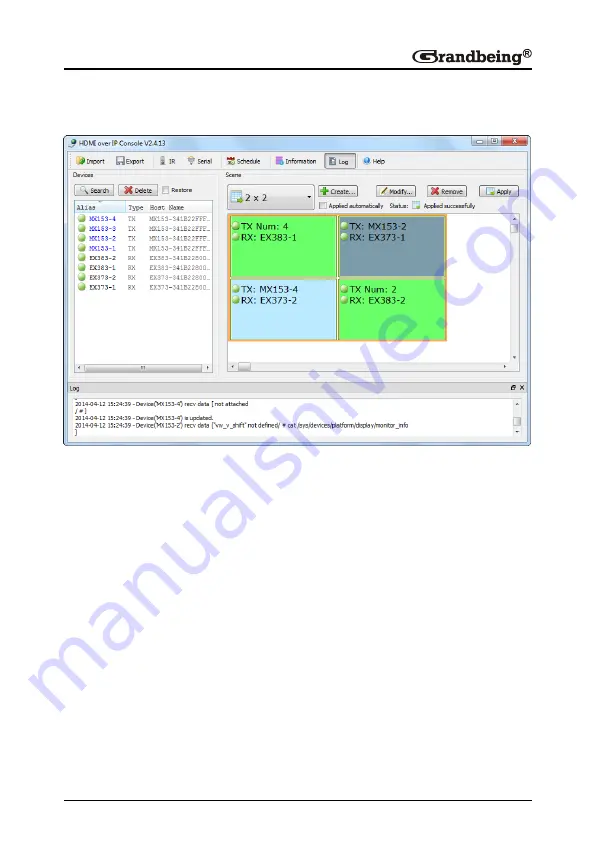
4)  Configure  the intersection  between TX and RX  in other cells  in the 

same way. The final scene is created as below. 


Then  you can see the sinks  connected to N373s  show a complete picture 
filling the screen, the sinks  connected to N383s  show  multiple  complete 
pictures with the unoccupied parts shows nothing. 

Note: 

  If N383 is linked to a single N143, the sink will show a complete 

picture filling the screen as that connected to N373. 

  After a 2 x 2 matrix is created, you can change TX and RX using 

the control software to enjoy different viewing effects. In addition, 
you can also switch between different sources in a certain N143, if 
it is connected to multiple sources via HDMI, VGA or CVBS ports. 

Setting a Video Wall 

N373 supports the video wall function in the  single host mode.  You can 
combine multiple cells of N373s to show the same video source. This section 

Summary of Contents for N373

Page 1: ...Version V1 0 1 User Manual N143 N373 N383 Presentation Switcher H 264 Encoder and Decoder ...

Page 2: ...ell ventilated 3 To prevent risk of electric shock or fire hazard due to overheating do not obstruct the unit s ventilation openings with newspapers tablecloths curtains and similar items 4 Do not install near any heat sources such as radiators heat registers stoves or other apparatus including amplifiers that produce heat 5 Do not place sources of naked flames such as lighted candles on the unit ...

Page 3: ...ations 9 N143 9 N373 N383 11 Panel 13 N143 13 N373 N383 15 Typical Application 17 One Encoder to One Decoder 17 One Encoder to Multiple Decoders 17 Multiple Encoders to Multiple Decoders 18 Switching Inputs in One Encoder 18 Video Wall Function 19 Viewing Multiple Pictures in One Sink 19 Hardware Installation 21 Operating with Control Software 23 ...

Page 4: ...indow Introduction 33 Matrix Setting Introduction 34 Creating the Scene Window 35 Scene Area Window Introduction 36 IR Remote Control 38 RS232 Remote Control 39 Configuration Files Management 40 Logs 42 Configuration Examples 43 Switching Inputs in One Encoder 43 Setting a Matrix 47 Setting a Video Wall 52 Setting Video Wall Properties 61 Troubleshooting 63 Product Service 65 Maintenance 65 Provid...

Page 5: ...puts and one stereo output extracted from the HDMI output N143 can be used with decoders N373 and N383 to provide complete end to end streaming media system N143 adopts standard H 264 MPEG 4 AVC encoding and outputs two IP streams a stream from 480p 60 to 1920x1200 60 and a 480p 60 stream N143 outputs resolutions from 480p 60 to 1920x1200 60 scaled based on the sink EDID High performance signal pr...

Page 6: ... decoder used with N143 encoder to provide complete end to end streaming media transmission system N383 can decode up to 16 IP streams When N383 receives a single IP stream it has the same decoding features as N373 s such as supporting streaming resolutions and refresh rates from 480p 60 to 1920x1200 60 and output resolutions from 480p 60 to 1920x1200 60 scaled based on the sink EDID When receivin...

Page 7: ... Use with H 264 decoder N383 to provide multi picture viewing effects up to 16 pictures in a single screen in addition to the same features as N373 Supports the HDMI input resolution up to 1080p Outputs two IP streams a stream from 480p 60 to 1920x1200 60 and a 480p 60 stream Supports output resolutions from 480p 60 to 1920x1200 60 scaled based on the sink EDID Scales and optimizes video input sig...

Page 8: ...o wall function IR pass through control for sources or sinks over IP networks RS232 for debug or to control a RS232 device Automatic aspect ratio filling following and fitting management Support TCP IP Telnet UDP IGMP and H 264 Supports PoE Supports AutoIP configuration Automatically detected by control software Uses with the IP control box TK N006 000 for matrix control and management via LAN N38...

Page 9: ...based on the number of IP streams IR pass through control for sources or sinks over IP networks RS232 for debug or to control a RS232 device Automatic aspect ratio filling following and fitting management Support TCP IP Telnet UDP IGMP and H 264 Supports PoE Supports AutoIP configuration Automatically detected by control software Uses with the IP control box TK N006 000 for matrix control and mana...

Page 10: ...ing ear N373 1 x N373 1 x Power cable 1 x Power adapter 1 x Phoenix male connector 3 5 mm 3 pins 1 x Phoenix male connector 3 5 mm 5 pins 2 x Mounting ear N383 1 x N383 1 x Power cable 1 x Power adapter 1 x Phoenix male connector 3 5 mm 3 pins 1 x Phoenix male connector 3 5 mm 5 pins 2 x Mounting ear ...

Page 11: ... 20 Watts Input Video Signal 1 2 volts p p Input DDC Signal 5 volts p p TTL Data Rate 1K 40Mbps configurable Maximum Distance 100 meters Video Format Supported Input HDMI 480i 480p 576i 576p 720p 1080i 1080p VGA 640x480 60 800x600 60 1024x768 60 1280x720 60 1280x768 60 1280x800 60 1280x1024 60 1360x768 60 1400x1050 60 1440x900 60 1600x1200 60 1680x1050 60 1920x1080 60 1920x1200 60 ...

Page 12: ...scharge Surge Protection Voltage 1kV Operating Temperature 32 F to 95 F 0 C to 35 C 10 to 90 non condensing Storage Temperature 4 F to 140 F 20 C to 70 C 10 to 90 non condensing System Requirements HDMI equipped source devices and sinks connected with HDMI cables CVBS equipped source devices connected with CVBS cables VGA equipped source devices and sinks connected with VGA cables Industry standar...

Page 13: ...nnections 1 RJ45 1 AUDIO OUT 3 5mm phoenix 1 HDMI OUT 2 RS232 3 5mm phoenix 1 IR TX 3 5mm phoenix 2 IO IN 3 5mm phoenix 2 RELAY 3 5mm phoenix Power Supply 12V 2A DC 5 5mm Power Consumption 4 56 Watts Input Video Signal 1 2 volts p p Input DDC Signal 5 volts p p TTL Maximum Distance 100 meters Video Format Supported Input Ethernet 480p 60 1920X1200 60 for N373 480p 60 for N383 Output HDMI 480p 60 1...

Page 14: ... 0 C to 35 C 10 to 90 non condensing Storage Temperature 4 F to 140 F 20 C to 70 C 10 to 90 non condensing System Requirements HDMI equipped sinks connected with HDMI cables Industry standard CAT5e 6 cables or above A 10 100Base T Ethernet switch or above General Case Dimensions W x H x D 390 mm x 92 mm x 220 mm 15 4 x 3 6 x 8 7 Device Dimensions W x H x D 269 mm x 24 mm x 110 mm 10 6 x 0 9 x 4 3 ...

Page 15: ...ame Description 1 Power indicator Indicates the power status 2 Work indicator Indicates the working status 3 Reset button Presses and holds this button to restore the device to its default settings 4 Button indicator Lit when a button is selected 5 Selection button Presses this button to select the input sources ...

Page 16: ... IN Connects to the HDMI source devices via the HDMI cables 2 HDMI OUT Connects to a HDMI sink via a HDMI cable 3 VGA OUT Connects to a VGA sink via a VGA cable 4 LAN port Connects to a 10 100Base T Ethernet switch with a CAT5e 6 cable 5 RS232 RS232 1 Connects to a RS232 debug device such as a computer RS232 2 Connects to a RS232 device 6 GND Grounding 7 Power Connects to the AC power supply via a...

Page 17: ...nects the audio input devices corresponded to the VAG 1 VGA 2 CVBS 1 and CVBS 2 inputs N373 N383 N373 and N383 have the same appearance Front Panel 1 2 ID Name Description 1 Power indicator On N373 N383 is powered on Off N373 N383 is powered off 2 Link indicator Steady On N143 and N373 N383 are linked to each other Flashing N143 and N373 N383 are not linked to each other Rear Panel 1 2 8 9 3 4 5 6...

Page 18: ...s to a 10 100Base T Ethernet switch with a CAT5e 6 cable 4 AUDIO OUT Reserved port 5 HDMI OUT Connects to a HDMI sink via an HDMI cable 6 RS232 RS232 1 Connects to a RS232 debug device such as a computer RS232 2 Connects to a RS232 device 7 IR TX Connects to an IR emitter 8 IO IN Reserved ports 9 Relay Reserved ports ...

Page 19: ...r N373 N383 are used you can enjoy the full screen viewing effects in the sinks connected to the N373 N383 One Encoder to Multiple Decoders If one encoder N143 and multiple decoders N373 N383 are used you can enjoy the full screen viewing effects in the sinks connected to the N373 N383 ...

Page 20: ...are linked 3 4 STERO OU T1 STERO OU T2 STERO IN MIC IN L 1 R L 2 R L 3 R L 4 R L 1 R L 2 R L 3 R L 4 R L 5 R L 6 R 3 4 STERO OU T1 STERO OU T2 STERO IN MIC IN L 1 R L 2 R L 3 R L 4 R L 1 R L 2 R L 3 R L 4 R L 5 R L 6 R 3 4 STERO OU T1 STERO OU T2 STERO IN MIC IN L 1 R L 2 R L 3 R L 4 R L 1 R L 2 R L 3 R L 4 R L 5 R L 6 R 3 4 STERO OU T1 STERO OU T2 STERO IN MIC IN L 1 R L 2 R L 3 R L 4 R L 1 R L 2...

Page 21: ...g Multiple Pictures in One Sink Based on the number of IP streams from the sources a single screen can be divided into 1 4 9 or 16 parts with each part displays a complete picture For details see the following table Decoder Number of N143 linked Viewing effects on the screen N383 1 1 complete picture filling the entire ...

Page 22: ...illing the entire screen 10 16 16 complete pictures filling the entire screen Note When the number of N143 linked to N383 is from 2 3 5 8 or 10 15 the unoccupied parts of the screen show no picture For example N383 below is linked to one or two N143s the sinks connected to N383s show one or two complete pictures One N143 Linked Two N143s Linked ...

Page 23: ... two HDMI cables and one VGA cable 2 Connect one TV to the N373 via a HDMI cable 3 Connect one TV to the N383 via a HDMI cable 4 Connect a computer N143 N373 N383 to a 10 100Base T Ethernet switch via CAT5e 6 cables 5 Connect the devices to the power supplies and start the operations Note If the switch doesn t support PoE function or is unable to provide enough power connect N373 and N383 to the p...

Page 24: ...22 3 4 STERO OU T1 STERO OU T2 STERO IN MIC IN L 1 R L 2 R L 3 R L 4 R L 1 R L 2 R L 3 R L 4 R L 5 R L 6 R ...

Page 25: ...operating system firewall to allow this software to communicate on your network Note The operation system must be Windows XP or a later version Setting a Static IP on Your Computer Before using the control software make sure that the IP address of your computer installed with this software and TX RX are in the same network segment By default TX RX uses AutoIP protocol and their IP address is 169 2...

Page 26: ...e click Internet Protocol Version 4 TCP IPv4 3 Select Use the following IP address after configuring the following settings in the provided example and then click OK IP address 169 254 2 5 Subnet mask 255 255 0 0 ...

Page 27: ...em firewall in two methods Method 1 You can configure the firewall in the Windows Firewall panel on your computer For more information see HDIP Product FAQ Method 2 You can also configure the firewall when starting the control software Then Windows Security Alert window may display If so select a network you allow this software to communicate on for example select both private and public networks ...

Page 28: ...26 Control Software Instructions Tool Bar in Control Software You can click the icons in the tool bar to quickly configure the control software ...

Page 29: ...tically at a specified time Information Enables the device information window to notify the user this device s alias device type host name and IP address Log Enables the log information window to notify the user the software operation and device communication information which can be used for troubleshooting Note It is recommended that you turn on the log only when necessary such as use for troubl...

Page 30: ...ch is completed it may take a few seconds All functions are disabled when the search is in progress 3 When the search is completed the discovered devices are displayed in the Devices list The devices will show active green circles ...

Page 31: ...d automatically restore to the previous matrix configurations If no devices are found see Question 1 in Troubleshooting for solutions Device Parameter Settings In the Devices list right click on a single or more devices all the authorized operations are displayed in the shortcut menu The following table describes how to set the device parameters ...

Page 32: ... HDMI inputs setting the bitrates profile Update Updates one or more device status such as alias type or hostname Delete Deletes one or more devices that have been searched and listed below in the Devices list To display the devices that you have searched click Search Turn On OSD Not available Turn Off OSD Not available Reset Restores one or more devices to their factory settings This operation ma...

Page 33: ...Restart Restarts a single or more devices that have been searched and listed below in the Devices list This operation may take a few seconds When restart is completed the devices will become active again Device Settings Window Introduction In the Devices list right click on any device and then choose Config to display Device Settings window Or you can also double click on any device to display thi...

Page 34: ...the device is assigned an IP address by using a router or switch with a DHCP server Static Indicates a mode in which the device is assigned an IP address manually In this case you need to enter an IP address 169 254 x x in IP Address and 255 255 0 0 in Subnet Mask IP Address Network parameters Indicates the device IP address which can be set only when the static mode is selected Subnet Mask Indica...

Page 35: ...device and search it again in the control software TX Input Window Introduction GUI Element Attribute Description Video Input VGA IN 1 CVBS IN 1 HDMI IN 1 HDMI IN 2 Chooses a source type between VGA CVBS and HDMI inputs Bitrate Sets the bitrates of video input from 1 40000Kbps Profile Sets the profile of video input such as hp ...

Page 36: ... Matrix Setting Introduction On the home screen of the control software the Scene area displays the status of all TX and RX connections GUI Element Attribute Description Create Buttons Creates a new configuration scene Modify Modifies the current configuration scene Remove Deletes the current configuration scene ...

Page 37: ...on between TX and RX Status Icons Indicates that the matrix created by devices is restored Indicates that matrix settings are in progress Indicates that matrix settings are applied successfully Indicates that matrix settings fail to be applied Creating the Scene Window 1 Click Create in the Scene area the Add Scene dialog box is displayed 2 Change the configuration layout for example setting Name ...

Page 38: ...ick OK Note To modify the current configuration layout click Modify on the tool bar Scene Area Window Introduction You can right click a cell in the Scene area to perform the operations from the shortcut menu ...

Page 39: ...delete a TX for all RX Remove All Removes all the devices in the current Scene area Combine Combines all the cells to enable the video wall mode after all are selected Split Cancels the combine function to re enable the matrix mode and have each monitor single Video Wall Properties Configures the video wall properties after it s enabled Turn OSD On Not available Turn OSD Off Not available Remote c...

Page 40: ...lls To quickly configure multiple consecutive cells hold the right mouse button and drag to select the cells to display the shortcut menu to perform the operations IR Remote Control The TX RX has an IR library built in the control software which allows the user to easily send IR commands to control source devices or sinks from your computer To perform this operation click IR in the tool bar and fo...

Page 41: ...ntrol The control software allows the user to easily send RS232 commands to a RS232 device for device configuration and control To perform this operation click Serial in the tool bar and follow the on screen instructions ...

Page 42: ...the Windows operating system would save the configuration file project hoi to the working directory of current user Viewing the Default Configuration File Directory You can view the default directory from the Import dialog box displayed by clicking Import on the tool bar ...

Page 43: ...i Otherwise errors may be encountered during program running Export or Import the Configuration File On the home screen of the control software you can Click Export on the tool bar to save the current devices and scene configuration file to a specified directory Click Import on the tool bar to import the saved configuration file from this directory ...

Page 44: ...42 Logs The logs have recorded the software operation and device communication information which can be used for troubleshooting To view the logs click Log in the tool bar ...

Page 45: ...HDMI and one VGA outputs To perform this operation do as follows Preparations One N143 Four HDMI source devices Two sinks Two computers One CAT5e 6 cable three HDMI cables two VGA cables and one CVBS cable Hardware Connection 1 Connect one DVD player one computer two Apple TVs to the N143 via two HDMI cables one CVBS cable and one VGA cable ...

Page 46: ...ith the control software to the N143 with a CAT5e 6 cable 4 Connect all the devices to the power supplies and power them on PC with Control Software Operation 1 Double click HDMIoverIPConsole exe to launch the control software Click Search as shown below to start searching TX RX and one MX153 N143 is found ...

Page 47: ...45 2 Right click MX153 to display the shortcut menu ...

Page 48: ...put to display Select TX Input dialog box 4 Select a source type between HDMI VGA and CVBS inputs Set the bitrates Set a profile Note We would recommend that you keep the bitrate and profile as default values 5 Click OK ...

Page 49: ...ht HDMI cables and nine CAT5e 6 cables Hardware Connection 1 Connect one DVD player one Xbox two Apple TVs to four N143s via four HDMI cables 2 Connect the N143s to the 10 100Base T Ethernet switch with four CAT5e 6 cables 3 Connect four TVs to the N373s and N383s via four HDMI cables 4 Connect the N373s and N383s to the switch with four CAT5 6 cables 5 Connect your computer to the switch with a C...

Page 50: ...6 R 3 4 STERO OU T1 STERO OU T2 STERO IN MIC IN L 1 R L 2 R L 3 R L 4 R L 1 R L 2 R L 3 R L 4 R L 5 R L 6 R 3 4 STERO OU T1 STERO OU T2 STERO IN MIC IN L 1 R L 2 R L 3 R L 4 R L 1 R L 2 R L 3 R L 4 R L 5 R L 6 R Operation 1 Double click HDMIoverIPConsole exe to launch the control software Click Search as shown below to start searching TX RX and four MX153s N143 two EX373s N373 and two EX383s N383 ...

Page 51: ...49 2 Click Create to create a 2 x 2 configuration scene 3 Click OK a 2 x 2 configuration scene is created as shown below ...

Page 52: ...Configure the intersection between TX and RX in different cells in the Scene area 1 Right click the first cell choose Change RX and then RX383 1 2 Right click the first cell choose Change TX and then MX153 1 ...

Page 53: ...51 3 Repeat the above steps to select MX153 2 MX153 3 MX153 4 for EX383 1 to configure the intersection between TX and RX in the first cell And click Apply to make the changes to TX and RX take effect ...

Page 54: ...ed to a single N143 the sink will show a complete picture filling the screen as that connected to N373 After a 2 x 2 matrix is created you can change TX and RX using the control software to enjoy different viewing effects In addition you can also switch between different sources in a certain N143 if it is connected to multiple sources via HDMI VGA or CVBS ports Setting a Video Wall N373 supports t...

Page 55: ...the 10 100Base T Ethernet switch with a CAT5e 6 cable 3 Connect four TVs to the N373s via four HDMI cables 4 Connect the N373s to the switch with four CAT5 6 cables 5 Connect your computer to the switch with a CAT5e 6 cable 6 Connect all the devices to the power supplies and power them on Note If the switch doesn t support PoE function please remember to plug in the power adapters of Transmitters ...

Page 56: ...54 N143 and four EX373s N373 are found 2 Click Create to create a 2 x 2 configuration scene And click OK a 2 x 2 configuration scene is created as shown below ...

Page 57: ...55 3 Configure the intersection between TX and RX in different cells in the Scene area ...

Page 58: ...56 1 Right click the first cell choose Change RX and then EX373 1 2 Right click the first cell choose Change TX and then MX153 1 ...

Page 59: ...1 for EX373 2 EX373 3 EX373 4 respectively in the other cells And click Apply to make the changes to TX and RX take effect The final scene is created as below 4 Right click on any cell and choose Select All or press Ctrl A to select all the cells ...

Page 60: ...58 5 Right click on any cell and choose Combine to display the Video Wall Properties window ...

Page 61: ...59 6 Create a name such as 2 x 2 for the video wall 7 Enter the measurements of the sink Bezel and Gap Compensation By default keep the OW OH VW VH values unchanged And then click OK ...

Page 62: ...inside height of the sink in mm 8 Click Apply to make the video wall settings take effect The video wall is configured successfully as shown below You can identify the video wall is created in the control software by the double green lines across this 2 x 2 configuration scene Note You can easily right click on the video wall created and choose Change TX this will allow simple switching of any of ...

Page 63: ... outcome for any project Basic Settings You can right click the video wall created and choose Video Wall Properties the Video Wall Properties window is displayed Then click Basic Settings tab this will allow you to simultaneously configure the settings on all the sinks Note We would recommend you leave the settings as default values GUI Element Description Name Indicates the name of the video wall...

Page 64: ...mm VW Indicates inside width of the sink in mm VH Indicates inside height of the sink in mm Advanced Settings Click Advanced Settings tab this will allow you to precisely configure the settings on each sink Note We would recommend you leave the settings as default values ...

Page 65: ...Programs highlight Configuration tool for HDMI over IP check Home Work Private and Public Check the IP address and subnet mask of your computer The network segment for IP address is 169 254 x x and the subnet mask is 255 255 0 0 the computer and TX RX should be in the same network segment For more information see Setting a Static IP on Your Computer Check the IGMP snooping status in the switch Thi...

Page 66: ...60 1600x1200 60 1680x1050 60 1920x1080 60 1920x1200 60 CVBS 480i NTSC Check that TX has been switched to the right source type connected via the HDMI VGA or CVBS ports Check that TX and RX are linked based on status of the Link indicators on RX For details see description in Panel If link exceptions exist link TX and RX using the control software on your computer Check that your sink is switched t...

Page 67: ...ce the unit beyond that described in these operating instructions Refer all other servicing to authorized servicing personnel 3 Replacement parts When parts need replacing ensure the service uses parts specified by the manufacturer or parts that have the same characteristics as the original parts Unauthorized substitutes may result in fire electric shock or other hazards 4 Safety check After repai...

Page 68: ...imited Warranty period there will be no charge for labor During the Parts warranty period there will be no charge for parts You must mail in your product during the warranty period This Limited Warranty is extended only to the original purchaser and only covers product purchased as new A purchase receipt or other proof of original purchase date is required for Limited Warranty service Warranty Lim...

Page 69: ... use of this product or arising out of any breach of this warranty As examples this excludes damages for lost time cost of having someone remove or re install an installed unit if applicable travel to and from the service location loss of or damage to media or images data or other recorded content The items listed are not exclusive but are for illustration only 3 Parts and service which are not co...

Page 70: ...dcast Signal DHCP Dynamic Host Configuration Protocol EDID Extended Display Identification Data HDMI High Definition Multimedia Interface HP High Profile IR Infra red LAN Local Area Networks MP Main Profile OSD On Screen Display PoE Power over Ethernet RX Receiver TX Transmitter VGA Video Graphics Array ...

Page 71: ...dbeing Technology Co Ltd Address B 301 Science and Technology Building Phase11 1057 Nanhai Rd Nanshan District Shenzhen P P China Tel 86 755 21620566 Fax 86 755 21620564 Post Code 518067 www grandbeing biz ...

Reviews: