3
Operating Instructions and Parts Manual
7J823, 7J824
12N408,12N409,12N410
12N411,12N412,12N413
Setup and Installation
Carefully remove the outer carton and unpack the
legs, casters, and assembly hardware.
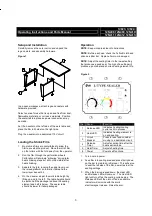
Figure 1
1
In an open workspace, attach legs and casters with
hardware provided.
Select an area for use that is open and free from dust,
flammable materials, or corrosive materials. Position
the sealer table in place so power connections may
be made.
Set the L-sealer on the left side of the work table and
place the film roll holder on the right side.
Plug the L-sealer into a dedicated 115V circuit.
Loading the Shrink Film
1. Most shrink films are centerfolded to allow the
film to envelop the product. Place the roll of film
on the rollers with the fold away from the operator.
2. Run the film through the perforation wheels.
Perforation will eliminate “pillowing” during later
heat shrinking steps but will not be visible after
heat shrinking.
3. Separate the fold, running the upper layer over
the raised platform on the roller table and the
lower layer beneath it.
4. On the L-sealer, adjust the work table height by
lifting up and to the left. The table height should
be set so half the package is above the sealing
element and half is below. The sealer table
should be lower for taller packages.
Operation
NOTE: Keep work area clear of obstructions.
NOTE: Before each use, check the Teflon® cloth and
silicone rubber bar. Replace if worn or damaged.
NOTE: Adjust the sealing timer to the lowest setting
that produces a good seal. Too high of a setting will
produce a poor seal and shorten heating element life.
Figure 2
○
1
○
2
○
3
○
4
○
5
○
6
No.
Panel
Function
1
Release LED
Indicates heating/cooling
cycle is still in process.
2
Heat LED
Indicates heating element is
on and sealing.
3
Circuit
Breaker
Press to reset and consider
moving to a dedicated circuit.
4
Release
Timer
Adjusts cooling time after the
heat seal is made.
5
Heat Timer
Adjusts heating time.
6
Power
Powers all functions.
1. Turn on main power.
2. Feed film into sealing area
and press firmly down
on the bar to create an initial seal. This will serve
to seal the left side of the film, as well as test the
sealing settings.
3. When the bar is pressed down, the Heat LED
and Release LED will come on. The Heat LED
light will turn off as the cooling cycle begins. The
Release LED will then turn off and an audible
indicator will coincide with the arm’s
electromagnet release. Raise the arm.


