background image

Troubleshooting 

30

3A7656C

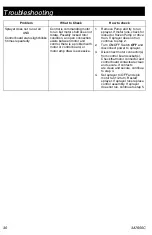
Sprayer does not run at all

AND

Control board status light blinks 

5 times repeatedly

Control is commanding motor 

to run but motor shaft does not 

rotate. Possibly locked rotor 

condition, an open connection 

exists between motor and 

control, there is a problem with 

motor or control board, or 

motor amp draw is excessive.

1.

Remove Pump and try to run 

sprayer. If motor runs, check for 

locked or frozen Pump or drive 

train. If sprayer does not run, 

continue to step 2.

2.

Turn ON/OFF Switch 

OFF

 and 

disconnect power to sprayer.

3.

Disconnect motor connector(s) 

from control board socket(s). 

Check that motor connector and 

control board contacts are clean 

and secure. If contacts 

are clean and secure, continue 

to step 4.

4.

Set sprayer to OFF and spin 

motor fan 1/2 turn. Restart 

sprayer. If sprayer runs replace 

control assembly. If sprayer 

does not run, continue to step 5.

Problem

What to Check

How to check

Summary of Contents for SaniSpray HP 130

Page 1: ... usage of the equipment Save these instructions Important Medical Information Read the medical alert card provided with the sprayer It contains injection injury treatment information for a doctor Keep it with you when operating the equipment WARNING CHEMICAL HAZARD To prevent serious injury Follow all directions and requirements on disinfectant label It is a violation of Federal law to use an EPA ...

Page 2: ...l Spray Gun and Airless Hose 16 How to Spray 17 Choose Your Spray Tip 17 Starting Your Spray and Adjusting Pressure 18 Clear Tip Clog 18 Cleanup 19 Clean the Gun 22 Storage 22 Maintenance 23 Recycling and Disposal 24 End of Product Life 24 Troubleshooting 25 Mechanical Fluid Flow 25 Electrical 28 Parts 34 Parts List 34 Accessories and Labels 35 Wiring Diagrams 36 120V 110V 36 230V 37 Technical Spe...

Page 3: ...3 Models 110474 Certified to CAN CSA C22 2 No 68 Conforms to UL 1450 Maximum Working Pressure 1000 psi 6 9 MPa 69 bar VAC Model 120 USA 25R793 230 Europe Multi 25R947 110 UK 25R951 240 AP Multi 25R955 100 JP TW 25T301 ...

Page 4: ...safety warnings in this manual NON ALCOHOL This type of disinfectant contains active ingredients such as aldehydes phenols quaternary ammonium compounds sodium hypochlorite bleach peroxyacetic acid hydrogen peroxide and hypochlorous acid Your sprayer is compatible with this type of material Before using your disinfectant sprayer read this manual for complete instructions on proper use and safety w...

Page 5: ...essure spray is able to inject toxins into the body and cause serious bodily injury that can result in amputation In the event that injection occurs get immediate surgical treatment Use only to spray surfaces Do not spray humans or animals Do not point spray tip at anyone or place any part of your body in front of tip For example do not try to stop leaks with any part of the body Always use the sp...

Page 6: ...flushing cleaning or servicing Do not spray pump assembly Do not smoke in the spray area or spray where sparks or flame is present Do not operate light switches engines or similar spark producing products in the spray area Keep area clean and free of disinfectant containers rags and other flammable materials Know the contents of the disinfectants being sprayed Read all Safety Data Sheet SDS and co...

Page 7: ...rs and other body parts Keep clear of moving parts Do not operate equipment with protective guards or covers removed Pressurized equipment can start without warning Before checking moving or servicing equipment follow the Pressure Relief Procedure and disconnect all power sources PERSONAL PROTECTIVE EQUIPMENT Wear appropriate protective equipment when in the work area to help prevent serious injur...

Page 8: ... When repair or replacement of the cord or plug is required do not connect the grounding wire to either power terminal The wire with insulation having an outer surface that is green with or without yellow stripes is the grounding wire Check with a qualified electrician or serviceman when the grounding instructions are not completely understood or when in doubt as to whether the product is properly...

Page 9: ...Whip Hose D Prime Spray Valve E Hose Guard F Spray Tip Guard G Spray Tip H Flex Plus Airless Spray Gun J Airless Hose K Power Cord L Trigger Lock M Drain Tube N Suction Tube P Pump R Fluid Outlet Fitting S Hanger T Inlet Strainer U Finger Guard V Pail Hook Model Serial Tag bottom of unit not shown ...

Page 10: ...ords may reduce sprayer performance Pails For disinfectants with alcohol active ingredients Follow local code Use only conductive metal pails placed on a grounded surface such as concrete Do notplacepailona non conductive surface such as paper or cardboard which interrupts grounding continuity Always ground a metal pail connect a ground wire to the pail Clamp one end to the pail and the other end ...

Page 11: ...se wrenches to tighten securely 3 Insert other end of Airless Whip Hose through Hose Guard at base of Spray Gun Connect to Spray Gun Use wrenches to tighten securely 4 Remove Spray Tip Guard assembly from Spray Gun NOTE This sprayer can be configured to spray with two guns To setup a Replace plug in manifold with provided fitting b Follow Setup instructions 1 4 for assembly of second Airless Hose ...

Page 12: ...gered accidentally 3 Turn Pressure Control Knob to the lowest setting 4 Put Drain Tube in a pail and turn Prime Spray Valve down to PRIME position to relieve pressure This equipment stays pressurized until pressure is manually relieved To help prevent serious injury from pressurized fluid such as skin injection splashing fluid and moving parts follow the Pressure Relief Procedure whenever sprayer ...

Page 13: ...he Spray Tip or Airless Hose is clogged or that pressure has not been fully relieved a VERY SLOWLY loosen the Spray Tip Guard retaining nut or the Airless Hose end coupling to relieve pressure gradually b Loosen the nut or coupling completely c Clear hose or tip obstruction Trigger Lock Always engage the Trigger Lock when sprayer is stopped to prevent the Spray Gun from being triggered accidentall...

Page 14: ...e sprayer before using it for the first time ti24640a ti24651a 1 Perform Pressure Relief Procedure page 12 2 Make certain ON OFF Switch is OFF 3 Place Suction Tube with Drain Tube in grounded metal pail partially filled with warm soapy water See Grounding page 10 4 Turn Prime Spray Valve down to PRIME position 5 Plug power supply cord into a properly grounded electrical outlet ...

Page 15: ...ow fluid to flow out of drain tube for 1 to 3 minutes 9 Turn ON OFF Switch to OFF position Fill Pump 1 Turn Pressure Control Knob to lowest setting 2 Turn ON OFF Switch to ON position 3 Place Suction Tube in pail of disinfectant Place Drain Tube in waste bucket 4 Turn Pressure Control Knob to Prime Slowtostartmotor Waituntildisinfectant flows from the Drain Tube 5 Turn ON OFF Switch to OFF positio...

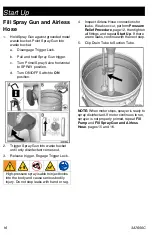
Page 16: ...e trigger Engage Trigger Lock 4 Inspect Airless Hose connections for leaks If leaks occur perform Pressure Relief Procedure page 12 then tighten all fittings and repeat Start Up If there are no leaks continue with the next step 5 Clip Drain Tube to Suction Tube NOTE When motorstops sprayerisreadyto spray disinfectant If motor continues to run sprayer is not properly primed repeat Fill Pump and Fil...

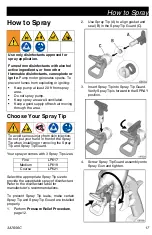
Page 17: ... Guard Verify Spray Tip is forward in the SPRAY position 4 Screw Spray Tip Guard assembly onto Spray Gun and tighten Use only disinfectants approved for spray application Fumes from disinfectants with alcohol active ingredients or from other flammable disinfectants can explode or ignite Pump motor generates sparks To prevent fumes from exploding or igniting Keep pump at least 20 ft from spray area...

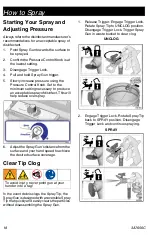
Page 18: ...ray of disinfect This will help reduce overspray 6 AdjusttheSprayGun sdistance fromthe surface and your hand speed to achieve the desired surface coverage Clear Tip Clog To avoid injury never point gun at your hand or into a rag In the event debris clogs the Spray Tip the Spray Gun is designed with a reversible Spray Tip that quickly and easily clears the particles without disassembling the Spray ...

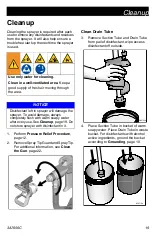
Page 19: ... 3 Remove Suction Tube and Drain Tube from pail of disinfectant wipe excess disinfectant off outside 4 Place Suction Tube in bucket of warm soapy water Place Drain Tube in waste bucket For disinfectants with alcohol active ingredients ground the bucket according to Grounding page 10 Use only water for cleaning Clean in a well ventilated area Keep a good supply of fresh air moving through the area ...

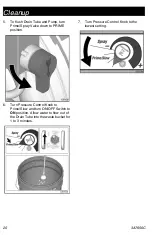
Page 20: ... Prime Spray Valve down to PRIME position 6 Turn Pressure Control Knob to Prime Slow and turn ON OFF Switch to ON position Allow water to flow out of the Drain Tube into the waste bucket for 1 to 3 minutes 7 Turn Pressure Control Knob to the lowest setting ...

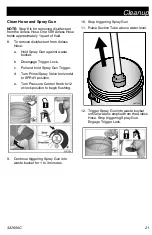
Page 21: ...t b Disengage Trigger Lock c Pull and hold Spray Gun Trigger d Turn Prime Spray Valve horizontal to SPRAY position e Turn Pressure Control Knob to 12 o clock position to begin flushing 9 Continue triggering Spray Gun into waste bucket for 1 to 3 minutes 10 Stop triggering Spray Gun 11 Raise Suction Tube above water level 12 Trigger Spray Gun into waste bucket until all water is emptied from the Ai...

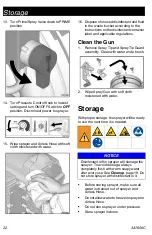
Page 22: ...n 1 Remove Spray Tip and Spray Tip Guard assembly Clean with water and a brush 2 Wipe Spray Gun with soft cloth moistened with water Storage With proper storage the sprayer will be ready to use the next time it is needed NOTICE Before storing sprayer make sure all water is drained out of sprayer and Airless Hose Do not allow water to freeze in sprayer or Airless Hose Do not store sprayer under pre...

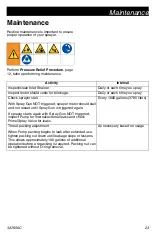
Page 23: ...n NOT triggered sprayer motor should stall and not restart until Spray Gun is triggered again If sprayer starts again with Spray Gun NOT triggered inspect Pump for internal external leaks and check Prime Spray Valve for leaks Every 1000 gallons 3785 liters Throat packing adjustment When Pump packing begins to leak after extended use tighten packing nut down until leakage stops or lessens This allo...

Page 24: ...ocedure page 12 Drain and dispose of fluids according to applicable regulations Refer to the material manufacturer s Safety Data Sheet Remove motors batteries circuit boards LCDs liquid crystal displays and other electronic components Recycle according to applicable regulations Donotdisposeofelectroniccomponents with household or commercial waste Deliver remaining product to a recycling facility ...

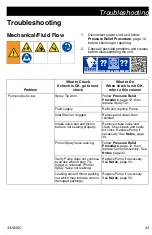
Page 25: ...e Spray Tip Fluid supply Refill and reprime Pump Inlet Strainer clogged Remove and clean then reinstall Intake valve ball and piston ball are not seating properly Remove intake valve and clean Check balls and seats for nicks Replace Pump if necessary See Notes page 33 Prime Spray Valve leaking Follow Pressure Relief Procedure page 12 then replace Control assembly See Notes page 33 Verify Pump does...

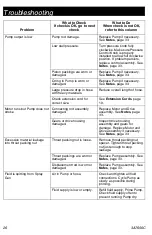
Page 26: ...ed Replace Motor and Drive assembly See Notes page 33 Gears or drive housing damaged Inspect drive housing assembly and gears for damage Replace Motor and Drive assembly if necessary See Notes page 33 Excessive material leakage into throat packing nut Throat packing nut is loose Remove throat packing nut spacer Tighten throat packing nut just enough to stop leakage Throat packings are worn or dama...

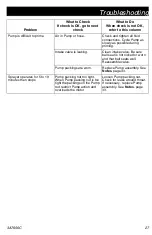
Page 27: ...ssemble valve Pump packings are worn Replace Pump assembly See Notes page 33 Sprayer operates for 5 to 10 minutes then stops Pump packing nut too tight When Pump packing nut is too tight the packings on the Pump rod restrict Pump action and overloads the motor Loosen Pump packing nut Check for leaks around throat If necessary replace Pump assembly See Notes page 33 Problem What to Check If check i...

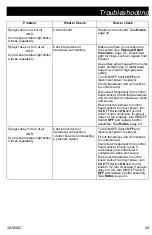
Page 28: ...rror code for example two blinks equals CODE 02 Error Code Messages Keep clear of electrical and moving parts during troubleshooting procedures To avoid electrical shock hazards when covers are removed for troubleshooting wait 5 minutes after disconnecting Power Cord for stored electricity to dissipate CODE MESSAGE ACTION 02 HIGH PRESSURE DETECTED RELIEVE PRESSURE Check for clogs Use only Graco Ai...

Page 29: ...board socket Check that transducer and control board contacts are clean and secure Reconnect transducer to control board socket Connect power turn ON OFF Switch ON and control knob 1 2 turn clockwise If sprayer does not run properly turn ON OFF Switch OFF and replace Control assembly See Notes page 33 Sprayer does not run at all AND Control board status light blinks 3 times repeatedly Check transd...

Page 30: ...p and try to run sprayer If motor runs check for locked or frozen Pump or drive train If sprayer does not run continue to step 2 2 Turn ON OFF Switch OFF and disconnect power to sprayer 3 Disconnect motor connector s from control board socket s Check that motor connector and control board contacts are clean and secure If contacts are clean and secure continue to step 4 4 Set sprayer to OFF and spi...

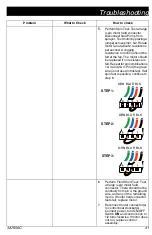
Page 31: ... 4 the green wire is not used in this test If all spin test is positive continue to step 6 6 Perform Field Short Test Test at large 4 pin motor field connector There should not be continuity from pin 4 the ground wire and any of the remaining 3 pins If motor field connector tests fail replace motor 7 Reconnect motor connector s to control board socket s Connect power turn ON OFF Switch ON and cont...

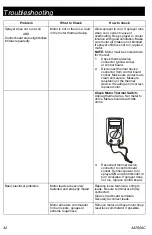
Page 32: ...Make sure contacts are clean and secure Measure resistance of the thermal device If reading is not correct replace motor Check Motor Thermal Switch Unplug thermal wires Set meter to ohms Meter should read 100k ohms 3 Reconnect thermal device connector to control board socket Connect power turn sprayerONandcontrolknob1 2 turn clockwise If sprayer does not run replace control board Basic electrical ...

Page 33: ...Notes 3A7656C 33 Notes ...

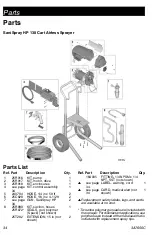
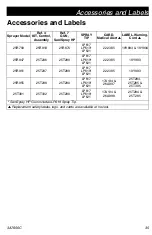
Page 34: ...HP 2 8 25R899 KIT suction hoses 1 25R872 SEALS gun polymer 5 pack not shown 25T282 EXTENSION 15 in not shown 2 16A005 FITTING 1 4 NPSM x 1 4 NPT SST not shown see page 34 LABEL warning cord 1 see page 34 CARD medical alert not shown 1 Replacement safety labels tags and cards are available at no cost Two extra polymer gun seals are included with the sprayer For disinfectant applications use polymer...

Page 35: ...P617 LP619 LP621 222385 19Y893 19Y894 25R947 25T286 25T289 LP617 LP619 LP621 222385 19Y993 25R951 25T287 25T289 LP617 LP619 LP621 222385 19Y993 25R955 25T288 25T290 LP617 LP619 LP621 17A134 26A997 25T284 25T285 25T305 25T301 25T302 25T290 LP617 LP619 LP621 17A134 26A998 25T284 25T285 SaniSpray HP Gun includes LP619 Spray Tip Replacement safety labels tags and cards are available at no cost ...

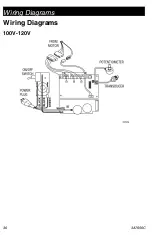
Page 36: ...Wiring Diagrams 36 3A7656C Wiring Diagrams 100V 120V ...

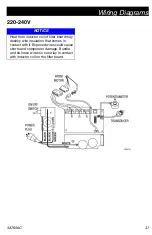
Page 37: ...E Heat from inductor coil of filter board may destroy wire insulation that comes in contact with it Exposed wires could cause shorts and component damage Bundle and tie loose wires so none lay in contact with inductor coil on the filter board ...

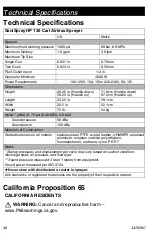
Page 38: ...69 bar 6 9 MPa Maximum Delivery 1 0 gpm 3 8 lpm Maximum Tip Size Single Gun 0 031 in 0 79 mm Two Guns 0 023 in 0 58 mm Fluid Outlet npsm 1 4 in Generator Minimum 4000 W Power Requirements 100 120V 15A 1Ø or 220 240V 9A 1Ø Dimensions Height 28 25 in Handle down 38 25 in Handle up 71 8 cm Handle down 97 2 cm Handle up Length 23 25 in 59 1 cm Width 20 5 in 52 1 cm Weight 75 lb 34 kg Noise dBa 70 psi ...

Page 39: ...hin two 2 years of the date of sale GRACO MAKES NO WARRANTY AND DISCLAIMS ALL IMPLIED WARRANTIES OF MERCHANTABILITY AND FITNESS FOR A PARTICULAR PURPOSE IN CONNECTION WITH ACCESSORIES EQUIPMENT MATERIALS OR COMPONENTS SOLD BUT NOT MANUFACTURED BY GRACO These items sold but not manufactured by Graco such as electric motors switches hose etc are subject to the warranty if any of their manufacturer G...

Page 40: ...apolis International Offices Belgium China Japan Korea GRACO INC AND SUBSIDIARIES P O BOX 1441 MINNEAPOLIS MN 55440 1441 USA Copyright 2020 Graco Inc All Graco manufacturing locations are registered to ISO 9001 www graco com Revision C May 2020 Graco Information For the latest information about Graco products visit www graco com For patent information see www graco com patents TO PLACE AN ORDER co...

Reviews: