


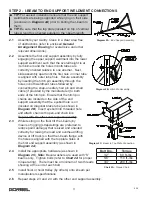
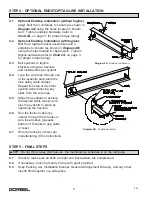


STEP 4 - OPTIONAL ENDSTOP/TAGLINE INSTALLATION
4.1 Optional Endstop Installation (without tagline)
only:
Bolt the 4 endstops to I-beam (as shown in
Diagram 4A
) using the holes located in I-beam
web. Tighten endstop hardware (refer to
Chart 2A
, on page 3, for proper torque rating).
4.2 Optional Endstop Installation (with tagline):
Bolt the 2 tagline bracket assemblies and 2
endstops to I-beam (as shown in
Diagram 4B
)
using the holes located in I-beam web. Tighten
tagline hardware (refer to
Chart 2A
, on page 3,
for proper torque rating).
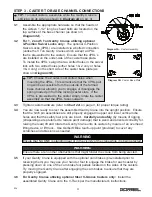
4.3
Bolt eyebolts to tagline
brackets using two hexnuts
and lockwashers per eyebolt.
4.4
Loop the wire rope through one
of the eyebolts and clamp the
loop using cable clamps.
Repeat this step at the other
eyebolt while removing any
slack from the wire rope.
4.5
Adjust the eyebolts to achieve
the desired cable tension and
lock the eyebolts in place by
tightening the hexnuts.
4.6
Run the festoon cable (by
others) through the S-hooks or
wire rope trolleys (squeeze
bottom of S-hooks to grip cable
or hose).
4.7
Wire the hoist (by others) per
manufacturing (SIC) instructions.
STEP 5 - FINAL STEPS
5.1
Check to make sure all bolts are tight and lockwashers are compressed.
5.2
If necessary, touch up Gantry Crane with paint provided.
5.3
Keep Packing List, Installation Manual, General Arrangement Drawing, and any other
inserts filed together in a safe place.
Diagram 4A.
Endstop Installation.
Diagram 4B.
Tagline Assembly.
5
9/19
TIP:
Do not throw away this manual: the maintenance schedule is on the last page.


