- 14 -
Operating
with the main unit
1.
Press
(8, 31) buttons. The display indicates
.
2.
Select your desired music, photos or videos, etc and play the connected
as usual.
3.
You can select the next or previous music tracks by pressing
/
TUNING
or
/ TUNING
(20, 35)
buttons repeatedly. Press
PLAY/PAUSE (14, 47) to play or pause.
4.
The numerical buttons 2,4,5,6 and 8 on the remote control can be used to operate the menu and
other functions of the
. Press MENU/6 button to show the menu screen of the
, then
use
/2 or
/8 button to highlight the item you want to operate, then press ENTER/5 button to
confirm. Press
/4 buttons once to repeat one track, press twice to repeat all. (Available in
play only)
5.
Press VOLUME
(18,48) button to adjust to desired sound level.
Note
: If want to watch photos and videos from the
, please connect the VIDEO and AUDIO
sockets on the rear of the unit as described in the "Setting up and Connecting" section of this
user guide.
Charging your
Note: Please make sure you are using the correct dock adaptor for your
and that it is properly
into
dock on the top of the unit. Failure to do so may cause damage to your
.
While your
is docked in the system, it recharges until fully charged. Note that other non-docking
types of
will NOT charge.
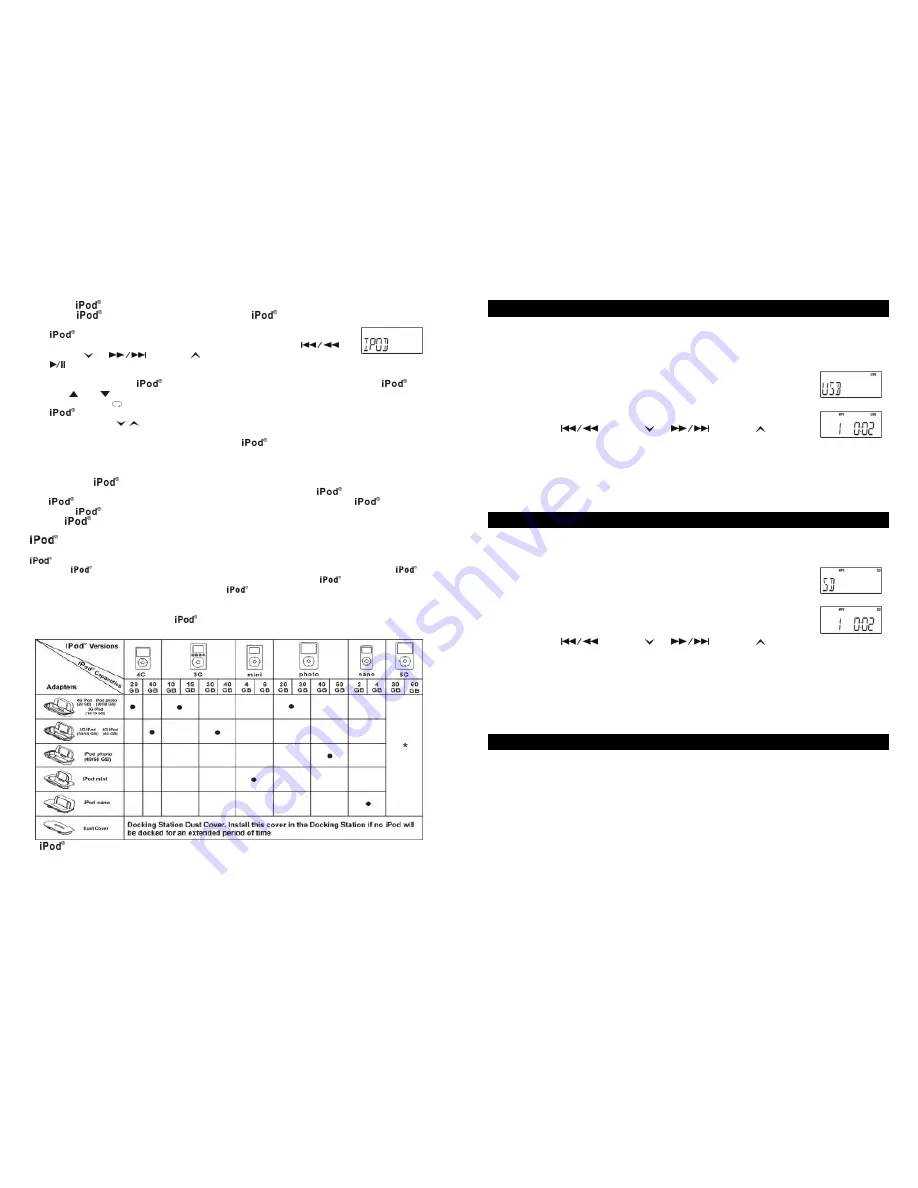
Adapter Information
This system includes 5 different adapters designed to allow you to securely connect any “dockable”
model to the docking station. Refer to the chart below to select the proper adapter for your
particular
model and insert that adapter into the docking station before connecting your
.
*
No adapters are provided for the 5G (fifth generation) 30GB and 60GB
s with video capability.
Please use the adapters that were included these
s at time of purchase. They will fit properly into
the docking station of this system.
We have also included one flat adapter with no opening at all. This serves, as a dust cover that can be
inserted in the docking station, if no
will be connected to the system for an extended period of
time.
is a registered trademark of Apple Computer Corporation.
- 15 -
PLAYING MP3/WMA MUSIC FILES FROM A USB DEVICE
Music files in MP3 or WMA format can be played by connecting a suitable USB device containing such
files into the USB port on the front of the unit.
1.
Press the CD/USB/SD (9, 46) button to select USB mode. The display will
show USB.
2.
Connect the USB device to the USB port (16) on the front panel of the unit.
After a few seconds, the unit detects the USB devise automatically and
starts to play the first MP3 or WMA music file.
3.
Press FOLDER- (51) or (41) repeatedly to select the desired
folder number.
4.
Press the
/ TUNING
or
/ TUNING
(20, 35)
buttons repeatedly to select the desired file number in the selected folder.
Direct folder and file access can be made by using the numerical buttons on the remote control.
Note:
Before removing a USB device from the unit, make sure that the current file is stopped. Do not
remove the USB device whilst music files are playing.
PLAYING MP3/WMA MUSIC FILES FROM A SD/MMC CARD
Music files in MP3 or WMA format can be played by connecting a suitable SD/MMC card containing
such files into the card slot on the front of the unit.
1.
Press the CD/USB/SD (9, 46) button repeatedly to select SD/MMC mode.
The display will show SD.
2.
Insert SD or MMC card into SD slot (4) on the front panel of the unit. After a
few seconds, the unit detects the SD or MMC card automatically and starts
to play the first MP3 or WMA music file.
3.
Press the FOLDER- (51) or (41) button repeatedly to select the
desired folder numb er.
4.
Press the
/ TUNING
or
/ TUNING
(20, 35)
buttons repeatedly to select the desired file number in the selected folder.
Note
: Before removing a SD/MMC card from the unit, make sure that the current file is stopped. Do
not remove the SD/MMC
card whilst music files are playing.
CARE AND MAINTENANCE
COMPACT DISCS
²
Treat the disc carefully. Handle the disc only by its edges. Never allow your fingers to contact with the
shiny, unprinted side of the disc.
²
Do not attach adhesive tape, stickers etc., to the disc label.
²
Clean the disc periodically with a soft, lint-free, dry cloth. Never use detergents or adhesive cleaners to
clean the disc. If necessary, use a CD cleaning kit.
²
If a disc skips or gets stuck on a section of the disc, it is probably dirty or damaged (scratched).
²
When cleaning the disc, wipe in straight lines from the center of the disc to the edge of the disc. Never
wipe in circular motions.
²
To remove a disc from its storage case, press down on the center of the case and lift the disc out,
holding it carefully by the edges.


