- 6 -
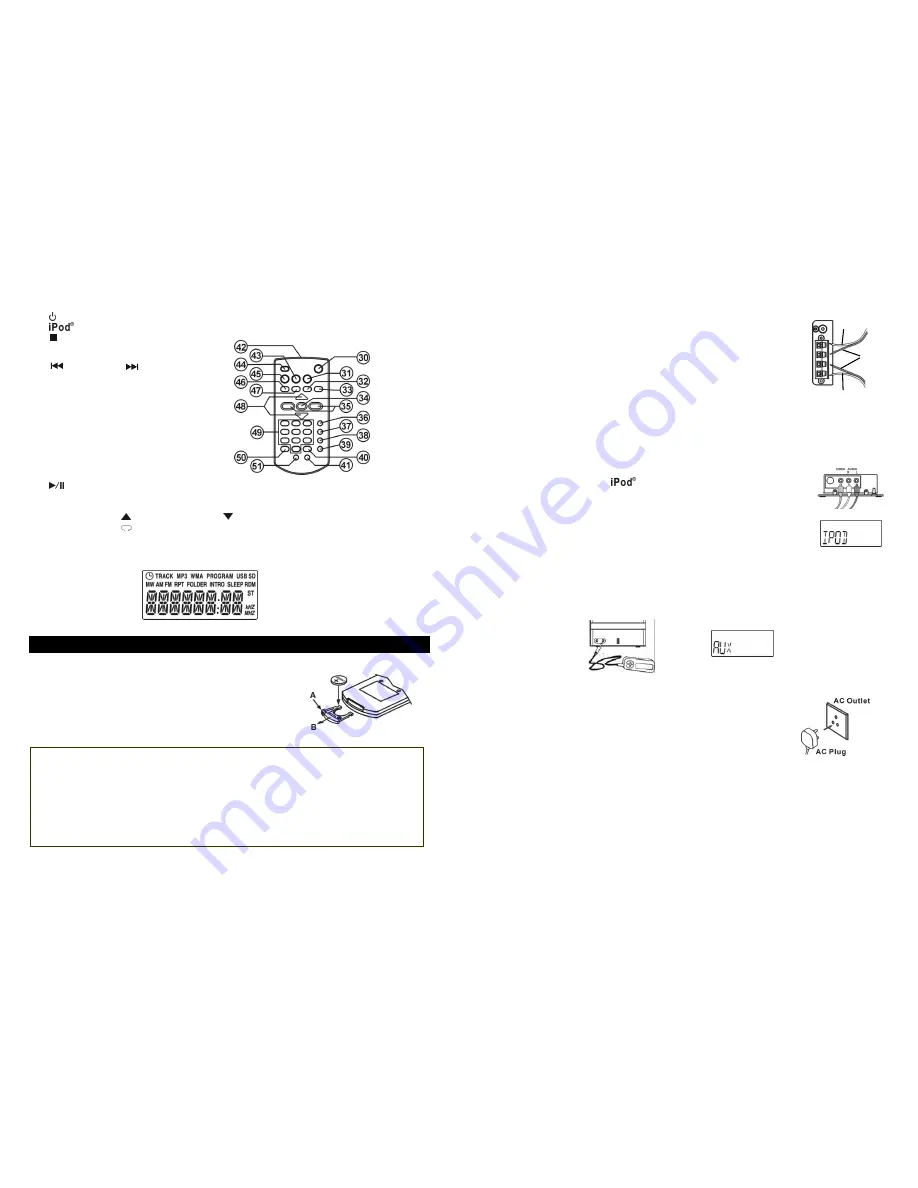
Remote Control
30.
Button
31.
Button
32.
STOP/PS+ Button
33. PLAY MODE/ST/MO Button
34. SLEEP/12/24HR Button
35.
/TUNING- and
/ Buttons
36. ID3 Button
37. TIMER Button
38. PROG/CLK ADJ Button
39. OPEN/CLOSE Button
40. MODE/REMAIN Button
41. Button
42. Infrared Transmitter
43. AUX Button
44. MUTE Button
45. TUNER/BAND Button
46. CD/SD/USB Button
47.
/ PS- Button
48. VOL +/- Button
49. Numerical 0 - 9 Buttons
- “2” button with
roll up, “8” button with
roll down
- “4” button with
Repeat
, “5” button with
ENTER
, “6” button with
MENU
50. EQ Button
51. FOLDER - Button
Display segment
SETTING UP AND CONNECTING
Replacing battery for the Remote Control
The remote control battery is already installed at the factory. If the
remote control stops operating, replace the battery with a new one.
1.
Squeeze the notched tab A while pulling the battery door latch B
out to take the battery holder out.
2.
Insert a “CR2025” 3V lithium battery. Make sure the polarity (the
+ and – side of the battery) is correct.
3.
Replace the battery holder back in the remote control.
BATTERY PRECAUTIONS
Follow these precautions when using battery in this device.
1.
Use only the size and type of battery specified.
2.
Be sure to follow the correct polarity when installing the battery as indicated in the battery
compartment. Reversed polarity may cause damage to the device.
3.
If the device is not to be used for a long period of time, remove the battery to prevent damage
or injury from possible battery leakage.
4.
Do not try to recharge battery, it is not intended to be recharged and doing so may cause the
battery to rupture or leak.
- 7 -
Speaker connection
1.
To insert the speaker cable, push down the terminal lever of the RIGHT
Speaker Terminal (27) and LEFT Speaker Terminal (28).
2.
Please ensure the cables are connected into the speaker terminals with
the correct polarities. Connect the left speaker to the terminals L and
the right speaker to the terminals R.
Headphone connection
You can use headphones (not included) to listen in privacy. Insert the
headphones 3.5mm plug into Phones Socket (12). Use corresponding
adaptors (specialist shops) if you have different plugs. The speakers will cut off
automatically when the headphones are being used.
Subwoofer connection
An external Subwoofer speaker can be connected to the socket marker "Subwoofer" (26) on the rear of
the main unit.
VIDEO OUTPUT connection
The video output from certain
s can be output to a TV using the VIDEO
OUT socket (24). The accompanying audio signal can be output using the AUDIO
OUT sockets (25).
A standard AV lead with yellow, red and white coloured plugs (not supplied) can
be used for this purpose.
Please note that the sockets on your TV must be configured to accept input rather
than output signals to enable this feature to work correctly.
AUX connection
1) Connect a 3.5mm stereo jack lead to the AUX IN socket (11) and the other end to your preferred
device.
2) Press the AUX button on the remote control (43) "AUX" will show in the display.
3) Select the play function on the auxiliary device and the sound output can then be heard from the
Micro 1465i.
Mains connection
1.
Unwind the AC Power Cord (29) completely.
2.
Insert the plug into any convenient AC outlet.
3.
As soon as the unit has been connected with the mains voltage, parts
of the unit are in operation due to the standby function. Turn off the unit
completely before pulling the mains plug out of the AC outlet.
Black
Red
Red


