Goodman *CSS9* Installation Instructions Manual Download Page 14

14

N

ON

-D

IRECT

 V

ENT

 I

NSTALLATIONS

A minimum of one 90° elbow should be installed on the combus-
tion air intake “coupling” to guard against inadvertent blockage.

A

LTERNATE

 V

ENT

/F

LUE

 L

OCATION

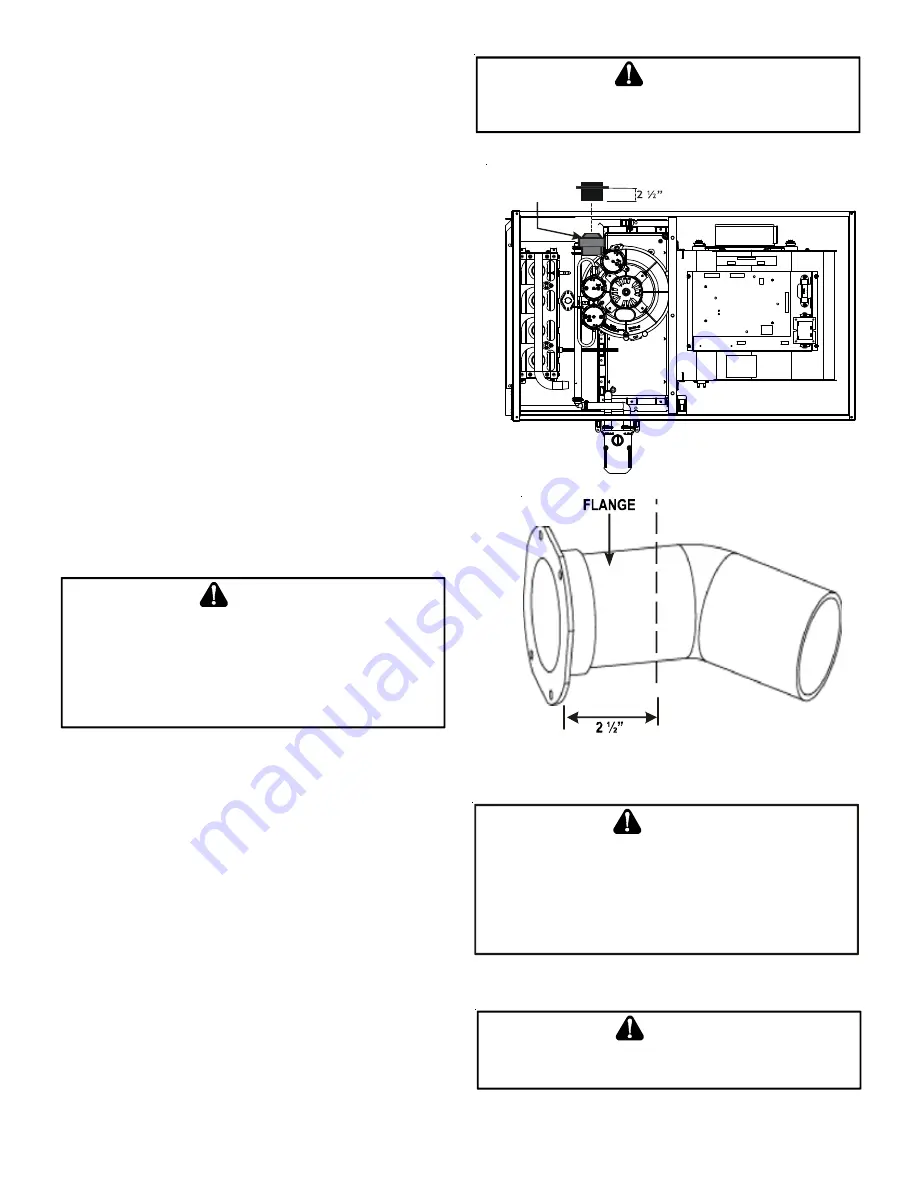
The alternate vent/flue location is the large hole directly


in line with

the induced draft blower outlet.  To use the alternate vent/flue loca-
tion refer to the following steps and the “Alternate Vent/Flue Loca-
tion” figure.  To use an alternate vent location on a counterflow
/ horizontal model, a special kit is required.

NOTE: In the horizontal left installation position, a means of
condensate collection must be provided to keep vent pipe con-
densate from entering the draft inducer housing. If the vent
drain elbow is eliminated from the installation, an RF000142 kit
must be used.

1. Remove the four screws from the vent pipe flange on top

the furnace.

2. Remove the internal elbow and vent pipe
3. Cut 2 1/2" from the flange .
4. Remove plastic plug in line with the inducer outlet
5. Install cut end of the flanged section and connect to inducer

with rubber coupling supplied with furnace.

6. Install screws removed in step 1 securing flange to cabinet.

T

HE


RUBBER


ELBOW


IS


NOT


DESIGNED


TO


SUPPORT


A


LOAD

. W

HEN


THE


RUBBER


ELBOW


IS


MOUNTED


EXTERNALLY


TO


THE


FURNACE


CABINET

EXTREME


CARE


MUST


BE


TAKEN


TO


ADEQUATELY


SUPPORT


FIELD

-

SUPPLIED


VENT

/

FLUE


PIPING

AS


DAMAGE


CAN


RESULT


IN


LEAKS


CAUSING


BODILY


INJURY


OR


DEATH


DUE


TO


EXPOSURE


TO


FLUE


GASES

INCLUDING


CARBON


MONOXIDE

WARNING

A

LTERNATE

 C

OMBUSTION

 A

IR

 P

ROVISION

(Upflow / Horizontal models only)

When using the alternate venting location, either in a hori-
zontal left side down installation or a vertical installation us-
ing down – venting, an alternate combustion air opening can
be used. A locating dimple is located on the right side of the
furnace cabinet. The locating dimple is 1 7/8" measured from
the front edge of the cabinet in line with the knock out. To
use the alternate combustion air location:

1. Remove screws and combustion air flange from cabinet.
2. Insert cabinet plug in unused combustion air hole.
3. Drill a pilot hole at the cabinet dimple (size dictated by

knockout tool used).

4. Use a knockout tool to create a 3" diameter hole
5. Install combustion air flange and secure with screws

removed in step one.

E

DGES


OF


SHEET


METAL


HOLES


MAY


BE


SHARP

. U

SE


GLOVES


AS


A


PRECAUTION


WHEN


REMOVING


HOLE


PLUGS

.

WARNING

C

U

T

 H

E

R

E

Figure 10

Vent/Flue Pipe Cuts

Insert flange. Cut 2 ½” long. 

R 000142

F

Figure 9

B

E


SURE


NOT


TO


DAMAGE


INTERNAL


WIRING


OR


OTHER


COMPONENTS


WHEN


REINSTALLING


COUPLING


AND


SCREWS

.

CAUTION

T

HE


RUBBER


ELBOW


IS


NOT


DESIGNED


TO


SUPPORT


A


LOAD

. W

HEN


THE


RUBBER


ELBOW


IS


MOUNTED


EXTERNALLY


TO


THE


FURNACE


CABINET

EXTREME


CARE


MUST


BE


TAKEN


TO


ADEQUATELY


SUPPORT


FIELD

-

SUPPLIED


VENT

/

FLUE


PIPING

AS


DAMAGE


CAN


RESULT


IN


LEAKS


CAUSING


BODILY


INJURY


OR


DEATH


DUE


TO


EXPOSURE


TO


FLUE


GASES

INCLUDING


CARBON


MONOXIDE

WARNING

Summary of Contents for *CSS9*

Page 1: ...OF CONTENTS SAFETY CONSIDERATIONS 3 SHIPPING INSPECTION 4 ELECTROSTATIC DISCHARGE ESD PRECAUTIONS 4 TO THE INSTALLER 5 PRODUCT APPLICATION 5 LOCATION REQUIREMENTS CONSIDERATIONS 6 CLEARANCES AND ACCES...

Page 2: ...EASUREMENT NATURAL GAS ONLY 34 TEMPERATURE RISE 34 CIRCULATOR BLOWER SPEEDS 35 BLOWER HEAT OFF DELAY TIMINGS 35 NORMAL SEQUENCE OF OPERATION 35 POWER UP 35 HEATING MODE 35 COOLING MODE 36 FAN ONLY MOD...

Page 3: ...tion GOODMAN WILL NOT BE RESPONSIBLE FOR ANY INJURY OR PROPERTY DAMAGE ARISING FROM IMPROPER SERVICE OR SERVICE PROCEDURES IF YOU INSTALL OR PERFORM SERVICE ON THIS UNIT YOU ASSUME RESPONSIBILITY FOR...

Page 4: ...nente muerte DANGER PELIGRO POSSIBLE PROPERTY DAMAGE PERSONAL INJURY OR DEATH DUE TO FIRE EXPLOSION SMOKE SOOT CONDENSATION ELECTRICAL SHOCK OR CARBON MONOXIDE MAY RESULT FROM IMPROPER INSTALLATION RE...

Page 5: ...d appliance and is appropriate for use with natural or propane gas NOTE If using propane a propane conversion kit is required Dual certification means that the combustion air inlet pipe is optional an...

Page 6: ...urnace is heating Provide provisions for venting combustion products outdoors through a proper venting system Special consideration should begiventovent fluepiperoutingandcombustionairintakepipewhenap...

Page 7: ...lationoveracombustiblefloorbecomesnecessary useanaccessory subbase seeSpecificationSheetapplicableforyourmodelfordetails Aspecialaccessorysubbasemustbeusedforupright counterflow unit installations ove...

Page 8: ...any unused openings in the venting system 2 Inspect the venting system for proper size and horizontal pitch as required by the National Fuel Gas Code ANSI Z223 1 or the Natural Gas and Propane Install...

Page 9: ...back drafting or improper combustion of gas fired appliances thereby exposing building occupants to gas combustion products that could include carbon monoxide If this furnace is to be installed in th...

Page 10: ...cesidepanel suspendingitbelowthefurnace Aminimum clearance of 5 5 below the furnace must be provided for the drain trap Additionally the appropriate downward piping slope must be maintained from the d...

Page 11: ...all vent flue piping and connectorsarecompatiblewithfurnaceflueproducts Additionally itistheresponsibilityoftheinstallertoensurethatallpipingand connections possess adequate structural integrity and s...

Page 12: ...in a horizontal section of pipe as this may create a water trap PREFERRED TRANSITION NO LESS THAN 45 DEGREES TO HORIZONTAL PLANE TO AVOID CREATING A WATER TRAP IN VENT PIPING ACCEPTABLE NO TRANSITION...

Page 13: ...e responsibility of the installer to ensure that the piping connections to the furnace are secure airtight and adequately supported Vent FluePipe The vent pipe outlet is sized to accept 2 pipe Secure...

Page 14: ...AN RESULT IN LEAKS CAUSING BODILY INJURY OR DEATH DUE TO EXPOSURE TO FLUE GASES INCLUDING CARBON MONOXIDE WARNING ALTERNATE COMBUSTION AIR PROVISION Upflow Horizontal models only When using the altern...

Page 15: ...ollowing figure Refer to Vent Flue Pipe and Combustion Air Pipe To secure the pipe passing through the wall and pro hibit damage to piping connections a coupling should be in stalled on either side of...

Page 16: ...anufacturer s specifications to prevent separation and flue gas leaks Figure 11 COMBUSTION AIR INTAKE OPTIONAL Not required for single pipe installation TEE OPTIONAL 96 MAX 3 MIN ROOF LINE INTAKE SCRE...

Page 17: ...es used in the terminations must be included when de termining the number of elbows in the piping systems If the combustion air intake pipe is to be installed above a finished ceiling or other area wh...

Page 18: ...the Side Wall Vent Kit p n0170K00000S or 0170K000001S forinstallationspeci fications CONDENSATE DRAIN LINES DRAIN TRAP A condensing gas furnace achieves its high level of efficiency by extracting hea...

Page 19: ...he furnace trap GENERAL DRAIN INFORMATION All furnace models come with a factory installed drain trap For vertical installations the trap will remain in the factory position except for a counterflow w...

Page 20: ...re with 1 clamp 5 Refer to Field Supplied Drain section for instructions on field supplied installed drain on outlet of furnace trap UPFLOW MODEL INSTALLED HORIZONTALLY WITH RIGHT SIDE DOWN Minimum 5...

Page 21: ...11 Draining the Collector Box Install the non grommet end of hose 11 from outside the cabinet in the bottom drain hole Install on collector box and secure with a silver clamp 12 Use two silver clamps...

Page 22: ...rap 3 Draining the Collector Box From outside the cabinet insert the non grommet end hose 8 into the back drain hole 4 Secure to collector box drain port using a silver clamp 5 Draining the Vent Elbow...

Page 23: ...NEC Class 1 and must comply with all applicable codes The furnace must be electrically grounded in accordance with local codes or in their absence with the latest edition ofThe National Electric Code...

Page 24: ...ctrical panel NOTE Do not use gas piping as an electrical ground To confirm proper unit grounding turn off the electrical power and perform the following check 1 Measure resistance between the neutral...

Page 25: ...areas the gas supplier may artificially derate the gas in an effort to compensate for the effects of altitude If the gas is artificially derated the appropriate orifice size must be determined based...

Page 26: ...ld must be maintained as shipped from the factory Maximum torque for the gas valve connection is 375 in lbs excessive over tightening may damage the gas valve Install a manual shutoff valve between th...

Page 27: ...lug in Alternate Gas Line Hole Gas Valve Burners Manual Shut Off Valve upstream from ground joint pipe union Drip Leg Grommet in Standard Gas Line Hole Ground Joint Pipe Union Ground Joint Pipe Union...

Page 28: ...oldwithallgasappliancesinoperation Main taining proper gas pressure depends on three main factors 1 Vaporization rate depending on temperature of the liquid and wetted surface area of the container or...

Page 29: ...ws 1 With clean filters in the furnace use a draft gauge inclined manometer to measure the static pressure of the return duct at the inlet of the furnace Negative Pressure 2 Measure the static pressur...

Page 30: ...o avoid condensation in the heating element With a parallelflowarrangement thedampersorothermeansusedtocontrol the flow of air must be adequate to prevent chilled air from entering the furnace and if...

Page 31: ...ter Locations Figure 37 Based on 300 ft min filter face velocity Change filters before occupants take ownership of a new home Model Minimum Filter Size MSS960402BNA 14 X 30 MSS960603BNA 20 X 25 MSS960...

Page 32: ...n smell for gas Be sure check near the floor as some types of gas are heavier than air 7 If you smell gas after five minutes immediately follow the Safety Instructions on page 3 of this manual If you...

Page 33: ...made by adjusting the gas valve pressure regulator The manifold pressure must be measured with the burners operating To measure and adjust the manifold pressure use the following proce dure 1 Turn OFF...

Page 34: ...ells us that at this rate it would take 46 seconds to consume one cu ft of gas 3600 46 78 This tells us that in one hour the furnace would consume 78 cu ft of gas The typical value range for 1 cu ft o...

Page 35: ...l terminals 4 Connect all unused blower motor leads to the PARK terminals on the integrated control module Any leads not connected to the PARK terminals must be taped 5 Turn ON power to furnace 6 Veri...

Page 36: ...an and compressor are de energized Circulator blower continues running during a cool off delay period of 45 seconds Furnace awaits next call from thermostat FAN ONLY MODE The normal operational sequen...

Page 37: ...ungrounded furnaces 1 Disconnectallpowertothefurnace Donottouchtheintegratedcontrolmoduleoranywireconnectedtothecontrolprior to discharging your body s electrostatic charge to ground 2 Firmly touch a...

Page 38: ...ipesystem Checkforblockageand orleakage Check theoutsideterminationandtheconnectionsatandinternal to the furnace Heat exchanger Check for corrosion and or buildup within the heat exchanger passageways...

Page 39: ...e burners without curling floating or lifting off Flames must not impinge on the sides of the heat exchanger firing tubes INDUCED DRAFT AND CIRCULATOR BLOWERS The bearings in the induced draft blower...

Page 40: ...e ordered by description Parts are available from your distributor Functional Parts List Gas Valve BlowerMotor Gas Manifold BlowerWheel Natural Gas Orifice BlowerMountingBracket Propane Gas Orifice Bl...

Page 41: ...Loose or improperly connected wiring Pressure switch circuit not closed Induced draft blower is operat ing Induced draft blower runs continuously with no further furnace operation Integrated control m...

Page 42: ...ir Induced draft blower and circulation blower runs continuously No furnace operation Integrated control module diagnostic LED is flashing FIVE 5 flashes Flame sensed with no call for heat Correct sho...

Page 43: ...5 1084 1005 HIGH 5 0 2284 30 2231 31 2170 31 2103 32 2037 33 1945 1836 1750 MED 4 0 1865 37 1869 36 1775 38 1732 39 1684 40 1619 1548 1480 MED LO 3 5 1594 43 1571 43 1530 45 1492 46 1454 47 1414 1355...

Page 44: ...N A 610 N A 604 571 519 HIGH 5 0 2233 32 2159 33 2086 34 2024 35 1941 37 1850 1753 1651 MED 4 0 1820 39 1778 40 1742 41 1695 42 1638 43 1551 1485 1384 MED LO 3 5 1571 45 1535 46 1497 48 1446 49 1402...

Page 45: ...45 THIS PAGE LEFT INTENTIONALLY BLANK...

Page 46: ...servicing or installing this unit Multiple power sources may be present Failure to do so may cause property damage personal injury or death Wiring is subject to change Always refer to the wiring diag...

Page 47: ...gas fueled heating appliance or equipment The sign shall read in print size no less than one half 1 2 inch in size GAS VENT DIRECTLY BELOW KEEP CLEAR OF ALL OBSTRUCTIONS 4 INSPECTION The state or loc...

Page 48: ...n on Products Parts Warranties Contractor Programs and Training Customer Services Financing Options 5151 San Felipe Suite 500 Houston TX 77056 www goodmanmfg com www amana hac com 2014 Goodman Manufac...

Reviews: