background image

7

IO-247A

     12/04

ACCESSIBILITY CLEARANCE,WHERE GREATER, SHOULD
TAKE PRECEDENCE OVER MINIMUM FIRE PROTECTION
CLEARANCE.  A gas-fired furnace for installation in a residential
garage must be installed so that the ignition source and burners
are located not less than eighteen inches (18") above the floor and
is protected or located to prevent physical damage by vehicles.  A
gas furnace must not be installed directly on   carpeting, tile, or
other combustible materials other than wood flooring.


Vent Pipe Clearance to Combustibles -
6" using Single Wall Connector or 1 " 
using B-1 vent.

Top  - 1"

Sid e
Cle arance - 1"

Back - 0"

Front Clea rance - 3"

• Adequate combustion/ combustion air must be supplied to

the closet.

• Furnace must be 

completely

 sealed to floor or base.

Combustion/ ventilation air supply pipes must terminate 12"
from top of closet and 12" from floor of closet. DO NOT
remove solid base plate for bottom return.

• Return air ducts must be 

completely

 sealed to the furnace

and terminate outside the enclosure. surfaces.
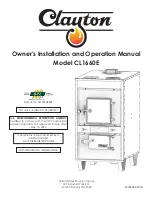
F

URNACE

 S

USPENSION

If suspending the furnace from rafters or joist, use 3/8" threaded
rod and 2”x2”x3/8” angle iron as shown below.  The length of rod
will depend on the application and the clearances necessary.

TILT  OUTWARD  TO ALLOW  FOR

DOOR  AND  CIRCULATOR  BLOWER

REMOVAL

3/8"  DIAMETER

 THREADED ROD

(6  PLACES)

PROVIDE  8"  MINMUM CLEARANCE BETWEEN

CENTER ROD  AND  FURNACE CABINET

TO ALLOW  FOR  CIRCULATOR  BLOWER  REMOVAL 

ASSURE FURNACE IS LEVEL FROM

END TO END AND HAS A SLIGHT

FORWARD TILT WITH THE FRONT

OF THE FURNACE 0"-3/4" 

BELOW THE BACK OF THE FURNACE

POSITION AS  CLOSE  AS  POSSIBLE

TO BLOWER DECK  TO  ALLOW  FOR 

CIRCULATOR  BLOWER  REMVOAL

HOLD  DOWN

  NUTS

SUPPORT

NUTS

2"x2"x3/8"

ANGLE IRON

(3 PLACES)

 Suspended Furnace

E

XISTING

 F

URNACE

 R

EMOVAL

NOTE:

 When an existing furnace is removed from a venting system

serving other appliances,


the venting system may be too large to

properly vent the remaining attached appliances.

The following vent testing procedure is reproduced from the

American National Standard/National Standard of Canada for
Gas-Fired Central Furnaces ANSI Z21.47b-2002, CSA-2.3b-2002

Section 1.23.1.

  The following steps shall be followed with each

appliance connected to the venting system placed in operation,
while any other appliances connected to the venting system are
not in operation:

a. Seal any unused openings in the venting system;
b. Inspect the venting system for proper size and horizontal

pitch, as required by the National Fuel Gas Code, ANSI
Z223.1 or the CAN/CSA B149 Installation Codes and these
instructions. Determine that there is no blockage or
restriction, leakage, corrosion and other deficiencies which
could cause an unsafe condition;

c. In so far as practical, close all building doors and windows

and all doors between the space in which the appliance(s)
connected to the venting system are located and other
spaces of the building. Turn on clothes dryers and any
appliance not connected to the venting system. Turn on any
exhaust fans, such as range hoods and bathroom exhausts,
so they shall operate at maximum speed. Do not operate a
summer exhaust fan. Close fireplace dampers;

d. Follow the lighting instructions. Place the appliance being

inspected in operation. Adjust thermostat so appliance shall
operate continuously;

e. Test for draft hood equipped appliance spillage at the draft

hood relief opening after 5 minutes of main burner operation.
Use the flame of a match or candle;

f. After it has been determined that each appliance connected

to the venting system properly vents when tested as outlined
above, return doors, windows, exhaust fans, fireplace
dampers and any other gas burning appliance to their
previous conditions of use;

g. If improper venting is observed during any of the above tests,

the venting system must be corrected.

Corrections must be in accordance with the latest edition of the
National Fuel Gas Code NFPA 54/ANSI Z223.1 and/or CAN/CSA
B149 Installation Codes.

If resizing is required on any portion of the venting system, use the
appropriate table in Appendix G in the latest edition of the National
Fuel Gas Code ANSI Z223.1 and/or CAN/CSA B149 Installation
Codes.

T

HERMOSTAT

 L

OCATION

In an area having good air circulation, locate the thermostat  about
five feet high on a vibration-free inside wall.  Do not install the
thermostat where it may be influenced by any of the following:

• Drafts, or dead spots behind doors, in corners, or under

cabinets.

• Hot or cold air from registers.
• Radiant heat from the sun.
• Light fixtures or other appliances.
• Radiant heat from a fireplace.
• Concealed hot or cold water pipes, or chimneys.
• Unconditioned areas behind the thermostat, such as an

outside wall.

HOT

COLD

DRAFTS OR DEAD SPOTS
-BEHIND DOORS
  -IN CORNERS
    -UNDER CABINETS

Thermostat Influences

Summary of Contents for AMV8

Page 1: ...than when the unit is in operation Remember it is your responsibility to install the product safely and to know it well enough to be able to instruct a customer in its safe use Safety is a matter of...

Page 2: ...INSTALLATION 13 FIX 1 LINER TERMINATION 13 FIX 2 CHANGE VENTING ARRANGEMENTS 13 FIX 3 REBUILD THE CROWN 13 FIX 4 RELINING 13 VIII Electrical Connections 14 WIRING HARNESS 14 115 VOLT LINE CONNECTIONS...

Page 3: ...7 ANNUAL INSPECTION 27 FILTERS 27 FILTER MAINTENANCE 27 FILTER REMOVAL 27 UPRIGHT FILTER REMOVAL 27 INDUCED DRAFT AND CIRCULATOR BLOWER MOTORS 28 FLAME SENSOR QUALIFIED SERVICER ONLY 28 IGNITER QUALIF...

Page 4: ...mponent failures could result in heating system operational problems TO THE INSTALLER Before installing this unit please read this manual thoroughly to familiarize yourself with specific items which m...

Page 5: ...uring grounding will be discharged 3 Service integrated control module or connecting wiring following the discharge process in step 2 Use caution not to recharge your body with static electricity i e...

Page 6: ...s permitted when installed in the horizontal configuration Line contact is defined as the portion of the cabinet that is formed by the intersection of the top and side National Fire Protection Associa...

Page 7: ...nting system are not in operation a Seal any unused openings in the venting system b Inspect the venting system for proper size and horizontal pitch as required by the National Fuel Gas Code ANSI Z223...

Page 8: ...AM AGE PERSONAL INJURY OR DEATH SUFFICIENT FRESH AIR FO R PROPER COM BUSTION AND VENTILATION OF FLUE G ASES M UST BE SUPPLIED MO ST HOM ES REQ UIRE OUTSIDE AIR BE SUPPLIED INTO THE FURNACE AREA Improv...

Page 9: ...input rating of all equipment in the enclosure Furnace Water Heater Chimney or Gas Vent NOTE The air duct openings must have a free area of not less than one square inch per 2000 BTU of the total inp...

Page 10: ...W 70 4 Inch 90 4 Inch 115 N A 140 N A MODEL Under some conditions larger vents than those shown above may be required or allowed When an existing furnace is removed from a venting system serving other...

Page 11: ...ter Water Heater Vent Connector Basement Floor F A F Vent Connector Figure 8 Typical Multiple Flue Clay Tile Chimney CHECKLIST SUMMARY This checklist serves as a summary of the items to be checked bef...

Page 12: ...must be removed and replaced Fix 4 Next gently tap the inside of the liner with a Phillips screwdriver If the screwdriver perforates the liner or if the tapping does not sound like metal hitting metal...

Page 13: ...acturer s instructions In some cases a shorter extension above the roof may be possible with a liner than would be required with a masonry chimney For further information on relining see Fix 4 FIX 2 C...

Page 14: ...s that have the junction box located in the include indoor swimming pools and chlorine bleaches paint strippers adhesives paints varnishes sealers waxes which are not yet dried and solvents used durin...

Page 15: ...switch 24 VOLT THERMOSTAT WIRING NOTE Wire routing must not interfere with circulator blower operation filter removal or routine maintenance As a two stage furnace the furnace integrated control modul...

Page 16: ...furnace integrated control module 4 Secure the dehumidistat ground wire typically the green lead to the ground screw on the furnace junction box NOTE Ground wire may not be present on all dehumidista...

Page 17: ...own on the rating plate Overfiring of the furnace can result in premature heat exchanger failure Gas pressures in excess of 13 inches water column can also cause permanent damage to the gas valve IMPO...

Page 18: ...pressure switch kits PROPANE GAS CONVERSION WARNING POSSIBLE PROPERTY DAMAGE PERSONAL INJURY OR DEATH MAY OCCUR IF THE CORRECT CONVERSION KITS ARE NOT INSTALLED THE APPROPRIATE KITS MUST BE APPLIED TO...

Page 19: ...h the left side of the furnace the installer must supply the following fittings starting from the gas valve Straight pipe to reach the exterior of the furnace A ground joint union drip leg and manual...

Page 20: ...9 1 559 50 18 37 79 131 198 376 114 237 448 913 1 417 60 16 35 72 121 187 340 103 217 409 834 1 275 80 13 29 62 104 155 289 89 185 346 724 1 066 100 11 26 55 90 138 255 78 162 307 630 976 125 10 24 48...

Page 21: ...waits call from thermostat NORMAL HEATING SEQUENCE R and W1 or R and W1 W2 thermostat contacts close initiating a call for heat Integrated control module performs safety circuit checks Induced draft b...

Page 22: ...blower requires 30 seconds to ramp up to full speed Electronic air cleaner terminals are energized with circulator blower Furnace circulator blower and outdoor cooling unit run their appropriate spee...

Page 23: ...Installation s gas heating HTG value 1 000 BTU ft3 Obtained from gas supplier Installation s seconds per cubic foot 34 sec ft3 Conversion Factor hours to seconds 3600 sec hr Input Htg value x 3600 sec...

Page 24: ...r the cooling system Most cooling systems are designed to work with air flows between 350 and 450 CFM per ton Most manufacturers recommend an air flow of about 400 CFM per ton Example 2 5 tons X 400 C...

Page 25: ...ormance to be optimized for the particular homeowner s needs O F F O F F 8 7 4 3 2 1 O F F O N 4 3 2 1 O N O F F 4 3 2 1 O N O N 4 3 2 1 Cooling Speed Tap A Cooling Speed Tap B Cooling Speed Tap C Coo...

Page 26: ...ontrol will reset and allow the furnace to resume normal operation WARNING TO PREVENT PREMATURE FAILURE OF HEAT EXCHANGER PROPERTY DAMAGE PERSONAL INJURY OR DEATH DO NOT ADJUST THE LIMIT CONTROL FACTO...

Page 27: ...n determining the cause XVI MAINTENANCE WARNING TO AVOID ELECTRICAL SHOCK INJURY OR DEATH DISCONNECT ELECTRICAL POWER BEFORE PERFORMING ANY MAINTENANCE IF YOU MUST HANDLE THE IGNITER HANDLE WITH CARE...

Page 28: ...VENT PERSONAL INJURY OR DEATH DO NOT REMOVE ANY INTERNAL COMPARTMENT COVERS OR ATTEMPT ANY ADJUSTMENT ELECTRICAL COMPONENTS ARE CONTAINED IN BOTH COMPARTMENTS CONTACT A QUALIFIED SERVICE AGENT AT ONCE...

Page 29: ...circuit Inspect pressure switch hose Repair if necessary Inspect flue for blockage proper length elbows and termination Correct pressure switch setpoint or contact motion Tighten or correct wiring con...

Page 30: ...spect for proper sensor alignment Check inlet air piping for blockage proper length elbows and termination Compare current gas pressure to rating plate info Adjust as needed Turn power OFF prior to re...

Page 31: ...MIT CONTROL WIRING TO UNIT MUST BE PROPERLY ON S OME M O DE LS IN DU CTO R COI L P R ES SU R E SWI TC H LO W FIR E Y L RD BK WH IN D U CED B R GN D WH WH BK BR RD GN BU BR WH AU XI LIA RY LI M I T C O...

Page 32: ...of product failure They are simple to service and forgiving to operate We use quality materials and components Finally every unit is run tested before it leaves the factory That s why we know There s...

Reviews: