background image

35

NOTE:

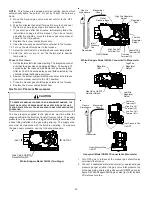
 If measuring gas pressure at the drip leg or Honeywell VR9205

gas valve, a field-supplied hose barb fitting must be installed prior to
making the hose connection. If using the inlet pressure tap  on the
White-Rodgers 36G54 gas valve, then use the 36G Valve Pressure
Check Kit, Goodman Part No. 0151K00000S.

3.

Turn ON the gas supply and operate the furnace and all other
gas consuming appliances on the same gas supply line.

4.

Measure furnace gas supply pressure with burners firing.
Supply pressure must be within the range specified in the

Inlet Gas Supply Pressure

 table.

Natural Gas

Minimum:    4.5" w.c.

Maximum:  10.0" w.c.

Propane Gas

Minimum:  11.0" w.c.

Maximum:  13.0" w.c.

Inlet Gas Supply Pressure

If supply pressure differs from table, make the necessary adjust-
ments to pressure regulator, gas piping size, etc., and/or consult
with local gas utility.

5. Turn OFF gas to furnace at the manual shutoff valve and

disconnect manometer.  Reinstall plug before turning on
gas to furnace.

6. Turn OFF any unnecessary gas appliances stated in step

3.

Gas Line

Gas
Shutoff
Valve

Gas Line 
To Furnace

Drip Leg Cap 
With Fitting

Manometer Hose

Manometer

Open To
Atmosphere

Measuring Inlet Gas Pressure (Alt. Method)

G

AS

 M

ANIFOLD

 P

RESSURE

 M

EASUREMENT


AND

 A

DJUSTMENT

T

O


PREVENT


UNRELIABLE


OPERATION


OR


EQUIPMENT


DAMAGE

,


THE


GAS


MANIFOLD


PRESSURE


MUST


BE


AS


SPECIFIED


ON


THE


UNIT


RATING


PLATE

.


O

NLY


MINOR


ADJUSTMENTS


SHOULD


BE


MADE


BY


ADJUSTING


THE


GAS


VALVE


PRESSURE


REGULATOR

.

CAUTION

Only small variations in gas pressure should be made by adjust-
ing the gas valve pressure regulator.  The manifold pressure must
be measured with the burners operating.  To measure and adjust
the manifold pressure, use the following procedure.

1. Turn OFF gas to furnace at the manual gas shutoff valve

external to the furnace.

2. Turn off all electrical power to the system.
3. Outlet pressure tap connections:

a. Honeywell VR9205 valve: Remove the outlet pressure

tap plug.  Install an 1/8" NPT hose barb fitting into the outlet
pressure tap.

b.

White-Rodgers 36G54 valve: Back outlet pressure test screw
(inlet/outlet pressure tap) out one turn (counterclockwise,
not more than one turn).

4.

Attach a hose and manometer to the outlet pressure barb fitting
(Honeywell valve) or outlet pressure tap (White-Rodgers valve).

5.

Turn ON the gas supply.

6.

Turn on power and close thermostat “R” and “W1” contacts to
provide a call for low stage heat.

7.

Measure the gas manifold pressure with burners firing.  Adjust
manifold pressure using the 

Manifold Gas Pressure

 table

shown below.

8. Remove regulator cover screw from the low (LO) outlet

pressure regulator adjust tower and turn screw clockwise
to increase pressure or counterclockwise to decrease
pressure.  Replace regulator cover screw.

9.

Close thermostat “R” and “W2” contacts to provide a call for
high stage heat.

10. Remove regulator cover screw from the high (HI) outlet

pressure regulator adjust tower and turn screw clockwise
to increase pressure or counterclockwise to decrease
pressure.  Replace regulator cover screw.

11. Turn off all electrical power and gas supply to the system.
12. Remove the manometer hose from the hose barb fitting or

outlet pressure tap.

13. Replace outlet pressure tap:

a. Honeywell VR9205 valve: Remove the 1/8" NPT hose barb

fitting from the outlet pressure tap.  Replace the outlet
pressure tap plug and seal with a high quality thread
sealer.

b. White-Rodgers 36G54 valve: Turn outlet pressure test

screw in to seal pressure port (clockwise, 7 in-lb
minimum).

14. Turn on electrical power and gas supply to the system.
15. Close thermostat contacts “R” and “W1/W2” to energize the

valve.

Using a leak detection solution or soap suds, check for leaks at
outlet pressure boss plug (Honeywell valve) or screw (White-Rodg-
ers valve).  Bubbles forming indicate a leak.  SHUT OFF GAS AND
REPAIR ALL LEAKS IMMEDIATELY!

NOTE: 

For gas to gas conversion, consult your dealer for

appropriate conversion.

Gas

Rate

Range

Nominal

Low Stage

1.7 to 2.3" w.c.

2.0" w.c.

High Stage

3.2 to 3.8" w.c.

3.5" w.c.

Low Stage

5.7 to 6.3" w.c.

6.0" w.c.

High Stage

9.7 to 10.3" w.c. 10.0" w.c.

Manifold Gas Pressure

Natural

Propane

G

AS

 I

NPUT

 R

ATE

 M

EASUREMENT

 (N

ATURAL

 G

AS

 O

NLY

)

The gas input rate to the furnace must never be greater than that
specified on the unit rating plate.  To measure natural gas input
using the gas meter, use the following procedure.

1. Turn OFF the gas supply to all other gas-burning appliances

except the furnace.

2.

While the furnace is operating, time and record one complete
revolution of the smallest gas meter dial.

Summary of Contents for ACSH96

Page 1: ...nking before acting Most dealers have a list of specific good safety practices follow them The precautions listed in this Installation Manual are intended as supplemental to existing practices However...

Page 2: ...MENTS 16 STANDARD FURNACE CONNECTIONS 16 ALTERNATE FURNACE CONNECTIONS 17 NON DIRECT VENT SINGLE PIPE PIPING 18 DIRECT VENT DUAL PIPE PIPING 19 VENT INTAKE TERMINATIONS FOR INSTALLATION OF MULTIPLE DI...

Page 3: ...OWER UP 37 HEATING MODE 37 MODE DIP SWITCH IS SET TO 1 STG POSITION 37 MODE DIP SWITCH IS SET TO 2 STG POSITION 38 COOLING MODE 38 FAN ONLY MODE 38 XVI Operational Checks 38 BURNER FLAME 38 XVII Safet...

Page 4: ...ed throughout the structure if the furnace or air handler is operating in any mode CO can cause serious illness including permanent brain damage or death B10259 216 TO THE INSTALLER Before installing...

Page 5: ...Electrical Connection Inlets Alternate 18 Coil Front Cover Pressure Tap 19 Coil Front Cover Drain Port 20 Drain Line Penetrations 21 Drain Trap 22 Blower Door Interlock Switch 23 Capacitor 24 Integra...

Page 6: ...verted to operate on L P gas by using the appropriate L P conver sion kit listed in the PROPANE GAS HIGH ALTITUDE INSTALLA TIONS section of this manual Install this furnace only in a location and posi...

Page 7: ...TO SHUT OFF TURN OFF THE MANUAL GAS SHUTOFF VALVE EXTERNAL TO THE FURNACE BEFORE TURNING OFF THE ELECTRICAL SUPPLY WARNING POSSIBLE PROPERTY DAMAGE PERSONAL INJURY OR DEATH DUE TO FIRE EXPLOSION SMOK...

Page 8: ...eaning solutions such as perchloroethylene printing inks paint removers varnishes hydrochloric acid cements and glues antistatic fabric softeners for clothes dryers and masonry acid washing materials...

Page 9: ...latest edition of the National Fuel Gas Code NFPA 54 ANSI Z223 1 and or CSA B149 1 05 1 05 Installation Codes Seal off a non direct vent furnace if it is installed near an area frequently contaminated...

Page 10: ...part of the unconfined space 5 3 3 Equipment Located in Confined Spaces a All Air from Inside the Building The confined space shall be pro vided with two permanent openings communicating directly wit...

Page 11: ...Water Heater Outlet Air Chimney or Gas Vent NOTE The inlet and outlet air openings must each have a free area of not less than one square inch per 4000 BTU of the total input rating of all equipment i...

Page 12: ...ions Refer to Recommended Installation Positions figure for appropriate in stallation positions ductwork connections and resulting airflow arrangements VII HORIZONTALAPPLICATIONS CONSIDERATIONS GENERA...

Page 13: ...The indicated kits must be used to insure safe and proper furnace operation All conversions must be performed by a qualified installer or service agency AIR DISCHARGE AIR DISCHARGE AIR DISCHARGE Bott...

Page 14: ...G Clearance to inside corner H Clearance to each side of center line extended above meter regulator assembly 3 ft 91 cm within a height 15 ft 4 5 m above the meter regulator assembly OTHER THAN DIRECT...

Page 15: ...d Fittings must be DWV type fit tings meeting ASTM D2665 and ASTM D3311 Carefully follow the manufactures instructions for cutting cleaning and solvent cement ing of PVC In addition to PVC and ABS pip...

Page 16: ...insulated and closed with a weather tight corrosion resistant flashing STANDARD FURNACE CONNECTIONS It is the responsibility of the installer to ensure that the piping con nections to the furnace are...

Page 17: ...ELBOW NON DIRECT VENT 90 PVC ELBOW NON DIRECT VENT STANDARD CONNECTIONS OR OR UPFLOW COUNTERFLOW ALTERNATE FURNACE CONNECTIONS If the standard locations are undesirable for a specific installation al...

Page 18: ...105 98 91 84 Not Applicable Not Applicable MH95 ACSH96 AMEH96 GCH95 GME95 Direct Vent 2 Pipe and Non Direct Vent 1 Pipe 6 Maximum Allowable Length of Vent Flue Pipe Combustion Air Pipe ft 1 2 Unit Inp...

Page 19: ...ameter for construction of the vent flue and combustion air intake pipe systems of a direct vent dual pipe installation The number of elbows tabulated represents the number of elbows and or tees in ea...

Page 20: ...e outside the structure and may be installed with the intake and exhaust pipes located side by side or with one pipe above the other This kit is NOT intended for use with single pipe indirect vent ins...

Page 21: ...trap secured to the outside of the cabinet NOTE Refer to Alternate Vent Flue Hose Connections for upright installations using an alternate vent flue outlet 1 Remove the rubber plug from the right side...

Page 22: ...ber elbow Discard cut portion 5 Insert Tube 1 into rubber elbow drain port and secure with a silver hose clamp Angle tube toward trap 6 Cut 17 3 4 inches from the long end of Hose B and discard 7 Secu...

Page 23: ...mp Angle tube outward toward front of furnace 5 Cut X inches from the long end of Hose B and discard Refer to table for appropriate length to cut Secure remaining hose to Tube 1 with a green hose clam...

Page 24: ...ked drain conditions Cut hose to appropriate length to minimize sagging Plug left unused pressure tap with plug removed from right side 2 Secure HoseA to front cover drain tap with a red hose clamp Ro...

Page 25: ...a hose to the induced draft blower housing 6 Cut 5 1 2 inches straight length from the long end of each Tube 2 and discard radius ends 7 Insert approximately one inch of each Tube 2 through left side...

Page 26: ...blower door For direct vent applica tions the cabinet opening to the junction box must be sealed air tight using either a UL approved bushing such as Heyco Liquid Tight or by applying a UL approved no...

Page 27: ...ire routing must not to interfere with circulator blower operation filter removal or routine maintenance Refer to the follow ing figure for thermostat connections to the integrated control module term...

Page 28: ...n specified on the furnace rating plate The combination of the lower air density and a lower manifold pressure will prohibit the burner orifice from drawing the proper amount of air into the burner Th...

Page 29: ...m of three inches long Install a 1 8 NPT pipe plug fitting accessible for test gauge connection immediately upstream of the gas supply connection to the furnace Always use a back up wrench when making...

Page 30: ...ch pipe fittings starting from the gas valve to reach the outside of the cabinet must be supplied 1 Close nipple 1 90 degree street elbow 1 2 1 2 pipe nipple 1 90 degree elbow Straight Pipe The straig...

Page 31: ...vert to capacities at 5 psig settings multiply by 0 879 Propane Gas Piping Chart I Sizing Between Single or Second Stage Regulator and Appliance Maximum Propane Capacities Listed are Based on 1 2 W C...

Page 32: ...s retaining the sheet metal over the duct opening Using tin snips cut the metal strips and remove the sheet metal to free the duct flanges Using the scribe line along the duct flange as a guide unfold...

Page 33: ...e HORIZONTAL INSTALLATIONS Filters must be installed in either the central return register or in the return air duct work XIV STARTUP PROCEDURE ADJUSTMENT Furnace must have a 115 VAC power supply prop...

Page 34: ...OR EQUIPMENT DAMAGE THE INLET GAS SUPPLY PRESSURE MUST BE AS SPECIFIED ON THE UNIT RATING PLATE WITH ALL OTHER HOUSEHOLD GAS FIRED APPLIANCES OPERATING CAUTION The line pressure supplied to the gas va...

Page 35: ...ach a hose and manometer to the outlet pressure barb fitting Honeywell valve or outlet pressure tap White Rodgers valve 5 Turn ON the gas supply 6 Turn on power and close thermostat R and W1 contacts...

Page 36: ...hermometer readings to stabilize 4 Adjust temperature rise by adjusting the circulator blower speed Increase blower speed to reduce temperature rise Decrease blower speed to increase temperature rise...

Page 37: ...to 12 minutes NOTE The ACSH AMH AMEH GCH GDH GMH and GME hybrid furnaces require a single stage thermostat These furnaces utilize a control board with single stage or two stage capability The second s...

Page 38: ...ws R and Y thermostat contacts close initiating a call for cool Integrated control module performs safety circuit checks Outdoor fan and compressor are energized Circulator blower is energized on cool...

Page 39: ...mly touch a clean unpainted metal surface of the furnaces near the control Any tools held in a person s hand during grounding will be discharged 3 Service integrated control module or connecting wirin...

Page 40: ...emove 1 Turn OFF electrical power to furnace 2 Remove filter s from the central return register or ductwork 3 Replace filter s by reversing the procedure for removal 4 Turn ON electrical power to furn...

Page 41: ...nal problem Perform the checks listed in Section XIV Startup Procedure andAdjustments to reduce the chances of repeated fouling XX BEFORE LEAVING AN INSTALLATION Cycle the furnace with the thermostat...

Page 42: ...kage proper length elbows and termination Check drain system Correct as necessary Correct pressure switch setpoint or contact motion Tighten or correct wiring connection Pressure switch hose blocked p...

Page 43: ...e and air inlet piping for blockage proper length elbows and termination Correct as necessary Check rollout limit Replace if necessary Check induced draft blower for proper performance Replace if nece...

Page 44: ...4 793 MED HI MED LO 2 0 981 61 962 62 943 63 917 65 888 67 830 764 665 LOW 1 5 750 79 730 81 714 83 692 86 657 90 620 570 502 HIGH 4 0 2069 29 1965 30 1871 32 1756 34 1661 36 1549 1415 1275 MH950704CX...

Page 45: ...9 534 HIGH 3 0 1431 42 1368 44 1296 47 1228 49 1150 53 1055 962 860 ACSH960703BX MED 2 5 1212 50 1182 51 1138 53 1091 55 1019 59 944 871 769 MED HI MED LO 2 0 1002 60 978 62 956 63 921 66 878 69 825 7...

Page 46: ...039 34 998 35 959 37 923 882 839 T4 BLUE 3 0 1274 28 1239 28 1199 29 1166 30 1129 31 1096 1059 1021 T5 BLACK 3 0 1306 27 1261 28 1232 29 1195 29 1162 30 1132 1090 1057 T1 YELLOW 1 5 714 80 667 79 604...

Page 47: ...682 619 534 HIGH 3 0 1431 42 1368 44 1296 47 1228 49 1150 53 1055 962 860 GCH950703BX MED 2 5 1212 50 1182 51 1138 53 1091 55 1019 59 944 871 769 MED HI MED LO 2 0 1002 60 978 62 956 63 921 66 878 69...

Page 48: ...039 34 998 35 959 37 923 882 839 T4 BLUE 3 0 1274 28 1239 28 1199 29 1166 30 1129 31 1096 1059 1021 T5 BLACK 3 0 1306 27 1261 28 1232 29 1195 29 1162 30 1132 1090 1057 T1 YELLOW 1 5 714 80 667 79 604...

Page 49: ...DOOR OPEN DOOR SWITCH WARNING DISCONNECT POWER BEFORE SERVICING WIRING TO UNIT MUST BE PROPERLY POLARIZED AND GROUNDED BK GND DISCONNECT L POWER SUPPLY WITH OVERCURRENT PROTECTION DEVICE WH JUNCTION B...

Page 50: ...the unit for the most up to date wiring HIGH VOLTAGE D ISCONNECT ALL POWER BEFORE SERVICING OR INSTALLING THIS UNIT M ULTIPLE POWER SOURCES MAY BE PRESENT F AILURE TO DO SO MAY CAUSE PROPERTY DAMAGE...

Page 51: ...the wiring diagram on the unit for the most up to date wiring HIGH VOLTAGE D ISCONNECT ALL POWER BEFORE SERVICING OR INSTALLING THIS UNIT M ULTIPLE POWER SOURCES MAY BE PRESENT F AILURE TO DO SO MAY C...

Page 52: ...t vent terminal for the horizontally vented gas fueled heating appliance or equipment The sign shall read in print size no less than one half 1 2 inch in size GAS VENT DIRECTLY BELOW KEEP CLEAR OF ALL...

Page 53: ...53 THIS PAGE LEFT INTENTIONALLY BLANK...

Page 54: ...54 THIS PAGE LEFT INTENTIONALLY BLANK...

Page 55: ...55 THIS PAGE LEFT INTENTIONALLY BLANK...

Page 56: ...forgiving to operate We use quality materials and components Finally every unit is run tested before it leaves the factory That s why we know There s No Better Quality Visit our web sites at www goodm...

Reviews: