background image

9

4. DEVICE CONFIGURATION    

    FROM THE Golmar GCall APP

In order to configure the device, you must first have 

created an account (or logged in using an existing 

account), as explained in paragraphs 2 and 3.
 

WARNING:

 the device GCall/Gtwin, once fully 

operational, will forward calls to the owner of 

the account that is used in the configuration 

step. It is therefore necessary to use the 

account of the end user during configuration 

operations. 

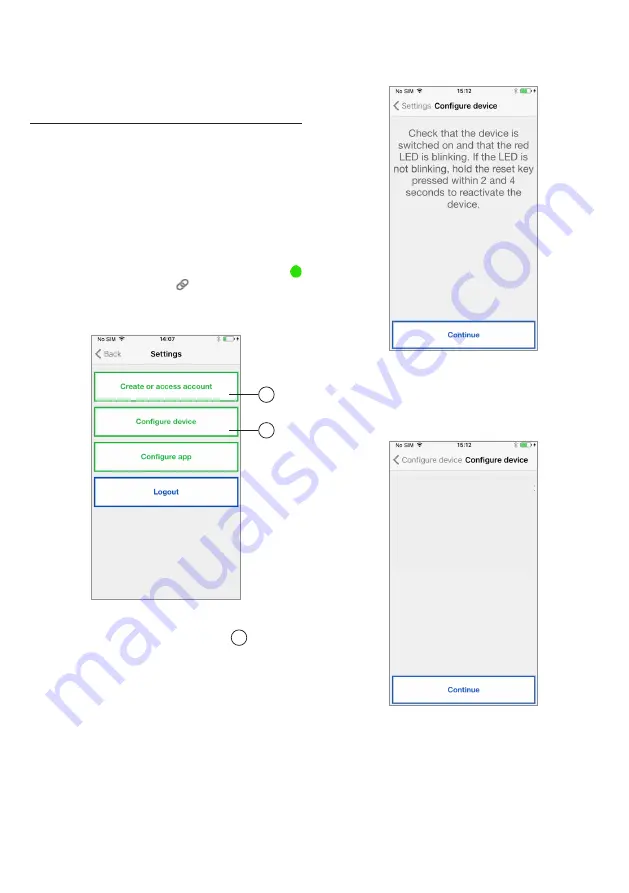
From the Home Page, (with the green dot   

displayed and chain closed  ) select the “Settings” 

key. 

You will display:

Settings Menu

From here, select “Configure device”  1  .

Follow the directions supplied 

(2)

 and press 

“Continue”:
(2) 

WARNING:


the first time the device is turned 

on it will take about 50 seconds before the LED 

starts flashing.

Configuring Instructions

After selecting “Continue” you must turn on the 

Wi-Fi on your mobile phone, and access the Wi-Fi 

network created by the device.

Password Info

On the next page you will be able to choose the 

name that you wish to give to your device (the name 

that will be displayed as ‘Caller’ when you receive 

an incoming call). We recommend setting your 

home address (street or city name) as the device 

name. Now press “Enter” and then “Continue”.

INSTALLER MANUAL

1

2

Connect the smartphone to 


the  wi-fi  network  of  the  device 

CALLFW

Summary of Contents for GCALL

Page 1: ...CALL FORWARDING DEVICE GCALL GTWIN USER AND INSTALLER MANUAL Code 50124023 TGCALL GTWIN EN REV 0119...

Page 2: ...ED OFF BUS LINE 17 10 NOTES 19 USER MANUAL 1 NORMAL OPERATION 1 1 CALL RECEIVING To be able to receive video door phone calls on your smartphone you must Have the Golmar GCall App with notifications e...

Page 3: ...ely or after having visually checked the visitor via the key View camera by swiping the green answer key from left to right 3 Rejecting the call To reject a call just swipe the red reject key from rig...

Page 4: ...gin the conversation With the Intercom key only the other smartphones and not the apartment monitor telephone can be called The user who is the forwarder of the call will see this screen Intercom call...

Page 5: ...meaning of the icons and buttons in the Home Page is as follows 1 Status icon If the dot is red with an open chain this indicates that the user is not logged in with an own Account username sip srvqt...

Page 6: ...er to use the App you must select the first Menu Create or access account the following page will open Create a new account or use a saved account Below is the meaning of each key 1 This is the correc...

Page 7: ...to the settings page In order for the Account to become active you need to log in to your email in box retrieve the mail that has just been received and click on the validation link Click on Continue...

Page 8: ...3 3 ACCOUNT MANAGEMENT The Manage Your Account menu item can be used to Ask sip srvqt com to mail you your forgotten username or password providing you enter the mail address with which your account w...

Page 9: ...ettings Menu From here select Configure device 1 Follow the directions supplied 2 and press Continue 2 WARNING the first time the device is turned on it will take about 50 seconds before the LED start...

Page 10: ...f you choose instead the connection via Wi Fi Connection via Wi Fi it is essential to select from the dropdown menu the home network to connect to Sample list of available networks After you have sele...

Page 11: ...dress select the option Advanced to open the following page Advanced Settings Enter the following values in the empty fields IP Address Subnet Mask Default Gateway and DNS e g 8 8 8 8 then press Conti...

Page 12: ...lmar GCall CONFIGURATION MENU App Configuration Menu Optionally the Golmar GCall application can help you to Limit incoming calls to periods in which the device is connected to a Wi Fi network which w...

Page 13: ...al to 3 To ensure correct operation of the Golmar GCall App some essential requirements must be verified 1 good Wi Fi signal quality on the device 2 upload data band 300 kbps for the Internet service...

Page 14: ...tive presses at time intervals shorter than 1s the device switches to Upgrade mode The green LED will blink continuously to indicate the event 3 LAN connector Ethernet port for wired connection to the...

Page 15: ...o 8 dip switch settings refer to the System Gtwin manual code 50122345 ON ON 6 3 PROGRAMMING AN INTERCOM CALL FROM MONITOR TELEPHONE TO THE SMARTPHONE After ensuring that the Call Forwarding Device is...

Page 16: ...0 x 60 mm The product is designed to be powered off a BUS line or external power supply FA GCALL via 24V 6 W 24 V terminals with power supply up to the specified power source requirements LPS and prot...

Page 17: ...more information see TGTWIN MANUAL SISTEMA c d 50122345 manual For the device configuration see pages 14 and 15 2 JP V INT V EXT V INT JP Z OFF To router modem ADSL or 3G 4G DIP1 OFF LINE 2 LINE 1 3...

Page 18: ...N To router modem ADSL or 3G 4G DIP1 OFF LINE 2 LINE 1 3 LINE LINE 4 LINE OUT LINE IN Z OFF LINE IN LINE OUT LAN 24Vcc MONITOR SLAVE 1 JP Z OFF CALL FORWARDING GCALL GTWIN DISTRIBUTOR D4L GTWIN 2 TO P...

Page 19: ...19 10 NOTES...

Page 20: ...vio aviso Golmar se r serve le droit de toute modification sans pr avis Golmar reserves the right to make any modifications without prior notice golmar golmar es www golmar es Sistemas de comunicaci n...

Reviews: