


10
IP G+
www.golmar.es
WEB CLIENT EL632/G+/48
Add Camera
The system allows to add
Golmar cameras
with the following specifications:
• ONVIF
interface protocol.
• H.264
video codec standard, “
baseline
” mode support.
(*) Golmar does not guarantee the compatibility of cameras from other manufacturers.
Steps to follow:
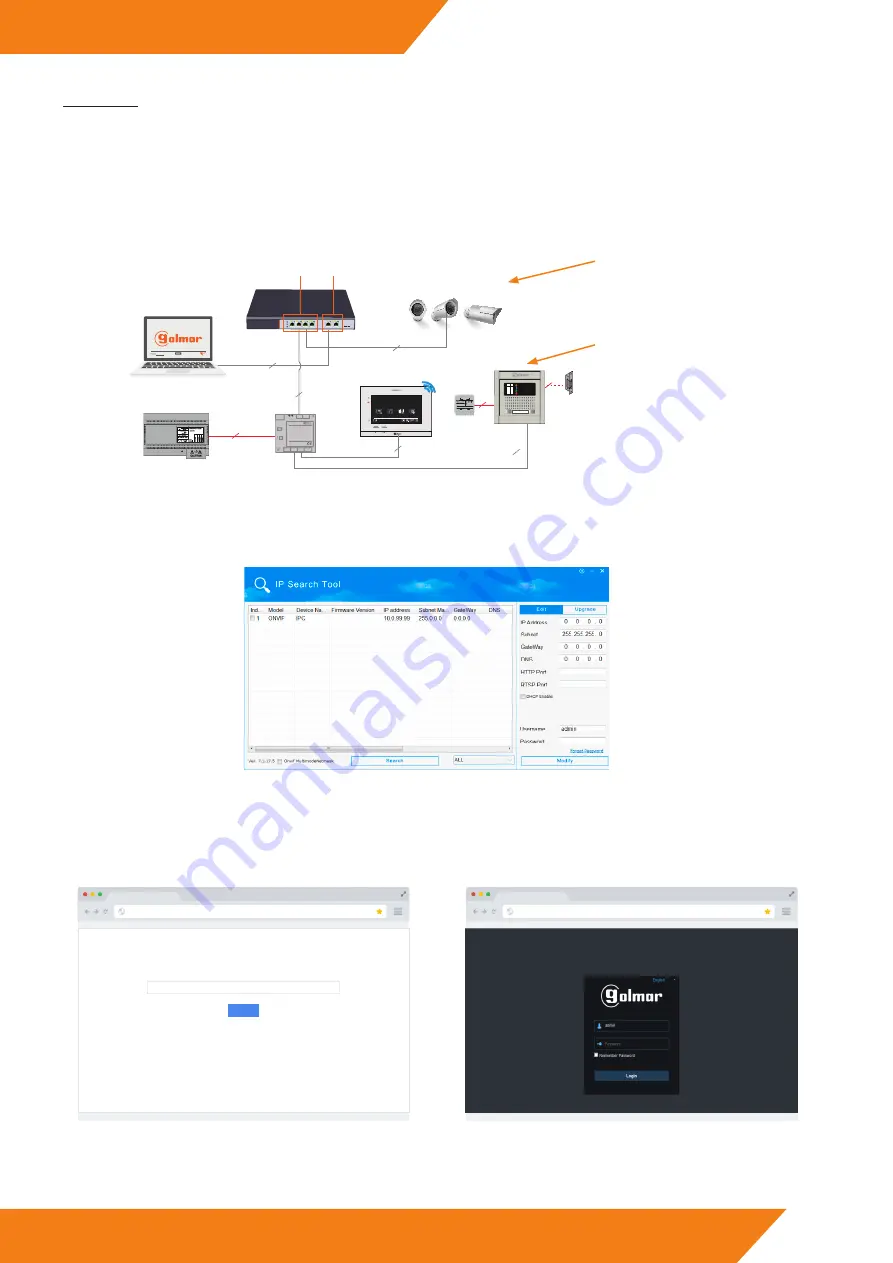
1 - Connect the camera to the system:
In this scheme the camera receives data and power
from the 48Vdc switch.
It is possible to send data from a switch and power the
camera locally with its power supply.
2
2
2
PRI 230V50/60HZ
SEC: 12V 6VA
12V
230V
TF-104
TF-104
D4L-G+/PoE
11:40
AM
20-02-2019
Wed
Door panel
Intercom
Recordings
Settings
FA-G+
UTP
UTP
UTP
12340100 FA-G+
UTP
SW-104
POE
UP-LINK
1
2
3
4
5-UP
6-UP
S
V
P
V
N
S
UP-LINK
PORTS
POE
PORTS
SW-104
D1
D2
IN
OUT
D3
D4
D4L-G+/PoE
+
-
18Vdc
Power
Columna
Riser
Local
UTP
Nexa panel with
EL632/G+ module.
2 - Know the camera IP address:
Discover the IP address assigned to the camera. If the default IP address of the camera is not reflected, we can find out the IP address
by using programs such as “IP search Tool”:
3 - Access the camera configuration environment:
Once we know the camera IP address and our computer is in the same range, we type the IP address in the web browser and we access the
camera settings (similar process to the one described at the beginning of the guide but in this case with the camera).
GO
10.0.99.99
S
e
a
r
c
h
Type the IP camera in the web browser:
The Golmar camera credentials used in this guide are the following::
User:
admin
, Password:
admin
(*) Check which are the access credentials of your camera.
Access the web client of the camera:
10.0.99.99
(*) If the camera is Golmar, use the Internet Explorer browser.


