background image

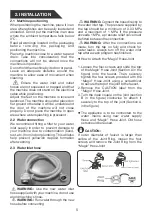
1.2 Installation Warning

1.1 General Safety Warning

1. SAFETY INSTRUCTIONS

• This machine is for domestic use only; do

not use it for other purposes. Commercial
use will void the guarantee.

Do not stand, sit or place loads on the 

open door of the dishwasher.

Only  use  detergents  and  rinse  aids 

produced  specifically  for  dishwashers. 


Our  company  is  not  responsible  for  any 

damage that may occur due to misuse.

Do not drink water from the machine.

1.3 During Usage

3

• Read  these  instructions  carefully  before

using  your  appliance  and  keep  this
manual for future reference.

      Please  check  the  packaging  of  your 
machine before installation and the outer 
surface  of  the  machine  once  the 
packaging  has  been  removed.  Do  not 
operate  the  machine  if  it  appear 
damaged  or  if  the  packaging  has  been
opened.

• Packaging  materials  protect  your

machine  from  any  damage  that  might
occur  during  transportation.  The
packaging  materials  are  environment
friendly  as  they  are  recyclable.  Use  of
recycled  material    reduces  raw  material
consumption  and  decreases  waste
production.

     Unplug the machine before installation.
     Your machine must only be installed by 
an authorised service agent. Installation 
by anyone other than an authorised agent 
may cause your warranty to be void.

  Check  that  the  indoor  electrical  fuse 

system  is  connected  in  line  with  safety 
regulations.
     All electrical connections must match 

the values on the plate.

     Ensure the machine does not stand on 
the electrical supply cable.

•

 This appliance can be used by children

aged  from  8  years  and  above,  and  by
persons with reduced physical, sensory or
mental capabilities or lack of experience
and  knowledge  if  they  have  been  given
supervision or instruction concerning the
use  of  the  appliance  in  a  safe  way  and
understand  hazards  involved.  Children
should  not  be  allowed  to  play  with  the
appliance.

•

Remove packaging and keep it out of

reach of children.

  Keep  children  away  from  detergents 

and rinse aids.

 There may be some residue left in the 

machine  after  washing.  Keep  children 
away from the machine when it is open.

    Never  use  an  extension  cord  or  a 
multiple socket connection.
     The plug should be accessible after the 
machine is installed.

• After  installation,  run  your  machine

unloaded for the first time.
     The machine must not be plugged in 
during positioning.
       Always use the coated plug supplied 
with your machine.
      If  the  electrical  cable  is  damaged,  it 
should  only  be  replaced  by  a  qualified 
electrician.

• Choose a suitable and safe place to install

your machine.

• Do not install the appliance in a damp and

dusty  place.  Do  not  install  or  store  the
appliance in any outdoor area or any area
that is subjected to weathering conditions
such  as  direct  sunlight,  wind  or  rain  or
temperatures below freezing.

• Only original spare parts should be used

with the machine.

Summary of Contents for EON VESTA DWF EON VES 12U NF STSL

Page 1: ...This image is for representation purpose only DWF EON VES 12U NF STSL Dishwasher USER MANUAL HOW TO GET THE BEST OUT OF YOUR GODREJ EON VESTA DISHWASHER...

Page 2: ...ate your machine optimally in order to get the best results If you need any further clarifications do contact your nearest Godrej dealer or any of our service centres offices We would be glad to help...

Page 3: ...t use 4 2 Fill the Salt 4 3 Test Strip 4 4 Water Hardness Table 4 5 Water Softener System 4 6 Setting 4 7 Detergent Usage 4 8 Filling the Detergent 4 9 Using Combined Detergents 4 10 Rinse aid Usage 4...

Page 4: ...onnected in line with safety regulations All electrical connections must match the values on the plate Ensure the machine does not stand on the electrical supply cable This appliance can be used by ch...

Page 5: ...opening system when the Energy Save option is active the door will open at the end of a program To prevent damage to your dishwasher do not attempt to close the door for one minute after it has opene...

Page 6: ...elp prevent yellowish deposit formation after washing WARNING Use the new water inlet hose supplied with your machine do not use an old machine s hose WARNING Run water through the new hose before con...

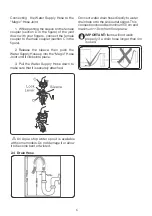
Page 7: ...1 While pushing the sleeve on the female coupler section D in the figure of the joint down with your fingers connect the female coupler to the male coupler section C in the figure 2 Release the sleev...

Page 8: ...A WARNING The countertop of which the machine will be placed under must be stable in order to prevent imbalance The top panel of the dishwasher must be removed to fit the machine under the countertop...

Page 9: ...dispenser 12 Upper basket track latch 13 Turbo Drying Unit This system provides better drying performance for your dishes 3 2 Technical Specifications Capacity Height Height Without worktop Width Dept...

Page 10: ...ier Replace the cap and close it After every 20th 30th wash add salt into your machine until it fills up approx 1 kg Use softener salt specifically produced for use in dishwashers When you start your...

Page 11: ...sh the latch to open the dispenser and pour in the detergent Close the lid and press it until it locks in place The dispenser should be refilled just before the start of each programme If the dishes a...

Page 12: ...the machine As rinse aid residues left as a result of overflowing will create extremely high amounts of foam and thus reduce the washing performance remove the excess amount of rinse aid by wiping it...

Page 13: ...point down and open utensils with their openings down Upper Basket Height adjustment Turn the Rail Stop Clips at the ends of the rails to the sides to open them as shown in the image below then pull...

Page 14: ...ss production process Chemical composition of the detergent Water temperature of the wash programme Recommendation Use only glasses and porcelain which the manufacturer designates as dishwasher proof...

Page 15: ...sts the temperature and the quantity of water the energy consumption and program duration NOTE THE PROGRAMME DURATION MAY CHANGE ACCORDING TO THE AMOUNT OF DISHES THE WATER TEMPERATURE THE AMBIENT TEM...

Page 16: ...rol Panel indicate the status of the programme in operation The machine will remain silent for 40 to 50 minutes while the Drying light is on NOTE Simultaneously press the Programme Selection 2 and Hal...

Page 17: ...the Machine Off When the End light illuminates switch your machine off using the Power On Off button Disconnect the plug and turn off the water tap NOTE Do not open the door before the programme is c...

Page 18: ...ean the filter combination turn it counter clockwise and remove it by lifting it upwards 1 Pull the coarse filter out of the micro filter 2 Then pull and remove 8 2 Spray arms Make sure that the spray...

Page 19: ...dishwasher and the control panel regularly using a damp cloth and a little washing liquid WARNING Health Hazard due to detergents containing chlorine Always use chlorine free detergents Do not use sp...

Page 20: ...rogramme is finished Machine stops during washing Power failure Check mains power Water inlet failure Check water tap Shaking and hitting noises are heard during a wash operation The spray arm is hitt...

Page 21: ...Rinse aid dosage set too low Increase rinse aid dosage setting Rust stains form on the dishes Stainless steel quality of the dishes is insufficient Use only dishwasher proof sets High level of salt i...

Page 22: ...he hose Contact for service if the error continues Pressure system failure Contact for service Continuous water input Close the tap and contact for service Inability to discharge water Water discharge...

Page 23: ...on washing and drying performance Please see the programme and consumption table for more information 4 Rinse dirty dishes before placing them in the dishwasher 5 Only use the Prewash programme when n...

Page 24: ...3 Standard program water consumption in litres per cycle 12 Energy consumption 258 kwh per year based on 280 standard cleaning cycles using cold water fill and the consumption of low power modes Actua...

Page 25: ...Branch Branch Addresses Service Connect 12 BRANCH ADDRESSES SERVICE CONNECT 24...

Page 26: ...Ltd Appliance Division undertakes to get the appliance repaired free of charge during warranty period subject to terms and conditions below WARRANTY DISHWASHERS 9 The pressure supplied by the tap sho...

Page 27: ...26...

Page 28: ...27...

Page 29: ...mbol is known as the Crossed out Wheellie Bin Symbol It means that the product should not be disposed of with your general house hold waste It should be disposed of only through the company s collecti...

Reviews: