background image


64 

1.  Click this button you can record video of the selected channel 

directly  to  your  PC.


By  default,  recorded  files  are  saved  in 

C:\Downloadfile. You can modify the directory in Setup -> Local 

Setup page. 

2.  Click  this  button  you  can  take  a  snapshot  of  the  selected  channels  on  the  main  display 

screen. By default, recorded files are saved in C:\Capture. You can modify the directory in 

Setup -> Local Setup page 

3.  Click this button you can switch to the previous channel(s). 

4.  Click this button you can switch to the next channel(s). 

6


Display Modes

: Click the icons to view channels in single-channel full-screen, quad, and 

split-screen configurations. 

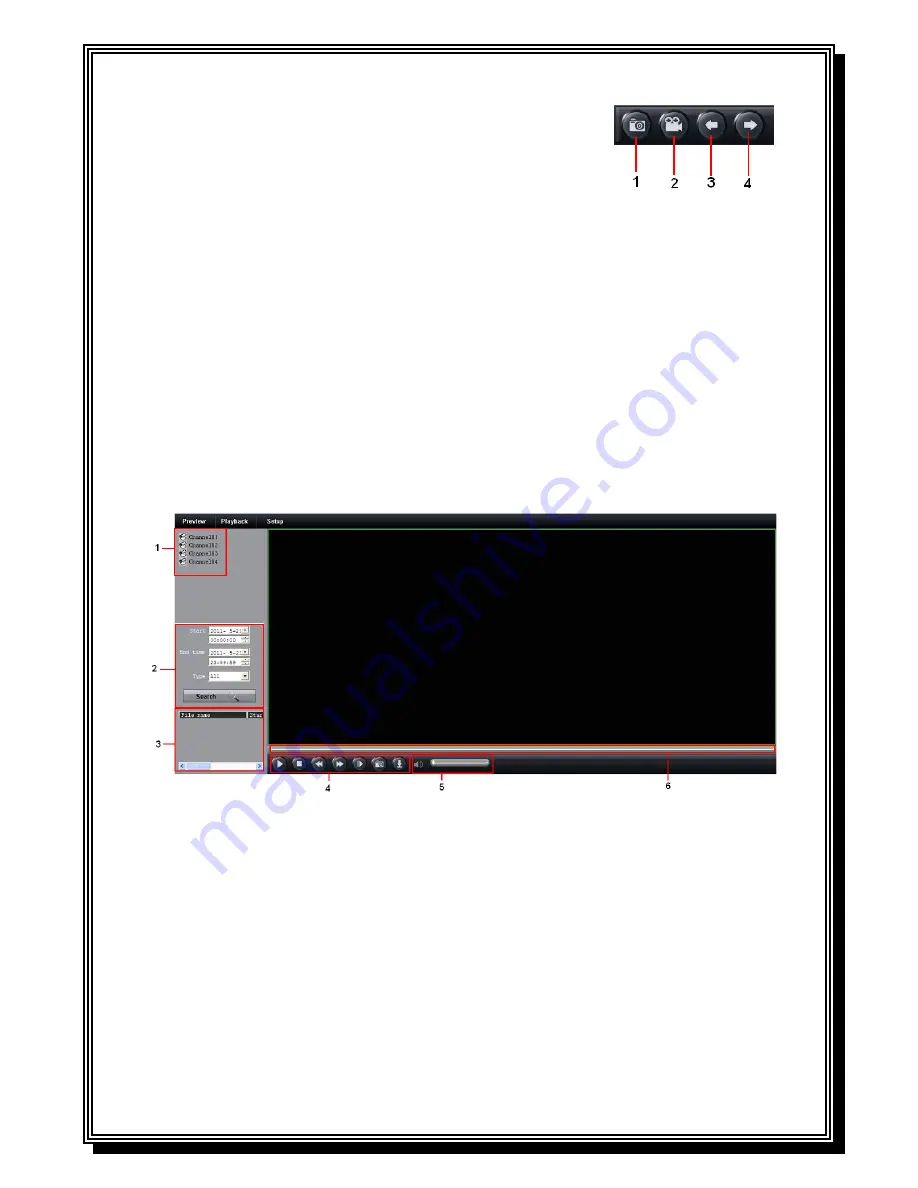
13.3.  Remote Playback 

Use the Replay menu to search and playback recorded video on your system. 


Search the recording files 

1

  Click 

Playback 

at the top of the main screen. The main screen will be grey; 

2

  Select a channel to playback (Area 1) ; 

3

  Select the search condition: Start time, End time and recording file type, then click Search 

button (Area 2); 

4

  Seletct  a  recording  file  from  the  search  result  (Area  3)  and  then  you  can  control  this  file, 

including Play, Pause, Speed-up, Slow-down, single frame, and also you can download this 

recording file to you PC (Area 4, 5, 6). 

Playback Control 

Summary of Contents for RD8504C

Page 1: ...1 RD8504C H 264 LAN DVR User Manual Version 1 0 1...

Page 2: ...is designed for indoor use only Keep all liquids away from the DVR Ensure environmental conditions meet factory specifications Ensure unit is properly secured to a rack or shelf Major shocks or jolts...

Page 3: ...w Displays 16 4 RECORD SETTINGS 17 4 1 Initializing Record Settings 17 4 2 Scheduling a Recording 18 4 3 Starting a Manual Recording 20 5 PLAYBACK 21 5 1 Understanding the Playback Interface 21 5 2 Pl...

Page 4: ...s 43 9 3 4 Customizing Patterns 45 10 CAMERA MANAGEMENT 47 10 1 Configuring OSD Settings 47 10 2 Setting up Privacy Mask 47 10 3 Adjusting Display Settings 48 11 HDD MANAGEMENT 50 11 1 Managing HDDs 5...

Page 5: ...5 12 3 5 Viewing System Logs 59 13 REMOTE SURVEILLANCE 61 13 1 Setup ActiveX Plug In 61 13 2 Remote Live View 63 13 3 Remote Playback 64 13 4 Setup 65 14 APPENDIX 66 14 1 Glossary 66 14 2 FAQ 67...

Page 6: ...log channel supports dual stream Main stream supports D1 CIF resolution and sub stream supports CIF QCIF resolution Video encoding parameters of each channel can be set separately including resolution...

Page 7: ...recording type time event etc Supports pause rewind play fast play slow skip forward and skip backward when layback locating in progress bar by dragging the mouse Backup Supports USB device and networ...

Page 8: ...nel include 1 Power Button Powers DVR on off 2 MENU OKEXIT Button In preview mode user press the MENU OK button will enter the main menu after successful login In the main menu mode user press the MEN...

Page 9: ...cursor in menus down OK In menus press to confirm selections 5 Mode Press to switch between quad and split screen displays 6 Number Channel buttons While in menus press buttons 0 9 to enter values dur...

Page 10: ...tween single screen and multi screen mode in Preview Playback mode Click and Drag Clicking and dragging the Left mouse button can be used to control the digital zoom area It can also be used to setup...

Page 11: ...r analog video output 3 AUDIO IN Connector for 4 channels audio input 4 AUDIO OUT Connector for 1 channel audio output 5 VGA OUTPUT DB9 connector for VGA output Display local video output and menu 6 L...

Page 12: ...on the front panel should turn on indicating the unit is receiving power 2 Press the POWER switch on the rear panel The Power indicator LED should turn on The unit will begin to start There are two p...

Page 13: ...y also reboot or lock your DVR Locking your DVR will return you to the Live Preview mode which will require an user name and password to exit out of it The Reboot button will reboot your DVR To reboot...

Page 14: ...video tampering Record Icon Indicates the current channel is recording Audio Icon Indicates the current channel is in audio output Alarm Icon Indicate there is an alarm or exception 3 1 2 Operating t...

Page 15: ...can be selected from a drop down list PIP Picture in picture To select this you will have 2 cameras in 1 channel Next Screen When displaying less than the maximum number of cameras in Live Preview cl...

Page 16: ...ormal size Exit 3 2 Configuring Live Preview Displays Live Preview displays can be customized to your own needs These settings can be accessed by entering the Display Settings menu To access the Displ...

Page 17: ...h HDD management before proceeding 2 Navigate to Menu Configuration Record Settings You will be taken to the Record Settings menu 3 Select the camera you would to configure the settings for 4 Configur...

Page 18: ...ds to pre record before the actual recording begins Post record Sets the time in seconds to post record after the actual recording ended 4 2 Scheduling a Recording Scheduling a recording allows you to...

Page 19: ...otion or alarm and alarm Motion detected and alarm triggered recordings are further explained in Configuring Alarms 9 Click the OK button to finish configuration 10 Repeat steps 3 9 for other cameras...

Page 20: ...manual recording can be started at any time To start a manual recording Start manual recording by selecting Start or Stop for the cameras desired Note Only when the scheduled recordings are off can u...

Page 21: ...at the speed of x2 x4 x8 Slow Forwards Select to playback the recording files forward at the speed of x1 2 1 4 1 8 Hide Select to hide the playback control panel Exit Select to exit playback Playback...

Page 22: ...teria or click the Search button to bring up the list of search results After search results are presented select the file you would like to playback and press Play to enter synchronous playback camer...

Page 23: ...up button This will take you to the Search Results menu 4 Select the files to export You may also click the Play button to verify that these files are indeed the ones you would like to export 5 The si...

Page 24: ...24 Check for compatibility from vendor 7 Delete Delete a file from the backup device 8 Format Format the backup device 9 Click Start to begin backup process...

Page 25: ...by navigating to Menu Configuration Camera Settings Select channel to configure motion detection on 2 Select the Advanced tab to open up the Advanced Camera Settings menu 3 Check the checkbox next to...

Page 26: ...by checking the checkboxes under the desired cameras 10 Select Schedule tab to set arm time 8 periods can be set 11 Click OK to complete motion settings for the selected camera You may now add a sched...

Page 27: ...options available are Normally Opened N O and Normally Closed N C 3 Select the checkbox next to Handle Alarm In as and click the Handle button to enter the Alarm Input Handle menu 4 Select the Trigge...

Page 28: ...cheduling a Recording Alarm outputs may also be configured in the Alarm Management menu To set up Alarm Output 1 Select the Alarm Output tab This will bring up the Alarm Output interface 2 Select the...

Page 29: ...Alarm Outputs Manually 7 1 3 Triggering Alarm Outputs Manually To trigger alarm outputs manually 1 Enter the Manual Alarm menu by clicking Menu Manual Alarm 2 In the Manual Alarm menu you may Trigger...

Page 30: ...nable feature 4 Click the Handle button to enter the Handle menu 5 Select the Handle tab to configure exceptions handling Exception trigger options are further explained in the next section See Unders...

Page 31: ...gs menu by clicking Menu Configuration Camera Settings 2 Select the Advanced tab and select camera to configure tamper detection 3 Select the Tamper Detection checkbox 4 Select the sensitivity of the...

Page 32: ...If all channel and all week are the same settings please select Copy To All Week and Copy to All channel in Advanced tab 7 2 Set up Exception 7 2 1 Setting Exception Setting exceptions allow the DVR t...

Page 33: ...tting up exception handlers for such features as motion detection and sensor alarms you may select triggering options to alert you of these exceptions The triggering options that you may select includ...

Page 34: ...Preferred DNS Server Server Port HTTP Port Note The IP address can not be conflict with that of any other device Every port including the SERVER PORT HTTP PORT must be forwarded in the router SEVER PO...

Page 35: ...s can be obtained from your network administrator Once the setup is completed your DVR will automatically dial up into your network after rebooting Please check the PPPoE status in Network Status tab...

Page 36: ...tained from the website www 3322 org Lastly enter the User Name and Password registered in the 3322 network DynDNS Enter Device Domain Name i e test dyndns org obtained from the website www dyndns com...

Page 37: ...k OK to save and exit menu Note If the DVR is used on a public network you should use a NTP server that has a time synchronization function such as the server at the National Time Center IP Address 21...

Page 38: ...sted after they are entered This can be accomplished by clicking the Send Email button in the E mail menu 8 2 4 FTP Settings FTP is used to upload recording streaming to your FTP server You can set up...

Page 39: ...he network status and FTP server status This icon indicates the DVR is trying to upload the streaming of this channel but it failed You should check whether the FTP configuration is correct Also you s...

Page 40: ...elligent appliances and mobile devices from many different vendors In our DVR UPNP is used to automatically map the HTTP port and server port in your router To configure UPNP settings 1 First of all e...

Page 41: ...lect a PTZ camera Call Preset Call a PTZ preset Call Patrol Call a PTZ sequence Call Pattern Call a PTZ pattern Preset Enter PTZ preset configuration menu Patrol Enter PTZ patrol configuration menu Pa...

Page 42: ...terns 9 3 1 Understanding PTZ Controls Before setting presets patrols and patterns it s important to understand some of the features of the PTZ control panel shown in Figure 3 The controls on the PTZ...

Page 43: ...el to adjust the position of the preset Select a Preset number and click the Set button to save preset location Clear Preset Select a Preset number and click the Clear button to delete the preset You...

Page 44: ...ation and Speed The Key Point No determines the order at which the PTZ will follow while cycling through the patrol The Duration refers to the time span to stay at the corresponding key point The Spee...

Page 45: ...utton to call the patrol select the stop button to stop the patrol 9 3 4 Customizing Patterns Patterns can be setup by recording the movement of the PTZ To setup and use PTZ patterns 1 Select the Patt...

Page 46: ...e the PTZ control panel to move the PTZ The PTZ movements will be recorded until the Stop Record button is clicked 4 To run a pattern click the Run Pattern button on a valid pattern The PTZ will move...

Page 47: ...re OSD settings 1 Enter the Camera Management Settings menu by clicking Menu Configuration Camera Settings 2 Select channel to setup OSD settings under Channel Click the Set button 3 Configure desired...

Page 48: ...s contrast saturation and hue can also be adjusted in the Camera Management menu To adjust display settings 1 Enter the Camera Management Settings menu by clicking Menu Configuration Camera Settings 2...

Page 49: ...49...

Page 50: ...the Init button 4 Select OK button to begin initialization After the HDD has been initialized the status of the HDD will change from No to Yes To check the status of a HDD 1 Enter the HDD Management m...

Page 51: ...DD and the detailed information of HDD 11 2 Configuring HDD Alarms HDD alarms can be set to trigger when an HDD is full or in an abnormal state To set HDD alarms 1 Enter Exception menu by clicking Men...

Page 52: ...eral Settings 2 Select the General tab 3 Configure general settings These settings include Language Default language used in DVR menus Video standard NTSC PAL VGA Resolution VGA output resolution HDMI...

Page 53: ...The No of the DVR Device Name The name of DVR 12 2 Managing User Accounts By default your DVR comes with one user account the Administrator account The Administrator user name is admin and the passwo...

Page 54: ...ed into two tiers Operator The Operator user level has the authority to configure two way audio in network settings and all parameters in channel settings Guest The Guest user can not configure networ...

Page 55: ...et the record mode Network Settings Set the IP DDNS etc PTZ Settings Set the PTZ configuration Alarm Settings Set the alarm Display Settings Set the parameters for display Exception Set the exception...

Page 56: ...the User Settings menu by clicking Menu Configuration User Management 2 Select user to delete 3 Click the Delete button to delete user 4 Click the OK button to exit menu 12 2 3 Modifying a User To mo...

Page 57: ...export a configuration file to USB device USB device must be connected at this point to the DVR 3 To import a configuration file select the file from the USB device and click the Import button After...

Page 58: ...ct your system supplier for further assistance 12 3 3 Restoring Default Settings To restore default factory settings to your DVR 1 Enter the Default Settings menu by clicking Menu Maintenance Default...

Page 59: ...DVR are logged into the system logs To access the system logs and search for these events 1 Enter the Log Search menu by clicking Menu Maintenance Log Search 2 Set search parameters 3 Click the Searc...

Page 60: ...60 4 Click Cancel to exit out of menu...

Page 61: ...control firstly You can download this ActiveX plug in from DVR or setup it from the attached CD Setup ActiveX control from attached CD In the attached CD enter the directory of Tools double click the...

Page 62: ...the attention bar at the top of the main page and select Install ActiveX Control DVR Net viewer will reset 6 In the warning box click Install The login page appears Note The process will last for seve...

Page 63: ...the channel of the connected PTZ camera s Click the navigation arrows to pan and tilt the camera 3 Click to control zoom focus and iris You can adjust the movement speed of the PTZ by dragging the sc...

Page 64: ...next channel s 6 Display Modes Click the icons to view channels in single channel full screen quad and split screen configurations 13 3 Remote Playback Use the Replay menu to search and playback recor...

Page 65: ...control 10 Play position scroll bar 13 4 Setup Click Setup at the top of the main screen you can select local setup or remote setup from the pop up menu Local Setup In local setup page you can setup...

Page 66: ...l for encapsulating Point to Point Protocol PPP frames inside Ethernet frames It is used mainly with ADSL services where individual users connect to the ADSL transceiver modem over Ethernet and in pla...

Page 67: ...roperly connected 2 Check that the dome decoder type is correct 3 Check that the dome decoder speed configuration is correct 4 Check that the dome decoder address bit configuration is correct 5 Check...

Page 68: ...68...

Reviews: