background image

MDE-5183C Passport® PX60 Express Ordering Kiosk Installation Guide · May 2018

Page 61

Installing Express Ordering Kiosk

22

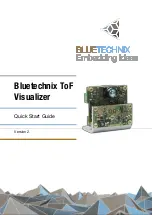
Install the Kitchen Monitor system. 

Note: For assistance on configuring and troubleshooting the kitchen monitor system, contact 

MicroPlus Inc. at 1-919-816-9222/1-919-816-9333.

Connect to corporate network if not already connected. 

Note: Best practice is to have a controller box attached to the screen using Video 

Electronics Standards Association (VESA) mount screws. Retain the screws and 
mounting brackets that are shipped with Kitchen Monitor system. 

An example of a Kitchen Monitor mounted over kitchen preparation area is shown in 

Figure 126

Figure 126: Kitchen Monitor Mounted over Kitchen Preparation Area

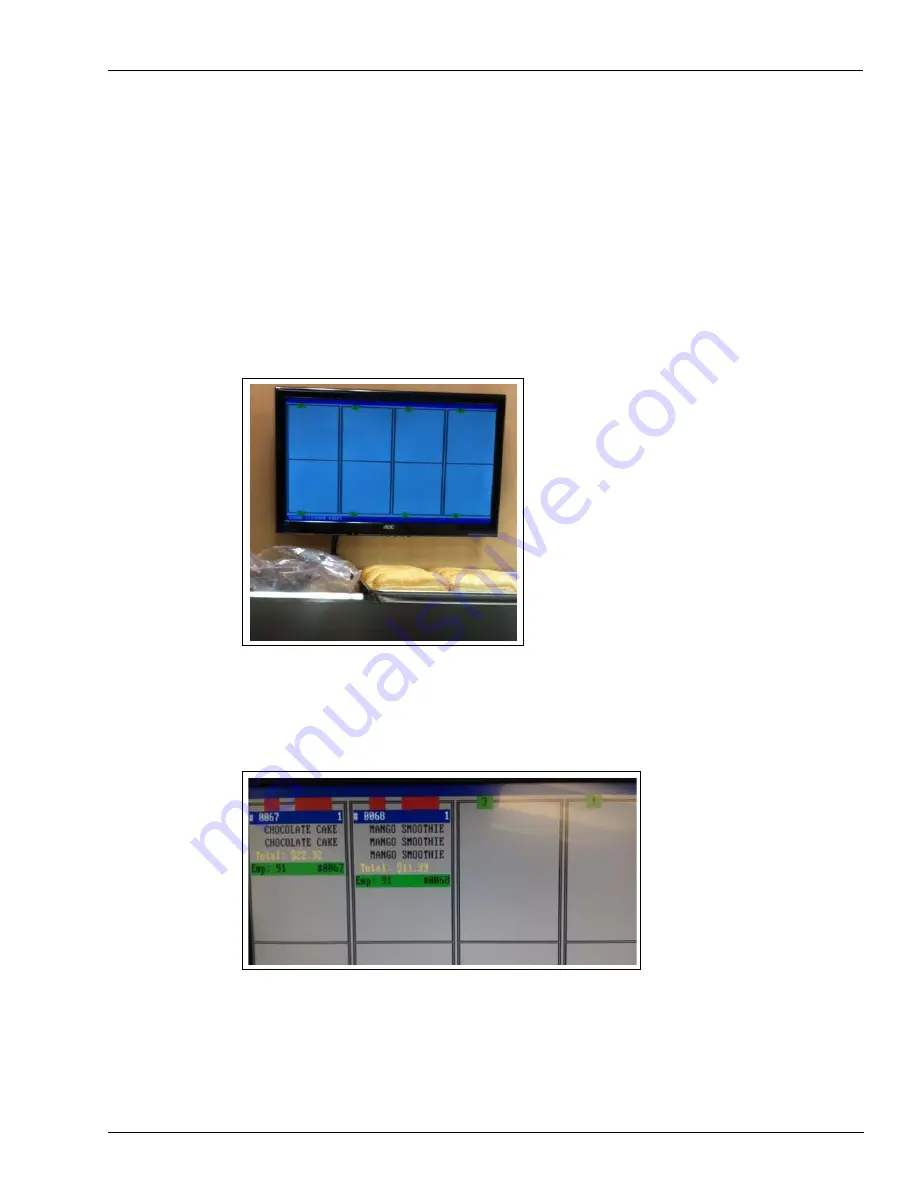
An example of a Kitchen Monitor placed on the counter in the store area is shown in 

Figure 127

The screen displays a bump bar and bump printer.

Figure 127: Kitchen Monitor on the Counter 

Summary of Contents for Passport PX60

Page 1: ...sport PX60 Express Ordering Kiosk Flat blade Screwdriver Phillips Screwdriver USB QWERTY Keyboard USB Mouse USB Thumb Drive provided by Gilbarco Veeder Root Parts List The following table lists the spare parts required to install the Passport PX60 Express Ordering Kiosk Item Description Part Number Quantity 1 Double Data Rate DDR 3 Dynamic Random Access Memory DRAM 4 GB 1066 1333 MHz M09219B002 1 ...

Page 2: ...rt up and Service Manual for the Cisco Firewall Router Q13708 08 Passport MDE 4956 Honeywell Xenon 1900 Scanner Setup Service Instructions POS Peripheral MDE 5083 Passport Hardware Start up and Service Manual for PX60 Platform Passport MDE 5187 Express Ordering Kiosk Quick Reference Poster Passport PT 1877 Retail Automation Products Illustrated Parts Manual Parts Manual Abbreviations and Acronyms ...

Page 3: ... Introduction TAC Technical Assistance Center TCP IP Transmission Control Protocol Internet Protocol TEA Training Effectiveness Analysis UPS Uninterruptible Power Supply USB Universal Serial Bus VESA Video Electronics Standards Association VGA Video Graphics Adapter Term Description ...

Page 4: ...d mouse Keyboard and mouse are not required to stay connected to the kiosk If they cannot be secured out of reach of site customers remove them and have the site personnel keep available for future use Ensure Passport is on minimum version Passport minimum required versions 8 02V 8 03L 8 05K 8 06G 9 0D V10 00 V10 00L patch and later for third party data interface functionality Ensure the Honeywell...

Page 5: ...lized letters The Xpedient software is hard coded to look for printer named LOCAL when sending receipt information Ensure printer Dual Inline Package DIP switch settings are completed TM T88V settings 9600 8 none 1 DTR DSR All switches are off except DSW1 7 on To check settings hold Feed button while powering on receipt will print with DIP switch settings POST INSTALLATION CHECKLIST Check if OK Pr...

Page 6: ...il POS OPOS Settings 19200 8N1 with Flow Control TM T88V DSW 1 All Off Except 7 DSW 2 All Off OPOS Settings 9600 8N1 DTR DSR Note Epson printers for Passport are shipped with different DIP switch settings than described in the table Ensure that you configure the DIP switches to match the settings in the table Connecting the Kiosk To connect the kiosk proceed as follows 1 Connect the 9 pin barrel c...

Page 7: ...s complete USB keyboard and mouse temporarily installed can be removed and retained for reuse Figure 1 Connections Printer Power LAN2 DMZ Connection to Passport Secure Router Main Kiosk ONLY LAN1 Store Corporate Connection Keyboard and Mouse Printer Kiosk Power Connection Printer Data 5 Apply power to the unit and enter BIOS setup Turn on secondary NIC for KIOSK001 a When the logo shown in Figure ...

Page 8: ...t Chipset South Bridge Figure 4 Navigating to South Bridge d Select 2nd LAN Controller Figure 5 Navigating to 2nd LAN Controller e Select Enabled then press Enter Figure 6 Enabling 2nd LAN Controller f Press F4 on the keyboard The dialog box shown in Figure 7 opens Figure 7 Saving Configuration g Select Yes and press Enter ...

Page 9: ...ame the kiosks the same system name or you will have issues with Kitchen Monitor printing Figure 8 Naming Kiosks b When the dialog box shown in Figure 9 opens select Yes The unit will reboot Figure 9 Confirming Kiosk Name Note Prior to selecting Yes record the requirement in step 7a 7 Once the system has booted log in as Passport technician and elevate the Passport user to Admin a When the Windows...

Page 10: ...lation Guide May 2018 Installing Express Ordering Kiosk c Select Start Control Panel User Accounts Figure 10 Selecting User Accounts d Select Manage another account Figure 11 Selecting Manage Another Account e Select Passport Figure 12 Selecting Passport Account ...

Page 11: ... Page 11 Installing Express Ordering Kiosk f Select Change the account type Figure 13 Changing Account Type g Select Administrator Change Account Type and exit Figure 14 Selecting Administrator Login h Close the User Accounts window and reboot the system to start as Passport ...

Page 12: ...adapter settings To configure LAN1 adapter proceed as follows a Select Start Control Panel Network and Sharing Center Figure 15 Selecting Network and Sharing Center b Select Change Adapter Settings Figure 16 Changing Adapter Settings c Right click Local Area Connection on the upper left and select Properties Figure 17 LAN1 Adapter Properties ...

Page 13: ...s Ordering Kiosk d Select Internet Protocol Version 4 Properties Figure 18 Configuring LAN1 Adapter e Enter the supplied IP address information and select OK This should have been obtained from the site IT personnel and recorded on the pre installation checklist Figure 19 Entering IP Address for LAN1 ...

Page 14: ...ering Kiosk 9 Configure LAN2 network adapter settings To configure LAN2 adapter proceed as follows a Right click the Local Area Connection 4 on the upper right and select Properties Figure 20 LAN2 Adapter Properties b Select Internet Protocol Version 4 TCP IPv4 Properties Figure 21 Configuring LAN2 Adapter ...

Page 15: ...s for LAN2 d Close all open windows 10 Copy files from USB a Insert a USB storage device provided in the installation kit into an available USB port on kiosk to access the required Xpedient software b Select the Windows Explorer icon from the task bar Figure 23 Starting Windows Explorer Kiosk Unit IP Address Subnet Mask Default Gateway Kiosk001 10 5 60 31 255 255 255 0 10 5 60 14 Kiosk002 10 5 60 ...

Page 16: ...ress Ordering Kiosk c Select C File New Folder Figure 24 Creating New Folder d Name this folder Xpedient Figure 25 Naming Folder to Xpedient e From the left plane select Removable Disk D Figure 26 Selecting Removable Disk Drive f From the toolbar select Edit Select all Figure 27 Edit Shortcut Menu ...

Page 17: ...ng Express Ordering Kiosk g Select all items on the USB drive as shown in Figure 28 Figure 28 Selecting USB Drive Files h From the toolbar select Edit Copy to folder Figure 29 Selecting Copy to Folder in Menu i Select the C Xpendient folder and click Copy Figure 30 Copying to Xpedient Folder ...

Page 18: ...ied Figure 31 Copying Files Once all the files are copied remove the USB storage device from the system 11 Install Adobe Flash To install Adobe Flash proceed as follows a Select Start Windows Explorer C Xpedient Flash Player 14 b Double click flashplayer14_0r0_176_winax msi Figure 32 Executing Adobe Flash Player c Click Install Figure 33 Installing Adobe Flash Player ...

Page 19: ...ompleting Installation of Adobe Flash Player 12 Install TeamViewer remote support software for Gilbarco Support To install TeamViewer proceed as follows a Select Start Windows Explorer C Xpedient TeamViewer Host b Double click Teamviewer_Host_Setup exe Figure 35 Executing TeamViewer c Click Next Figure 36 TeamViewer Installation Welcome Screen ...

Page 20: ...uide May 2018 Installing Express Ordering Kiosk d Select Both of the above and then click Next Figure 37 Selecting TeamViewer Environment e Agree to the terms and click Next Figure 38 Accepting License Agreement Terms f Click Next Figure 39 TeamViewer Setup Wizard Screen ...

Page 21: ...e May 2018 Page 21 Installing Express Ordering Kiosk g Enter and confirm password 911Tech and click Next Figure 40 Entering TeamViewer Password h Select I don t want to create a TeamViewer account now and then click Next Figure 41 Selecting TeamViewer Account Option ...

Page 22: ...ormation only click the Finish button Figure 42 Completing TeamViewer Wizard j Once TeamViewer is installed and connected to network you should see that the unit is online and you have a unique TeamViewer ID Notate the unique TeamViewer ID for Gilbarco Help Desk to configure into our system After notating the TeamViewer ID click OK Figure 43 TeamViewer Configuration Confirmation ...

Page 23: ... Explorer C Xpedient OPOS b Double click OPOSN1 12 17 exe c Select Unzip and OK when it is successfully unzipped and close the file Figure 44 Extracting OPOS Printer Setup File i ii d Close the Winzip Self Extractor window e Using Windows Explorer navigate to C OposadkforNET Ver1 12 17 f Double click setup exe Figure 45 Executing OPOS Printer Extracted Setup File g Choose English as the setup lang...

Page 24: ...May 2018 Installing Express Ordering Kiosk h Click Next on the Welcome screen to continue the installation Figure 47 Welcome Screen i On the License Agreement screen select I accept the terms of the license agreement and click Next Figure 48 Accepting License Agreement Terms ...

Page 25: ... User as the type of setup required Click Next to proceed Figure 49 Choosing Setup Type k Select all the check boxes Serial Parallel USB and Ethernet as communication method and then click Next to proceed Figure 50 Choosing Communication Method for POS Printer 1 The installer displays the current settings before copying files ...

Page 26: ...ering Kiosk Installation Guide May 2018 Installing Express Ordering Kiosk l Click Next to proceed Figure 51 Copying Files m Select No I will restart my computer later when asked to reboot Click Finish to proceed Figure 52 Completing Installation ...

Page 27: ...s Ordering Kiosk Installing Receipt Printer 14 Install the Receipt Printer a Click the Start All Programs menu to confirm that EPSON OPOS for NET is installed Figure 53 EPSON OPOS for NET b Right click SetupPOS to open the context menu and select Run as administrator Figure 54 Context Menu c Click Add ...

Page 28: ...ceed Note In this example TM T88V is selected as the Device Name Figure 55 Adding Device e Turn off your receipt printer press Print Feed and then turn on the receipt printer power to obtain the printout of printer serial specific settings Cycle power to the printer to return it to normal operations once you have validated the settings Figure 56 Serial Specific Settings For proper functionality th...

Page 29: ...Add Device window and set the Serial Specific settings to match the printer receipt After verifying that the information is correct click Next Figure 57 Verifying Serial Specific Settings Note Port name must be configured for COM5 g When the dialog box shown in Figure 58 opens click Done Figure 58 Confirming Serial Specific Settings ...

Page 30: ...ly update the printer configuration Figure 59 POS Printer i Test the printer to ensure that it is functioning correctly This can be done using the CheckHealth Utility located under Start Menu All Programs EPSON OPOS for NET Figure 60 CheckHealth Utility j Click the sign beside PosPrinter and click LOCAL to select the specific receipt printer ...

Page 31: ...a small receipt and the POSPrinter Service window opens with a Complete message If the printer was not successfully set up reprint the configuration from the unit and reattempt configuration Figure 62 POSPrinter Service 15 Configure Passport for third party interface Passport Third party Interface Configuration Note For Passport systems running software V10 Service Pack N or later it is not necess...

Page 32: ...r Workstation MWS with the proper credentials and select Feature Activation Figure 63 Selecting Feature Activation b Verify that the Third Party Data Interface bundle is activated If the bundle is not activated call the Gilbarco Help Desk at 1 800 800 7498 for activation Figure 64 Confirming Third party Data Interface Activation If activation is required it will be necessary to sign off and then b...

Page 33: ...sk Installation Guide May 2018 Page 33 Installing Express Ordering Kiosk c After validating or activating the Third party Interface bundle select Set Up in MWS Figure 65 Selecting Setup d On the Set Up menu select Store Figure 66 Selecting Store ...

Page 34: ...e f In the Price Book section of the interface configuration it is necessary to check all boxes for Export price book when price book is imported from an external source Export price book on a nightly basis and Copy inbound item List Combo And Match files After selecting these boxes click Save Figure 68 Third party Interface Options g Press CTRL ALT P on the keyboard to access the Passport System ...

Page 35: ...8 Page 35 Installing Express Ordering Kiosk h Provide the current call center credentials for access and click Login Figure 69 Call Center Credentials i When the System Maintenance toolbar opens select Call Center and then Adv User Figure 70 Call Center Credentials Adv User ...

Page 36: ...dering Kiosk j Username PassportTech Password 911Tech When the Advanced User login dialog box opens enter the appropriate username and password Figure 71 Logging In Adv User k When the Passport Image Control Panel opens select Administrative Command Prompt Figure 72 Selecting Administrative Command Prompt ...

Page 37: ...dvantage pos bin directory m To access the correct path type the following and press Enter cd program files advantage pos bin Figure 73 Navigating to Bin Directory of Advantage Pos n Once in the appropriate directory type the following and press Enter PricebookExporterJob exe Figure 74 Executing PricebookExporterJob o Minimize the command prompt 16 Set up the Passport Secure Router ...

Page 38: ...k Passport Secure Router Setup To set up the Passport Secure Router proceed as follows a On the Passport Image Control Panel click Internet Explorer 10 5 48 1 Figure 75 Passport Image Control Panel b When the security dialog box opens click Continue to this website not recommended Figure 76 Passport Security Dialog ...

Page 39: ...042 as the password when the login screen opens Figure 77 Passport Router Login Note For locations with the Linksys Secure Router enter the following credentials d On the System Summary section select Setup Figure 78 Passport System Summary e In the DMZ Setting section click the Configuration icon Figure 79 DMZ Setting Username admin Password GVR09RV042 ...

Page 40: ...mmary section select Firewall and then Access Rules Figure 81 Firewall Access Rules h At the bottom of the page click Add Figure 82 Adding Firewall Access Rule i Action Allow Service PX52 hardware BOSShare TCP 139 139 PX52 hardware PX60 hardware BOSShare TCP 445 445 PX60 hardware Log Log packets to match this rule Source Interface DMZ Source IP Range 10 5 60 31 To 10 5 60 39 Destination IP 10 5 48...

Page 41: ... all the settings match the example shown in Figure 83 Figure 83 Verifying DMZ Settings k Click Save l When the dialog box shown in Figure 84 opens click Cancel Figure 84 Confirming DMZ Settings m When the Access Rules page is displayed verify that the new rule is enabled and programmed properly Figure 85 Verifying New Access Rule ...

Page 42: ...s RV042 Router that is being used for the third party router refer to MDE 4866 Passport Firewall Router Start up and Service Manual as necessary To perform the same setup for any other router you must follow the manufacturer s documentation IMPORTANT INFORMATION a Apply power to the Cisco RV042 Router b Press and hold the Reset button on the back of the router for 30 seconds Figure 86 Resetting Ro...

Page 43: ...e network connection on your laptop and then to the port 1 of the router Figure 87 Connecting CAT5E Cable f Open Internet Explorer and navigate to 192 168 1 1 g When the security dialog box opens click Continue to this website not recommended Figure 88 Third party Router Security Dialog h Enter admin as the username and the password when the login screen opens Figure 89 Admin Login Screen ...

Page 44: ... Summary menu select System Management Figure 90 System Management j On the System Management menu select Backup and Restore Figure 91 Backup and Restore k In the Backup and Restore section click Browse and navigate to the location where you previously saved the configuration file on the Gilbarco FTP Click Restore Figure 92 Restore ...

Page 45: ...m When the dialog box shown in Figure 94 opens enter the password as GVRRV042 Figure 94 Restore Password n During this time you will lose connection to the router as the configuration is loaded Close Internet Explorer o On your laptop navigate to Control Panel Network and Internet Network Connections p Right click on Local Area Connection and select Properties Figure 95 LAN Connection Properties ...

Page 46: ...ocol Version 4 TCP IPv4 and click Properties Figure 96 Protocol Version Properties r IP Address 10 5 60 15 Subnet mask 255 255 255 192 Default gateway 10 5 60 14 Select the option Use the following IP address and click OK after entering the following parameters Figure 97 Protocol Settings s Open Internet Explorer and navigate to 10 5 60 14 ...

Page 47: ...ck Continue to this website not recommended Figure 98 Protocol Settings Security Dialog u Enter GVR as the username and GVRRV042 as the password when the login screen opens Figure 99 GVR Login Screen v Once the RV042 System Summary screen is displayed click DHCP in the left navigation column Figure 100 Navigating to Dynamic Host Configuration Protocol DHCP ...

Page 48: ...31 10 5 60 39 Food Service Back Office 10 5 60 15 10 5 60 39 Food Service Impulse 10 5 60 31 10 5 60 49 Food Service Impulse Back Office 10 5 60 15 10 5 60 49 x After entering the valid Dynamic Range scroll to the bottom of the page and click Save y Disconnect the CAT5E cable from your laptop and place the Secondary Router sticker supplied in a box on top of the router z Connect the CAT5E cable yo...

Page 49: ... LAN CAT5E cables and the Back Office LAN CAT5E cable to ports 2 3 and 4 of the secondary router Figure 103 Passport System with Two Kiosk Units and Back Office To Passport Secure Router DMZ Port To Back Office Computer To Kiosk Units LAN 2 Connection To Site LAN Internet Router or Switch Figure 104 Passport System with Three Kiosk Units and Back Office To Passport Secure Router DMZ Port To Back O...

Page 50: ...roceed as follows a On Kiosk001 click the Windows shortcut key on the keyboard and select Windows Explorer b In the Windows Explorer toolbar click Tools Map network drive in the drop down list Figure 105 Mapping Network Drive If the system is staged off site it is necessary to map the folder to a local one and correct this once installed onsite IMPORTANT INFORMATION c Once the Map Network Drive wi...

Page 51: ...ering Windows Security Credentials f Once the username and password credential information have been entered select the Remember my credentials check box and then click OK 19 Connect the Kitchen Monitor to customer network To connect the Kitchen Monitor to customer network proceed as follows a Connect MicroPlus Kitchen Monitor Electrically Programmable Analog Device EPAD to customer local network ...

Page 52: ...s currently on the network run ping test from Kiosk001 Figure 108 Mapping Primary Kiosk to Network Drive Power Cable Bump Pad Video Graphics Adapter VGA Cable LAN Cable MicroPlus Kitchen Monitor 20 Install Xpedient software if not already installed To install Xpedient software proceed as follows a Select Start Windows Explorer C Xpedient b Right click Xpedient2011_Kiosk_7 0 27 zip Figure 109 Xpedi...

Page 53: ...53 Installing Express Ordering Kiosk c Click Extract All Figure 110 Extracting Xpedient Compressed File d When the screen shown in Figure 111 opens ensure that the box is checked for Show extracted files when complete and click Extract Figure 111 Extracting Xpedient Compressed File ...

Page 54: ... Installing Express Ordering Kiosk e When the new folder opens double click KioskInstallationPackage msi Figure 112 Executing Kiosk Installation Package File f Select Accept to accept the Xpedient License Agreement and click Next Figure 113 Accepting Xpedient License Agreement Terms ...

Page 55: ...tings check boxes cleared and click Next to proceed do not select Replace OS Shell or Utilize Auto Login Figure 114 Xpedient Auto Login The Kiosk Settings screen has three tabs that require data entry or review before you can begin the installation Note The second and third tabs are not applicable for kiosks 2 and higher Figure 115 Kiosk Settings ...

Page 56: ...ollowing is description of the fields in each of the three tabs Order Numbers The order number range is 1 200 for the main kiosk 201 400 for the second kiosk and 401 600 for the third kiosk Each kiosk order number range starts at the next number after the last and will have 200 order numbers Figure 116 Kiosk Order Numbers ...

Page 57: ...he Kitchen Monitor The IP is supplied by the customer as it is on their store corporate network Prior to this step you should have already tested the connectivity to the MicroPlus Kitchen Monitor system from the main kiosk If this has not been done at this time enter the IP address as it should be when all is connected If this IP address should change there is a tool under the Xpedient Installatio...

Page 58: ...Selection Review screen If successful the installation displays the The installation has completed successfully dialog box Figure 119 Xpedient Installation Successful If the error shown in Figure 120 opens you need to correct the mapped drive issue Figure 120 Xpedient Installation Error Once the issue is resolved continue with installation ...

Page 59: ...dient Installation Confirmation k After the system restarts select the Kiosk ID and select Set Kiosk ID Figure 122 Setting Kiosk ID l Enter the License Code and select License Kiosk as shown in Figure 123 Note Make note of the Machine Identifier code provide this information to Xpedient Help Desk to get a valid License Code Figure 123 Entering Xpedient License Code ...

Page 60: ...figuration to kiosks 2 and higher proceed as follows a On the keyboard press CTRL Shift Alt F12 simultaneously to minimize the Xpedient software b Using Windows Explorer navigate to C Program Files Xpedient Kiosk DefaultConfig c Right click KioskConfiuration xml select Open with and then click Notepad Figure 124 Editing Kiosk Configuration File d Replace the RemotePrinterNames empty tag with Remot...

Page 61: ...est practice is to have a controller box attached to the screen using Video Electronics Standards Association VESA mount screws Retain the screws and mounting brackets that are shipped with Kitchen Monitor system An example of a Kitchen Monitor mounted over kitchen preparation area is shown in Figure 126 Figure 126 Kitchen Monitor Mounted over Kitchen Preparation Area An example of a Kitchen Monit...

Page 62: ...or a routing character that will be ignored by the first terminal in case you have two screens in place driving to kitchen screens with different items Field 44 Used on secondary kitchen system to identify characters that are unique for that screen to display only particular food items Field 45 Used to tell first kitchen system to echo signal out COM1 to secondary kitchen system Field 47 Used to t...

Page 63: ...not functional verify system name on all kiosks 26 Validate the QR code on the Passport system by scanning and verifying all items accounted for are on the receipt If some or all PLUs are missing or scanning fails refer to Troubleshooting on page 66 27 Verify information on the Passport receipt is accurate and has order number for the correct kiosk 28 Call Xpedient to set up a GoToMeeting test ses...

Page 64: ...terial and use it to pack the failed HDD if it is returned CAUTION HDD Tests To provide more accurate diagnostics all requests for SATA HDD replacements must be accompanied by Drive Fitness Test results Drive Fitness Test for PX60 allows you to test the HDD when it is inside the Express Ordering Kiosk Refer to Troubleshooting on page 66 Figure 132 SATA HDD Replacing SATA HDD To replace the SATA HD...

Page 65: ... ii iii Replacing the HDD is now complete Connecting SATA HDD The SATA HDD connects directly to the Express Ordering Kiosk HDD backplane through a slide in tray Keyboard USB QWERTY Keyboard The USB QWERTY keyboard is a standard IBM compatible keyboard that connects to the Express Ordering Kiosk This keyboard enables users to input alphanumeric data Mouse A USB mouse connects to the Express Orderin...

Page 66: ...tmeter Bad power supply cable If the wall outlet has power but the blue LED on the power supply brick is off swap with the known working cable If no change is seen swap the brick with the known working unit Loose or damaged cable Remove and reseat all power cord connections If the blue LED on the power supply brick is on check for damaged pins on low voltage side of the cable connecting to the com...

Page 67: ...mal printer head software glitch Verify you are using the correct paper type If the other kiosk s is working use paper from the other printer to test If the test fails swap printers If no change reboot the kiosk If no change escalate or call TAC Order not printing to kitchen printer Wrong paper connections printer configuration bad printer Check paper power verify connections at the kiosk printer ...

Page 68: ...erify NetOps is functioning on the kiosk s Xpeditent cannot connect Kiosk has wrong IP address Site router configuration changed LAN cable disconnected or connected to wrong LAN port on kiosk No communication to router GoToMeeting software has not been setup Ensure that LAN2 is enabled in BIOS Check LAN connections and verify if correct ports are being used Check router configuration will require ...

Page 69: ...creen Either No IP Configured on MicroPlus or IP Address never entered into Express Ordering software Confirm MicroPlus EPAD is connected to customer network Run Ping test to confirm you can ping component from Kiosk 001 If no IP address configured on MicroPlus refer to MicroPlus KMS on page 57 If the connections are correct you need to make sure that MicroPlus is connected with Express Ordering D...

Page 70: ... of Gilbarco Inc GOLDSM is a service mark of Gilbarco Inc GoToMeeting is a trademark of Citrix Online Honeywell is a registered trademark of Honeywell International Inc IBM is a registered trademark of International Business Machines Corporation Intel is a registered trademark of Intel Corporation Internet Explorer is a registered trademark of Microsoft Corporation Linksys is a registered trademar...

Reviews: