background image

GiiNii 

8” Digital Picture Frame                                                                            GN-801W 


29 

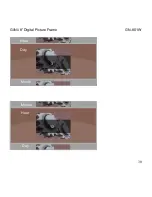
3.4.2 Date and Time 

Press Left or Right, and enter Date and Time, use Up or Down to select the items 

you

’d like to edit, use adjust Day, Hour, Minute, AM/PM, Month and Year. 

Then press OK to confirm. 


Year 

1970 

Month 

Month 

Day 

Year 

Summary of Contents for 8" Digital Picture Frame

Page 1: ...GiiNii 8 Digital Picture Frame User Guide Edition Version 3 4 www giinii com 2008 GiiNii International Model GN 801W...

Page 2: ...necting to Power 6 Turning on the Digital Picture Frame 7 2 Buttons 8 Buttons and Menu Operation 8 Inserting a memory card or USB Flash Drive 9 3 Menu Options 11 Slideshow 11 Button functions in slide...

Page 3: ...me GN 801W 3 3 4 2 Date and Time 29 3 4 3 Slideshow Setting 32 3 4 4 Information 34 4 Technical specification 35 Replacement Parts 35 5 Frequently Asked Questions 36 6 Regulation Compliance 37 7 GiiNi...

Page 4: ...nds and your family To get the most out of your new GiiNii product please read through this entire Owner s Manual Chapter 1 Let s Get Started Chapter 2 Buttons Chapter 3 Menu Options Also please check...

Page 5: ...in 1 card socket Supports USB 2 0 drive Selectable transition effects for pictures Multiple Language Selection available for Menu Display in English Fran ais Nederlands Espa ol Deutsch Portugu s Itali...

Page 6: ...AC Adaptor 5V 1 5 A 1 Let s Get Started Connecting to Power Place your digital picture frame on a flat surface Insert the small jack into the picture frame as shown below then plug the AC cord into an...

Page 7: ...a few seconds if you have a memory device to insert Your player comes with 3 preinstalled pictures and will automatically begin slideshow if there is no memory card or supported media found If you in...

Page 8: ...e sides The buttons can be used to drive all functions of the on screen menu The G Button is used to navigate between modes and time Once the player is powered on press any button on the right side to...

Page 9: ...o previous menu Left Previous item Right Next item Up Previous menu item Down Next menu item OK Validate process Enter submenu Inserting a memory card or USB Flash Drive Your player is equipped with p...

Page 10: ...nd MS Duo can be played with an adaptor not provided You may also use a USB Flash Drive in this device The player gives priority to memory cards in the 6 in 1 before a USB drive Remove inserted memory...

Page 11: ...ow In this mode press the Up or Down or OK buttons to access the Photo menu press the Left or Right buttons to select previous or next photo press the G Button to show Clock and press it again to retu...

Page 12: ...GiiNii 8 Digital Picture Frame GN 801W 12 Photo Setting Photo View Slideshow Slideshow Clock Press G button Press G button Clock...

Page 13: ...e previous photo OK Up Down Access Photo View Right Show the next photo Main Menu In Slideshow press OK to access Photo Slideshow Thumbnail Main Menu Slideshow Mode Transit to show thumbnail Photo bro...

Page 14: ...Clock When in slideshow press the G button to access Clock Press OK Up Down to show Clock menu then press Left and Right buttons to select the clock style A Analog Clock and D Digital Clock Use the U...

Page 15: ...ontained in your memory card SD SDHC MMC MMC MMC MS MS Duo XD Card and USB Flash Drive are supported 2 When the Photo menu is selected photos are displayed in thumbnail If there is no card inserted de...

Page 16: ...Picture Frame GN 801W 16 Button Function G Button Slideshow Clock Up Access Clock Left Select the left photo Play OK Slideshow Photo Menu Thumbnail Right Select the right photo Down Access Setting Pho...

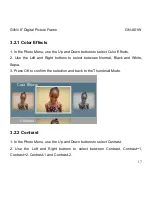
Page 17: ...t and Right buttons to select between Normal Black and White Sepia 3 Press OK to confirm the selection and back to the Thumbnail Mode 3 2 2 Contrast 1 In the Photo Menu use the Up and Down buttons to...

Page 18: ...and back to the Thumbnail Mode 3 2 3 Brightness 1 In the Photo Menu use the Up and Down buttons to select Brightness 2 Use the Left and Right buttons to select the brightness 3 Press OK to confirm th...

Page 19: ...ture Frame GN 801W 19 3 2 4 Delete 1 In the Photo Menu use the Up and Down buttons to select Delete 2 Use the Left and Right buttons to select Yes or No Default Brightness Delete Contrast Delete Rotat...

Page 20: ...thumbnail photos 3 2 5 Rotate Manual Rotate in menu mode 1 In the Photo Menu use the Up and Down buttons to select Rotate 2 Use the Left and Right buttons to select between Landscape and Portrait 3 P...

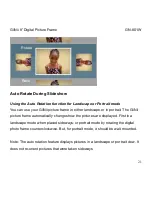
Page 21: ...ortrait The GiiNii picture frame automatically changes how the pictures are displayed First in a landscape mode when placed sideways or portrait mode by rotating the digital photo frame counterclockwi...

Page 22: ...tio 1 In the Photo Menu use the Up and Down buttons to select Ratio 2 Use the Left and Right buttons to select Full Screen Default or Actual Size 3 Press OK to confirm the selection and back to the Th...

Page 23: ...GiiNii 8 Digital Picture Frame GN 801W 23 3 3 Calendar Calendar Clock...

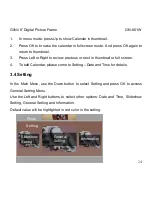
Page 24: ...thumbnail or full screen 4 To edit Calendar please come to Setting Date and Time for details 3 4 Setting In the Main Menu use the Down button to select Setting and press OK to access General Setting M...

Page 25: ...1 1 Language In General Setting Menu use the Up or Down buttons to enter Language Menu Use Left or Right buttons to select language English Fran ais Nederlands Espa ol Deutsch Portugu s Italiano Pres...

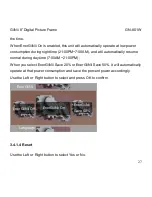
Page 26: ...to adjust between Darker Normal and Brighter Press OK to confirm and back to Setting Menu 3 4 1 3 EnerGiiNii Four selections are available EnerGiiNii Off EnerGiiNii On EnerGiiNii Save 20 and EnerGiiNi...

Page 27: ...ume normal during daytime 7 00AM 21 00PM When you select EnerGiiNii Save 20 or EnerGiiNii Save 50 it will automatically operate at that power consumption and save the percent power accordingly Use the...

Page 28: ...GiiNii 8 Digital Picture Frame GN 801W 28 Select Yes press OK to reset otherwise select No and press OK to return to the Setting menu Reset Yes No Reset Press OK key to reset No Language Language...

Page 29: ...801W 29 3 4 2 Date and Time Press Left or Right and enter Date and Time use Up or Down to select the items you d like to edit use adjust Day Hour Minute AM PM Month and Year Then press OK to confirm...

Page 30: ...GiiNii 8 Digital Picture Frame GN 801W 30 Day Month 3 Hour 12 Hour Minute Day...

Page 31: ...GiiNii 8 Digital Picture Frame GN 801W 31 PM AM PM AM Minute 14 AM PM Hour Minute...

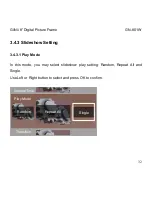
Page 32: ...3 4 3 Slideshow Setting 3 4 3 1 Play Mode In this mode you may select slideshow play setting Random Repeat All and Single Use Left or Right button to select and press OK to confirm Play Mode Repeat A...

Page 33: ...hutter Insert Leave News Plug Sign Flabellate Fade and Shrink Use the Left or Right button to select and press OK to confirm 3 4 3 3 Interval Time In this mode you may select the slideshow interval ti...

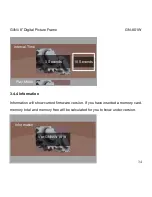
Page 34: ...4 Information Information will show current firmware version If you have inserted a memory card memory total and memory free will be calculated for you to know under version Interval Time 3 Seconds 1...

Page 35: ...5 min Shell Material ABS Buttons Select Buttons x 7 Power Button x 1 Supported Cards SD SDHC MMC MMC MS MS Duo and xD Photo Format JPG TIFF GIF Replacement Parts If you need a replacement part for you...

Page 36: ...the player away from any interference e g induction cooker hair dryer magnetized and unshielded speakers etc Card Error message shown 1 Backup the contents and then format the memory card with a comp...

Page 37: ...format Please refer to the product Specifications section for supported file formats 6 Regulation Compliance This equipment has been tested and found to comply with the limits for a Class B digital de...

Page 38: ...o TV technician for help 7 GiiNii 90 Day Limited Warranty Please read this Limited Warranty carefully The limited warranty set forth below is given by GiiNii the maker of your new Digital Photo Frame...

Page 39: ...ovide a new product of similar or greater value at its discretion Or provide new or rebuilt replacement parts at its sole discretion Replacement or repair of one part of the product does not constitut...

Page 40: ...ur original dated proof of purchase from an authorized retailer in the United States B Your original package that your product was sold in Your warranty claim will not be honored without the original...

Page 41: ...shall not be liable for any incidental or consequential damages for breach of any expressed or implied warranty on this product Except to the extent prohibited by applicable law any implied warranty o...

Page 42: ...Frame GN 801W 42 www giinii com 2008 GiiNii International Printed in China Warning Changes or modifications to this unit not expressly approved by GiiNii voids this warranty and may result in persona...

Reviews: