background image

6VX7B-4X Motherboard


37 

 Step 2: 

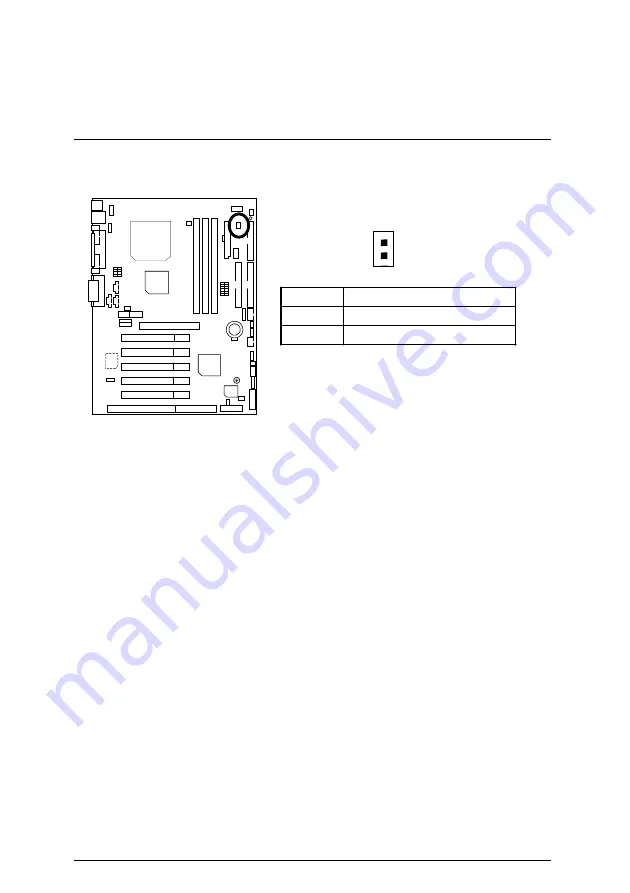
(If you want to use STR Function, please set jumper JP11 Closed.) 


Pin No. 

Definition 

Open  STR Disabled (Default) 

Close STR 

Enabled 


Step 3: 

Power on the computer and as soon as memory counting starts, press <Del>. You will enter 
BIOS Setup. Select the item “POWER MANAGEMENT SETUP”, then select 

ACPI Sleep 

Type

: S3 / STR”. Remember to save the settings by pressing "ESC" and choose the “SAVE 

& EXIT SETUP” option.  

  Congratulation! You have completed the installation and now can use the STR function.   


Summary of Contents for GA-6VX7B-4X

Page 1: ...o television technician for additional suggestions You are cautioned that any change or modifications to the equipment not expressly approve by the party responsible for compliance could void Your authority to operate such equipment This device complies with Part 15 of the FCC Rules Operation is subjected to the following two conditions 1 this device may not cause harmful interference and 2 this d...

Page 2: ...t 1 apparatus Residual commercial and light industry EN 55015 Limits and methods of measurement EN 55081 2 Generic emission standard Part 2 of radio disturbance characteristics of Industrial environment fluorescent lamps and luminaries EN 55020 Immunity from radio interference of EN 55082 2 Generic immunity standard Part 2 broadcast receivers and associated Industrial environment equipment EN 5502...

Page 3: ...6VX7B 4X Socket 370 Processor Motherboard USER S MANUAL Socket 370 Processor Motherboard REV 3 2 Second Edition R 32 02 010627 12ME 6VX7B4X 3202 ...

Page 4: ......

Page 5: ...tem Checklist Product item list 3 Features Product information specification 4 Hardware Setup Instructions on setting up the motherboard 5 Performance Block Diagram Product performance block diagram 6 Suspend to RAM Instructions STR installation 7 BIOS Setup Instructions on setting up the BIOS software 8 Appendix General reference ...

Page 6: ......

Page 7: ... of Features P 3 6VX7B 4X Motherboard Layout P 5 Page Index for CPU Speed Setup Connectors Panel and Jumper Definition P 6 Performance List P 34 Block Diagram P 35 Suspend to RAM Installation P 36 Memory Installation P 42 Page Index for BIOS Setup P 43 Appendix P 72 ...

Page 8: ...cond release of the 6VX7B 4X motherboard user s manual Jun 2001 The author assumes no responsibility for any errors or omissions that may appear in this document nor does the author make a commitment to update the information contained herein Third party brands and names are the property of their respective owners Jun 27 2001 Taipei Taiwan R O C ...

Page 9: ...Item Checklist 2 Item Checklist The 6VX7B 4X motherboard Cable for IDE floppy device Diskettes or CD TUCD for motherboard driver utility 6VX7B 4X user s manual ...

Page 10: ... sockets y Supports PC 100 PC 133 SDRAM and VCM SDRAM y Supports up to 1 5GB Max y Supports only 3 3V SDRAM DIMM y Supports 72bit ECC type DRAM integrity mode I O Control y VT82C686B Slots y 1 AGP Slot Supports 4X mode AGP 2 0 compliant y 5 PCI Slot Supports 33MHz PCI 2 2 compliant y 1 ISA Slot y 1 AMR Audio Modem Riser Slot On Board IDE y Supports PIO mode 3 4 UDMA33 ATA66 IDE ATAPI CD ROM y 2 ID...

Page 11: ...e and PS 2 mouse interface BIOS y Licensed AMI BIOS 2M bit flash ROM On Board Sound y Build in VIA sound VIA VT82C686B y Creative CT5880 sound Optional Additional Features y Supports Wake on LAN WOL y Supports Internal External modem wake up y Includes 3 fan power connectors y Poly fuse for keyboard over current protection y Support STR Suspend to RAM function y Support USB KB MS Wake up From S3 S...

Page 12: ...DIO COMB COMA LPT PS 2 SW1 PCI4 PCI5 ISA DIMM2 DIMM1 SW2 AGP AMR JP16 6VX7B 4X PCI1 BAT1 PGA 370 CPU JP9 JP19 JP30 JP15 JP5 USB1 ATX Power JP11 Floppy IDE1 IDE2 J11 JP23 JP1 Front USB J3 JP2 J4 J12 JP22 J2 BIOS JP20 Creative CT5880 BZ1 JP8 JP7 JP18 J7 J8 J5 VT82C694X USB2 J1 LED1 JP24 ...

Page 13: ...23 J1 Wake on LAN P 23 J7 TEL P 24 J5 AUX_IN P 24 J8 CD Audio Line In P 25 JP5 STR LED Connector LED 1 DIMM LED P 25 Front USB Port Optional P 26 J11 SM BUS P 26 Panel and Jumper Definition P 27 J2 2x11 Pins Jumper P 27 JP1 Clear CMOS Function P 28 JP18 JP7 JP8 Onboard AC97 AMR Select P 28 JP11 STR Enable P 29 JP20 Onboard Sound Function Selection Optional P 29 JP24 Normal Recovery Optional P 30 J...

Page 14: ... X O X X 100 33 3 O X X X X X 112 37 3 O X O X X X 124 31 X X X O X X 133 33 3 X X X X X X 140 35 X X O O X X 150 37 5 X X O X X X 0 0 0 0 The CPU speed must match with the frequency RATIO It will cause system hanging up if the frequency RATIO is higher than that of CPU SW2 DIP SWITCH FREQ RATIO 1 2 3 4 X3 O X O O X3 5 X X O O X4 O O X O X4 5 X O X O X5 O X X O X5 5 X X X O X6 O O O X X6 5 X O O X...

Page 15: ... value 2 We don t recommend you to set up your system speed to 75 83 112 124 140 150 MHz because these frequencies are not the standard specifications for CPU Chipset and most of the peripherals Whether your system can run under 75 83 112 124 140 150 MHz properly will depend on your hardware configurations CPU SDRAM Cards etc 1 CeleronTM 533 66MHz FSB SW2 ON 1 2 3 4 SW1 ON 1 2 3 4 5 6 ...

Page 16: ...X7B 4X Motherboard 9 2 CeleronTM 566 66 MHz FSB 3 CeleronTM 600 66 MHz FSB 4 CeleronTM 633 66 MHz FSB SW2 ON 1 2 3 4 SW1 ON 1 2 3 5 4 6 SW2 ON 1 2 3 4 SW1 ON 1 2 3 5 4 6 SW2 ON 1 2 3 4 SW1 ON 1 2 3 5 4 6 ...

Page 17: ... Speed Setup 10 5 CeleronTM 667 66 MHz FSB 6 CeleronTM 700 66 MHz FSB 7 Cyrix III 550 100 MHz FSB Optional SW1 ON 1 2 3 5 4 6 SW2 ON 1 2 3 4 SW2 ON 1 2 3 4 SW1 ON 1 2 3 5 4 6 SW1 ON 1 2 3 5 4 6 SW2 1 2 3 4 ...

Page 18: ...herboard 11 8 Cyrix III 533 133 MHz FSB Optional 9 Cyrix III 600 133 MHz FSB Optional 10 Pentium 500 100MHz FSB SW2 ON 1 2 3 4 SW1 ON 1 2 3 5 4 6 SW1 ON 1 2 3 5 4 6 SW2 ON 1 2 3 4 SW1 ON 1 2 3 5 4 6 SW2 ON 1 2 3 4 ...

Page 19: ...CPU Speed Setup 12 11 Pentium 550 100MHz FSB 12 Pentium 600 100MHz FSB 13 Pentium 650 100MHz FSB SW2 ON 1 2 3 4 SW2 ON 1 2 3 4 SW2 ON 1 2 3 4 SW1 ON 1 2 3 5 4 6 SW1 ON 1 2 3 5 4 6 SW1 ON 1 2 3 5 4 6 ...

Page 20: ...VX7B 4X Motherboard 13 14 Pentium 700 100MHz FSB 15 Pentium 750 100MHz FSB 16 Pentium 800 100MHz FSB SW2 ON 1 2 3 4 SW1 ON 1 2 3 5 4 6 SW2 ON 1 2 3 4 SW1 ON 1 2 3 5 4 6 SW2 ON 1 2 3 4 SW1 ON 1 2 3 5 4 6 ...

Page 21: ...CPU Speed Setup 14 17 Pentium 850 100MHz FSB 18 Pentium 533 133MHz FSB 19 Pentium 600 133MHz FSB SW2 ON 1 2 3 4 SW2 ON 1 2 3 4 SW1 ON 1 2 3 5 4 6 SW1 ON 1 2 3 5 4 6 SW2 ON 1 2 3 4 SW1 ON 1 2 3 5 4 6 ...

Page 22: ...VX7B 4X Motherboard 15 20 Pentium 667 133MHz FSB 21 Pentium 733 133MHz FSB 22 Pentium 800 133MHz FSB SW2 ON 1 2 3 4 SW2 ON 1 2 3 4 SW1 ON 1 2 3 5 4 6 SW1 ON 1 2 3 5 4 6 SW2 ON 1 2 3 4 SW1 ON 1 2 3 5 4 6 ...

Page 23: ...CPU Speed Setup 16 23 Pentium 866 133MHz FSB 24 Pentium 933 133MHz FSB 25 Pentium 1GHz 133MHz FSB SW2 ON 1 2 3 4 SW1 ON 1 2 3 5 4 6 SW2 ON 1 2 3 4 SW1 ON 1 2 3 5 4 6 SW2 ON 1 2 3 4 SW1 ON 1 2 3 5 4 6 ...

Page 24: ...6VX7B 4X Motherboard 17 Connectors Game Audio Port MIC In Game Port Line In Line Out COM A COM B LPT Port COM A LPT Port COM B ...

Page 25: ...finition 1 USB V0 2 USB D0 3 USB D0 4 GND 5 USB V1 6 USB D1 7 USB D1 8 GND 5 6 7 8 4 3 2 1 PS 2 Keyboard PS 2 Mouse Connector PS 2 Mouse Keyboard Pin No Definition 1 Data 2 NC 3 GND 4 VCC 5V 5 Clock 6 NC PS 2 Keyboard PS 2 Mouse 1 2 3 4 5 6 ...

Page 26: ...6VX7B 4X Motherboard 19 JP16 CPU Fan Pin No Definition 1 GND 2 12V 3 SENSE 1 JP15 Power Fan Pin No Definition 1 GND 2 12V 3 NC 1 ...

Page 27: ...0 JP2 System Fan Pin No Definition 1 GND 2 12V 3 SENSE 1 ATX Power Pin No Definition 3 5 7 13 15 17 GND 1 2 11 3 3V 4 6 19 20 VCC 10 12V 12 12V 18 5V 8 Power Good 9 5V SB stand by 5V 14 PS ON Soft On Off 10 11 20 1 ...

Page 28: ... 4X Motherboard 21 USB 2 Connector 1 4 Pin No Definition 1 VCC 2 USB D0 3 USB D0 4 GND 5 VCC 6 USB D1 7 USB D1 8 GND 8 5 IR Connector PIN No Definition 1 VCC 5V 2 NC 3 IR data input 4 GND 5 IR data output 1 ...

Page 29: ...Connectors 22 Floppy Port Red Line IDE1 Primary IDE2 Secondary Port IDE 1 IDE 2 Red Line 6 ...

Page 30: ...6VX7B 4X Motherboard 23 J3 Ring Power On Internal Modem Card Wake Up Pin No Definition 1 Signal 2 GND 1 J1 Wake On LAN Pin No Definition 1 5V SB 2 GND 3 Signal 1 ...

Page 31: ...Connectors 24 J7 TEL The connector is for Modem with internal voice connector Pin No Definition 1 Signal In 2 GND 3 GND 4 Signal Out 1 J5 AUX_IN Pin No Definition 1 AUX L 2 GND 3 GND 4 AUX R 1 ...

Page 32: ...6VX7B 4X Motherboard 25 J8 CD Audio Line In Pin No Definition 1 CD L 2 GND 3 GND 4 CD R 1 JP5 STR LED Connector LED1 DIMM LED STR LED Connector External DIMM LED 1 ...

Page 33: ...Connectors 26 Front USB Port Optional Pin No Definition 1 4 5 10 NC 2 5V 3 7 9 GND 6 USBP0 8 USBP0 2 10 1 9 J11 SM BUS 1 Pin No Definition 1 SMB CLK 2 NC 3 GND 4 SMB DATA 5 5V ...

Page 34: ... Mode GD Green LED Pin 1 LED anode Pin 2 LED cathode HD IDE Hard Disk Active LED Pin 1 LED anode Pin 2 LED cathode SPKR Speaker Connector Pin 1 VCC Pin 2 Pin 3 NC Pin 4 Data RE Reset Switch Open Normal Operation Close Reset Hardware System P P P Power LED Pin 1 LED anode Pin 2 LED cathode Pin 3 LED cathode PW Soft Power Connector Open Normal Operation Close Power On Off ...

Page 35: ...fault 2 3 close Clear CMOS JP7 JP8 JP18 Onboard AC97 AMR Primary or Secondary Select AMRÆ Æ Æ Æ Audio Modem Riser Jumper Function JP7 JP8 JP18 Only AC97 1 2 Close 1 2 Close Open Only AMR Primary 3 4 Close 3 4 Close Open AC97 MR Secondary Default 1 2 Close 1 2 Close 3 4 Close Close 1 JP8 JP7 JP18 ...

Page 36: ...9 JP11 STR Enable Pin No Definition Open STR Disabled Default Close STR Enabled 1 JP20 Onboard Sound Function Selection Optional Pin No Definition 1 2 close Enabled Onboard Sound Default 2 3 close Disabled Onboard Sound 1 6 ...

Page 37: ...Panel and Jumper Definition 30 JP24 Normal Recovery mode Optional 1 Pin No Definition Open Normal Close Recovery JP19 Cyrix CPU Turbo Function Optional 1 Pin No Definition Open Normal Close Turbo ...

Page 38: ...ve to set the BIOS setting USB KB Wakeup from S3 S5 enabled and the jumper JP9 enabled Power on the computer and as soon as memory counting starts press Del You will enter BIOS Setup Select the item POWER MANAGEMENT SETUP then select USB KB Wakeup from S3 S5 Enabled Remember to save the setting by pressing ESC and choose the SAVE EXIT SETUP option JP23 Case Open Pin No Definition 1 Signal 2 GND 1 ...

Page 39: ...Write Enabled Default 0Please set Jumper JP22 to Open to enabled BIOS write function when you update new BIOS or new device JP30 Over Voltage CPU Speed Up Magic Booster Optional When JP30 set 7 8 Close CPU Voltage is rising 10 Pin No Definition 1 2 close 40 3 4 close 30 5 6 close 20 7 8 close 10 9 10 close Normal 1 10 9 2 ...

Page 40: ...7 RESET SW 6 8 Soft ON OFF 10 12 Green SW 9 5V 11 IR RX 13 GND 15 IRTX 14 NC 16 IR Power 1 2 15 16 BAT1 Battery Danger of explosion if battery is incorrectly replaced Replace only with the same or equivalent type recommended by the manufacturer Dispose of used batteries according to the manufacturer s instructions ...

Page 41: ...SDRAM MOSEL V436532S04VCTG 75 CACHE SIZE 256 KB included in CPU Pentium DISPLAY GA 66032D AGP Card Rev 1 3 STORAGE Onboard IDE Quantum KA13600AT O S Windows NT 4 0 SPK6a DRIVER Display Driver at 1024 x 768 True colors 75Hz VIA 4 in 1 Rev 4 24a Processor Intel Coppermine 933 MHz 133 x 7 Winbench99 CPU mark99 81 9 FPU Winmark 99 4940 Business Disk Winmark 99 5930 Hi End Disk Winmark 99 8760 Business...

Page 42: ...AGP Bus LPT PS 2 KB Mouse COM Ports IR USB Bus 14 318MHz 48MHz Host Bus VIA VT82C694X VIA VT82C686B 66 100 133 MHz 66 100 133 MHz 33 MHz ISA Bus AC97 CODEC Ultra DMA 33 ATA66 IDE Ports AMR Slot AC 97 Link Creative CT5880 IDE Bus USB Port AGP 2X 4X 66 100 133 MHz 24MHz ICS 9248DF 39 PGA 370 CPU ...

Page 43: ...p triggers or signals respectively A 2 STR function Installation Please use the following steps to complete the STR function installation Step By Step Setup Step 1 To utilize the STR function the system must be in Windows 98 ACPI mode Putting Windows 98 into ACPI mode is fairly easy Setup with Windows 98 CD A Insert the Windows 98 CD into your CD ROM drive select Start and then Run B Type without ...

Page 44: ...bled 1 Step 3 Power on the computer and as soon as memory counting starts press Del You will enter BIOS Setup Select the item POWER MANAGEMENT SETUP then select ACPI Sleep Type S3 STR Remember to save the settings by pressing ESC and choose the SAVE EXIT SETUP option Congratulation You have completed the installation and now can use the STR function ...

Page 45: ...38 A 3 How to put your system into STR mode There are two ways to accomplish this 1 Choose the Stand by item in the Shut Down Windows area A Press the Start button and then select Shut Down B Choose the Stand by item and press OK ...

Page 46: ...6VX7B 4X Motherboard 39 2 Define the system power on button to initiate STR sleep mode A Double click My Computer and then Control Panel B Double click the Power Management item ...

Page 47: ...up Now when you want to enter STR sleep mode just momentarily press the Power on button A 4 How to recover from the STR sleep mode There are five ways to wake up the system 1 Press the Power On button 2 Use the Resume by Alarm function 3 Use the Modem Ring On function 4 Use the Wake On LAN function 5 Use the USB Device Wake up function ...

Page 48: ...pply must comply with the ATX 2 01 specification provide more than 720 mA 5V Stand By current B Your SDRAM must be PC 100 compliant 2 Jumper JP5 is provided to connect to the STR LED in your system chassis Your chassis may not provide this feature The STR LED will be illuminated when your system is in STR sleep mode STR LED Connector External DIMM LED 1 6V ...

Page 49: ...the memory module just push it vertically into the DIMM Slot The DIMM module can only fit in one direction due to the two notch Memory size can vary between sockets Install memory in any combination table DIMM 168 pin SDRAM DIMM Modules DIMM1 Supports 16 32 64 128 256 512MB X 1 pcs DIMM2 Supports 16 32 64 128 256 512MB X 1 pcs DIMM3 Supports 16 32 64 128 256 512MB X 1 pcs ...

Page 50: ...s Setup P 50 Chipset Features Setup P 52 Power Management Setup P 55 PNP PCI Configuration P 58 Load BIOS Defaults P 60 Load Setup Defaults P 61 Integrated Peripherals P 62 Hardware Monitor Setup P 66 Supervisor Password User Password P 68 IDE HDD Auto Detection P 69 Save Exit Setup P 70 Exit Without Saving P 71 ...

Page 51: ...t by simultaneously press Ctrl Alt Del keys CONTROL KEYS Move to previous item Move to next item Move to the item in the left hand Move to the item in the right hand Esc Main Menu Quit and not save changes into CMOS Status Page Setup Menu and Option Page Setup Menu Exit current page and return to Main Menu PgUp Increase the numeric value or make changes PgDn Decrease the numeric value or make chan...

Page 52: ...ng the items and press Enter to accept or enter the sub menu Figure 1 Main Menu Standard CMOS Setup This setup page includes all the items in standard compatible BIOS BIOS Features Setup This setup page includes all the items of AMI special enhanced features AMIBIOS SIMPLE SETUP UTILITY VERSION 1 23 C 1999 American Megatrends Inc All Rights Reserved STANDARD CMOS SETUP INTEGRATED PERIPHERALS BIOS ...

Page 53: ...es the value of the system parameter which the system would be in the most appropriate configuration Integrated Peripherals This setup page includes all onboard peripherals Hardware Monitor Setup This setup page is auto detect fan and temperature status Supervisor password Change set or disable password It allows you to limit access to the system and Setup or just to Setup User password Change set...

Page 54: ...only Month The month Jan Through Dec Day The day from 1 to 31 or the maximum allowed in the month Year The year from 1990 through 2099 AMIBIOS SETUP STANDARD CMOS SETUP C 1999 American Megatrends Inc All Rights Reserved Date mm dd yyyy Tue Mar 07 2000 Time hh mm ss 10 36 24 TYPE SIZE CYLS HEAD PRECOMP LANDZ SECTOR MODE Pri Master Auto Pri Slave Auto Sec Master Auto Sec Slave Auto Floppy Drive A 1 ...

Page 55: ... items Enter the information directly from the keyboard and press Enter Such information should be provided in the documentation form your hard disk vendor or the system manufacturer CYLS Number of cylinders HEADS number of heads PRECOMP write precomp LANDZONE Landing zone SECTORS number of sectors If a hard disk has not been installed select NONE and press Enter Floppy Drive A Floppy Drive B The ...

Page 56: ...lue Memory The category is display only which is determined by POST Power On Self Test of the BIOS Base Memory The POST of the BIOS will determine the amount of base or conventional memory installed in the system The value of the base memory is typically 512 K for systems with 512 K memory installed on the motherboard or 640 K for systems with 640 K or more memory installed on the motherboard Exte...

Page 57: ... ATAPI ZIP C S M A R T for Hard Disks Enabled Enabled S M A R T Hard for Disks Disabled Disabled S M A R T Hard for Disks Default Value AMIBIOS SETUP BIOS FEATURES CMOS SETUP C 1999 American Megatrends Inc All Rights Reserved 1st Boot Device Floppy 2nd Boot Device IDE 0 3rd Boot Device CDROM S M A R T for Hard Disks Disabled BootUp Num Lock On Floppy Drive Seek Disabled Password Check Setup Proces...

Page 58: ...e to determine if it is 40 or 80 tracks Note that BIOS can not tell from 720 1 2 or 1 44 drive type as they are all 80 tracks Disabled BIOS will not search for the type of floppy disk drive by track number Note that there will not be any warning message if the drive installed is 360 Default Value Password Check Setup Set Password Check to Setup Default Value Always Set Password Check to Always Pro...

Page 59: ...to Set DRAM Frequency to Auto Default Value 66MHz Set DRAM Frequency is 66MHz 100MHz Set DRAM Frequency is 100MHz 133MHz Set DRAM Frequency is 133MHz AMIBIOS SETUP CHIPSET FEATURE CMOS SETUP C 1999 American Megatrends Inc All Rights Reserved DRAM Timing Top Performance Disabled SDRAM Timing by SPD Disabled SDRAM CAS Latency 3 DRAM Frequency Auto C2P Concurrency Master Enabled DRAM Integrity Mode D...

Page 60: ...Auto Default Value Manual Set AGP Comp Driving is Manual If AGP Comp Driving is Manual Manual AGP Comp Driving 00 FF AGP Aperture Size 4MB Set AGP Aperture Size to 4MB 8MB Set AGP Aperture Size to 8 MB 16MB Set AGP Aperture Size to 16 MB 32MB Set AGP Aperture Size to 32 MB 64MB Set AGP Aperture Size to 64 MB Default Value 128MB Set AGP Aperture Size to 128 MB 256MB Set AGP Aperture Size to 256 MB ...

Page 61: ...ntroller for USB Port 2 3 All USB Port USB Controller for All USB Port Default Value Disabled USB Controller Function Disabled USB Legacy Support Keyboard Set USB Legacy Support Keyboard Keyb Mouse Set USB Legacy Support Keyboard Mouse Disabled Disabled USB Legacy Support Function Default Value ...

Page 62: ... By Set Hard Disk Power Down Mode to Stand By Default Value AMIBIOS SETUP POWER MANAGEMENT SETUP C 1999 American Megatrends Inc All Rights Reserved ACPI Sleep Type S1 POS PME Event Wake up Enabled USB KB Wakeup From S3 S5 Disabled RTC Alarm Power On Disabled Video Power Down Mode Stand By RTC Alarm Date 15 Hard Disk Power Down Mode Stand By RTC Alarm Hour 12 Suspend Time Out Minute Disabled RTC Al...

Page 63: ...0min 40 Enabled Suspend Time Out after 40min 50 Enabled Suspend Time Out after 50min 60 Enabled Suspend Time Out after 60min Display Activity Ignore Ignore Display Activity Default Value Monitor Monitor Display Activity IRQ 3 IRQ15 Ignore Ignore IRQ3 IRQ15 Monitor Monitor IRQ3 IRQ15 Soft off by Power Button Instant off Soft switch ON OFF for Power Button Default Value Delay 4Sec Soft switch ON 4 S...

Page 64: ...n Wake On Lan Default Value PME Event Wake up Disabled Disabled PME Event Wake up function Enabled Enabled PME Event Wake up function Default Value RTC Alarm Power On You can set RTC Alarm Power On item to Enabled and key in date time to power on system Disabled Disable this function Default Value Enabled Enable alarm function to POWER ON system If the RTC Alarm Power On is Enabled RTC Alarm Date ...

Page 65: ...led ForhavingVideoCardonISABusandVGACardonPCIBus Disabled For VGA Card only Default Value AMIBIOS SETUP PNP PCI CONFIGURATION SETUP C 1999 American Megatrends Inc All Rights Reserved Plug and Play Aware O S No Reset Configuration Data No VGA Boot From AGP PCI VGA Palette Snoop Disabled DMA Channel 0 PnP DMA Channel 1 PnP DMA Channel 3 PnP DMA Channel 5 PnP DMA Channel 6 PnP DMA Channel 7 PnP IRQ 3...

Page 66: ... 3 5 6 7 PnP The resource is used by PnP device ISA EISA The resource is used by ISA EISA device PCI or ISA IRQ 3 4 5 7 9 10 11 14 15 PCI PnP The resource is used by PCI PnP device ISA EISA The resource is used by ISA EISA device PCI or ISA ...

Page 67: ...eserved STANDARD CMOS SETUP INTEGRATED PERIPHERALS BIOS FEATURES SETUP HARDWARE MONITOR SETUP CHIPSET FEATURES SETUP SUPERVISOR PASSWORD POWER MANAGEMENT SETUP USER PASSWORD PNP PCI CONFIGURATION IDE HDD AUTO DETECTION LOAD BIOS DEFAULTS SAVE EXIT SETUP LOAD SETUP DEFAULTS EXIT WITHOUT SAVING ESC Quit Select Item Shift F2 Change Color F5 Old Values F6 Load BIOS Defaults F7 Load Setup Defaults F10 ...

Page 68: ...Rights Reserved STANDARD CMOS SETUP INTEGRATED PERIPHERALS BIOS FEATURES SETUP HARDWARE MONITOR SETUP CHIPSET FEATURES SETUP SUPERVISOR PASSWORD POWER MANAGEMENT SETUP USER PASSWORD PNP PCI CONFIGURATION IDE HDD AUTO DETECTION LOAD BIOS DEFAULTS SAVE EXIT SETUP LOAD SETUP DEFAULTS EXIT WITHOUT SAVING ESC Quit Select Item Shift F2 Change Color F5 Old Values F6 Load BIOS Defaults F7 Load Setup Defau...

Page 69: ...E8 2E8 COM4 Enable onBoard Serial port 1 and address is 2E8 Disabled Disable onBoard Serial port 1 AMIBIOS SETUP INTEGRATED PERIPHERAL C 1999 American Megatrends Inc All Rights Reserved OnBoard IDE Both Game Port 200h 207h Enabled OnBoard FDC Auto OnBoard Serial Port 1 Auto OnBoard Serial Port 2 Auto Serial Port 2 Mode Normal Duplex Mode N A OnBoard Parallel Port Auto Parallel Port Mode ECP Parall...

Page 70: ...DA Mode Normal Set onboard I O chip Serial Port 2 to Normal Mode Default Value Duplex Mode Half Duplex IR Function Duplex Half N A Disabled this function Default Value Full Duplex IR Function Duplex Full On Board Parallel port 378 Enable On Board LPT port and address is 378 278 Enable On Board LPT port and address is 278 3BC Enable On Board LPT port and address is 3BC Auto Set On Board LPT port is...

Page 71: ...ard Legacy Audio Enabled Enabled OnBoard Legacy Audio Default Value Disabled Disabled OnBoard Legacy Audio Sound Blaster Enabled Enabled Sound Blaster Disabled Disabled Sound Blaster Default Value SB I O Base Address 220h 22Fh Set SB I O Base Address is 220h 22Fh Default Value 280h 28Fh Set SB I O Base Address is 280h 28Fh 260h 26Fh Set SB I O Base Address is 260h 26Fh 240h 24Fh Set SB I O Base Ad...

Page 72: ...I O Address is 300h 303h 310h 313h Set MUP 401 I O Address is 310h 313h 320h 323h Set MUP 401 I O Address is 320h 323h FM Port 388h 38Bh Disabled Disabled FM Port 388h 38Bh Default Value Enabled Enabled FM Port 388h 38Bh Game Port 200h 207h Disabled Disabled Game Port 200h 207h Enabled Enabled Game Port 200h 207h Default Value ...

Page 73: ...ff 70 C 158 F Monitor CPU Temp at 70 C 158 F if Temp 70 C 158 F system will automatically power off 75 C 167 F Monitor CPU Temp at 75 C 167 F if Temp 75 C 167 F system will automatically power off AMIBIOS SETUP HARDWARE MONITOR C 1999 American Megatrends Inc All Rights Reserved ACPI Shut Down Temp Disabled Current CPU Temp 36 C 96 F Current System Temp 28 C 82 F Case Status Closed Current CPU Fan ...

Page 74: ...ically Case Status If the case is closed Case Status will show Closed If the case have been opened Case Opened will show Open Current CPU Fan Speed Detect CPU Fan speed status automatically Current System Fan Speed Detect System Fan speed status automatically Current Voltage V VCORE 3 3V 5V 12V Detect system s voltage status automatically ...

Page 75: ...t and you can enter Setup freely If you select Always at Password Check Option in BIOS Features Setup Menu you will be prompted for the password every time the system is rebooted or any time you try to enter Setup Menu If you select Setup at Password Check Option in BIOS Features Setup Menu you will be prompted only when you try to enter Setup AMIBIOS SIMPLE SETUP UTILITY VERSION 1 23 C 1999 Ameri...

Page 76: ...28 MB AMIBIOS SETUP STANDARD CMOS SETUP C 1999 American Megatrends Inc All Rights Reserved Date mm dd yyyy Tue Feb 17 2000 Time hh mm ss 10 36 24 TYPE SIZE CYLS HEAD PRECOMP LANDZ SECTOR MODE Pri Master Auto Pri Slave Auto Sec Master Auto Sec Slave Auto Floppy Drive A 1 44 MB 3 Floppy Drive B Not Installed Boot Sector Virus Protection Disabled Base Memory 640 Kb Other Memory 384 Kb Extended Memory...

Page 77: ...ed STANDARD CMOS SETUP INTEGRATED PERIPHERALS BIOS FEATURES SETUP HARDWARE MONITOR SETUP CHIPSET FEATURES SETUP SUPERVISOR PASSWORD POWER MANAGEMENT SETUP USER PASSWORD PNP PCI CONFIGURATION IDE HDD AUTO DETECTION LOAD BIOS DEFAULTS SAVE EXIT SETUP LOAD SETUP DEFAULTS EXIT WITHOUT SAVING ESC Quit Select Item Shift F2 Change Color F5 Old Values F6 Load BIOS Defaults F7 Load Setup Defaults F10 Save ...

Page 78: ...rved STANDARD CMOS SETUP INTEGRATED PERIPHERALS BIOS FEATURES SETUP HARDWARE MONITOR SETUP CHIPSET FEATURES SETUP SUPERVISOR PASSWORD POWER MANAGEMENT SETUP USER PASSWORD PNP PCI CONFIGURATION IDE HDD AUTO DETECTION LOAD BIOS DEFAULTS SAVE EXIT SETUP LOAD SETUP DEFAULTS EXIT WITHOUT SAVING ESC Quit Select Item Shift F2 Change Color F5 Old Values F6 Load BIOS Defaults F7 Load Setup Defaults F10 Sav...

Page 79: ...e Pack Utility Insert the support CD that came with your motherboard into your CD ROM driver or double click the CD driver icon in My Computer to bring up the screen 1 2 3 4 5 6 1 Click VIA 4in 1 Service Pack Utility item 2 Click Next 3 Click Yes 4 Click Next 5 Click Next 6 Click Next ...

Page 80: ...6VX7B 4X Motherboard 73 7 8 9 10 7 Click Next 8 Click Next 9 Click Next 10 Click Finish to restart computer ...

Page 81: ...Driver Insert the support CD that came with your motherboard into your CD ROM driver or double click the CD driver icon in My Computer to bring up the screen 1 2 3 4 1 Click AC 97 Audio Driver item 3 Click Next 4 Click Finish to restart 2 Click Next Audio ...

Page 82: ...ptional Insert the support CD that came with your motherboard into your CD ROM driver or double click the CD driver icon in My Computer to bring up the screen 1 2 3 4 5 6 Audio 2 Click OK 3 Click Yes 1 Click Creative 5880 Sound Driver 4 Click Next 5 Click Next 6 Click here ...

Page 83: ...Appendix 76 7 8 7 Click Finish to restart computer ...

Page 84: ...t the flash utilities and BIOS file in 9 Restart your computer into MS DOS mode or command prompt only for Win95 98 go into the directory where the new BIOS file are located use the utility AWDFlash exe or AMIFlash exe to update the BIOS 9 Type the following command once you have enter the directory where all the files are located C utility AWDFlash or AMIFlash filename of the BIOS binary file int...

Page 85: ...Addressing EMC Electromagnetic Compatibility BIOS Basic Input Output System SMI System Management Interrupt IRQ Interrupt Request NIC Network Interface Card A G P Accelerated Graphics Port S E C C Single Edge Contact Cartridge LED Light Emitting Diode EPP Enhanced Parallel Port CMOS Complementary Metal Oxide Semiconductor I O Input Output ESD Electrostatic Discharge OEM Original Equipment Manufact...

Page 86: ...Motherboard 79 Acro Meaning PCI Peripheral Component Interconnect RIMM Rambus in line Memory Module DRM Dual Retention Mechanism ISA Industry Standard Architecture MTH Memory Translator Hub CRIMM Continuity RIMM ...

Reviews: