1
English
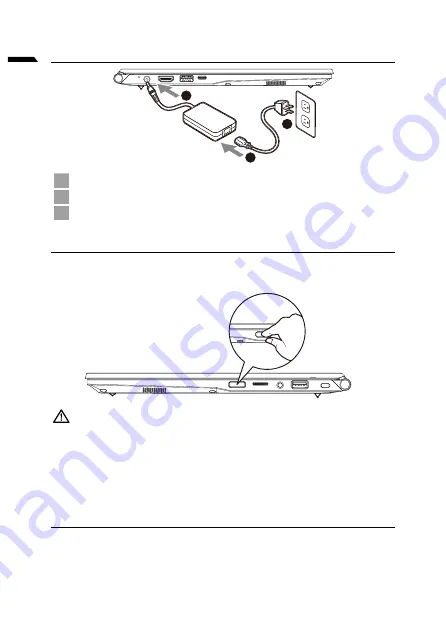
1-1. Using GIGABYTE Notebook for the First Time
1
3
2
1
Connect the power cord to the AC adapter.
2
Connect the AC adapter to the DC-in jack on the notebook.
3
Connect the power cord to the power outlet.
1-2. Switching on the Power
After you turn on the notebook for the very first time, do not turn it off until the
operating system has been configured. Please note that the volume for the audio
will not function until Windows
®
Setup has completed.
IMPORTANT:
● Ensure that your Notebook PC is connected to a grounded power adapter before turning it on for the first time.
● When using your Notebook PC on power adapter mode, the socket outlet must be near to the unit and easily
accessible.
● Locate the input/output mark on your Notebook PC and ensure that it matches the input/output rating informa
-
tion on your power adapter. Some Notebook PC models may have multiple rating output currents based on the
available SKU.
● Power adapter information:
- Input voltage: 100-240 Vac
- Input frequency: 50-60 Hz
- Rating output voltag:19V,3.42A
1-3. Full User Manual
For more user guide and software instruction, please refer to the below link:
https://www.gigabyte.com/Support
* Product specifications and product appearance may differ from country to country.
We recommend that you check with your local dealers for the specifications and appearance of the products available in your country.
* Although we endeavor to present the most accurate and comprehensive information at the time of publication,
we reserve the right to make changes without prior notice.
Summary of Contents for G5 GD
Page 1: ...U4 Quick S t ar t Guide V1 1...
Page 10: ...1 GIGABYTE 1 3 2 1 2 3 Windows SKU 240 100 60 50 3 42 19 https www gigabyte com Support...
Page 14: ...5 y y EFI SHELL Windows...
Page 15: ...6 Windows 10 F9 Windows 10 y Windows y GIGABYTE GIGABYTE 1 2 3 4...
Page 16: ...7 Windows Windows Windows UEFI UEFI Windows 5...
Page 17: ...8 GIGABYTE https www gigabyte com Support Laptop FAQ https www gigabyte com Support Faq...
Page 22: ...5 EFI SHELL Windows...
Page 23: ...6 Windows 10 F9 Windows 10 Windows GIGABYTE Smart Recovery GIGABYTE Smart Recovery 1 2 3 4...
Page 24: ...7 Windows Windows Windows UEFI UEFI Windows 5...
Page 25: ...8 GIGABYTE https www gigabyte com Support Laptop https www gigabyte com Support Faq...
Page 46: ...5 EFI SHELL Windows...
Page 47: ...6 Windows 10 F9 Windows 10 Windows GIGABYTE GIGABYTE Yes Recovery AC Shutdown 1 2 3 4...
Page 48: ...7 Windows Windows Windows UEFI UEFI Windows 5...
Page 49: ...8 GIGABYTE https www gigabyte com Support Laptop https www gigabyte com Support Faq...
Page 78: ...5 Ivrit y y EFI SHELL Windows...
Page 79: ...6 Ivrit Windows 10 Windows 10 Windows 10 y Windows y GIGABYTE GIGABYTE Yes 1 2 3 4...
Page 80: ...7 Ivrit Windows Windows Windows UEFI UEFI Windows 5...
Page 81: ...8 Ivrit GIGABYTE https www gigabyte com Support Laptop https www gigabyte com Support Faq...
Page 94: ...5 OS OS OS OS OS EFI SHELL Windows OS...
Page 95: ...6 Windows10 F9 Troubleshoot Continue 2 Reset this PC GIGABYTE Smart Recovery GIGABYTE 1 2 3 4...
Page 96: ...7 Windows Windows Windows UEFI UEFI Windows 5...
Page 97: ...8 GIGABYTE https www gigabyte com Support Laptop URL https www gigabyte com Support Faq...
Page 102: ...5 PC...
Page 105: ...8 https www gigabyte com kr Support FAQ https www gigabyte com kr Support Faq...
Page 158: ...5 EFI SHELL...
Page 161: ...8 GIGABYTE https www gigabyte com Support Laptop https www gigabyte com Support Faq...
Page 166: ...5 EFI SHELL Windows...
Page 169: ...8 https www gigabyte cn Support Laptop FAQ https www gigabyte cn Support Faq...
Page 182: ...5 EFI SHELL Windows...
Page 185: ...8 Control Center Control Center Control Center 1 2 3 F 1 2 3 4 1 2 1 2 3...
Page 198: ...5 EFI SHELL Windows...
Page 200: ...7 Windows Windows Windows UEFI UEFI Windows 5...
Page 201: ...8 GIGABYTE https www gigabyte com Support Laptop https www gigabyte com Support Faq...


