1
limba română
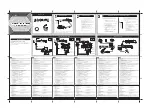
1-1. Prima utilizare a notebook-ului GIGABYTE
1
3
2
1
Conectați cablul de alimentare la adaptor.
2
Conectați adaptorul de ca la mufa DC-in de pe notebook.
3
Conectați cablul de alimentare la ieșirea de alimentare.
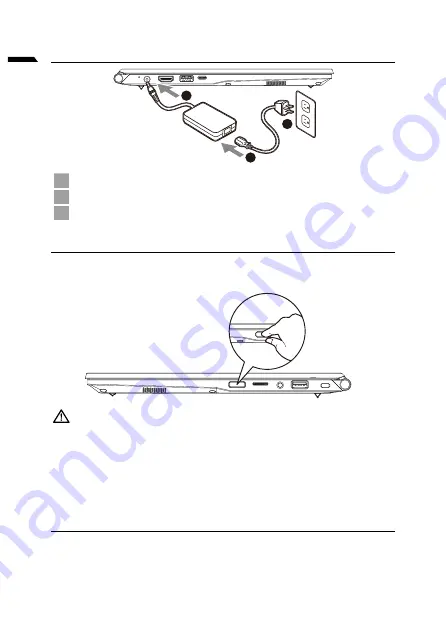
1-2. Pornirea alimentării
După ce porniți notebook-ul pentru prima dată, nu îl opriți înainte de configurarea
sistemului de operare. Rețineți că volumul audio nu va funcționa până la finalizarea
configurării Windows®.
IMPORTANT:
•
Asigurați-vă că PC-ul dvs. notebook este conectat la un adaptor de alimentare cu împământare înainte de a-l
porni pentru prima dată.
•
Când utilizați notebook-ul în modul adaptor de alimentare, priza trebuie să fie aproape de unitate și ușor
accesibilă.
•
Localizați marcajul de intrare/ieșire de pe notebook și asigurați-vă că se potrivește cu informațiile de intrare/
ieșire de pe adaptorul de alimentare. Unele modele de notebook-uri pot avea curenți de ieșire multipli, în
funcție de SKU-ul disponibil.
•
Informații despre adaptorul de alimentare:
- Tensiune de intrare: 100-240 V c.a.
- Frecvență de intrare: 50-60 Hz
- Tensiune de ieșire nominală: 19V, 3.42A
1-3. Manual complet de utilizare
Pentru mai multe ghiduri de utilizare și instrucțiuni software, consultați linkul de mai jos:
https://www.gigabyte.com/Support
* Specificațiile și aspectul produsului pot diferi de la o țară la alta. Recomandăm să consultați distribuitorii locali pentru specificațiile și aspectul
produselor disponibile în țara dvs.
* Deși ne străduim să prezentăm cele mai exacte și complete informații în momentul publicării, ne rezervăm dreptul de a face modificări fără
notificare prealabilă.
Summary of Contents for G5 GD
Page 1: ...U4 Quick S t ar t Guide V1 1...
Page 10: ...1 GIGABYTE 1 3 2 1 2 3 Windows SKU 240 100 60 50 3 42 19 https www gigabyte com Support...
Page 14: ...5 y y EFI SHELL Windows...
Page 15: ...6 Windows 10 F9 Windows 10 y Windows y GIGABYTE GIGABYTE 1 2 3 4...
Page 16: ...7 Windows Windows Windows UEFI UEFI Windows 5...
Page 17: ...8 GIGABYTE https www gigabyte com Support Laptop FAQ https www gigabyte com Support Faq...
Page 22: ...5 EFI SHELL Windows...
Page 23: ...6 Windows 10 F9 Windows 10 Windows GIGABYTE Smart Recovery GIGABYTE Smart Recovery 1 2 3 4...
Page 24: ...7 Windows Windows Windows UEFI UEFI Windows 5...
Page 25: ...8 GIGABYTE https www gigabyte com Support Laptop https www gigabyte com Support Faq...
Page 46: ...5 EFI SHELL Windows...
Page 47: ...6 Windows 10 F9 Windows 10 Windows GIGABYTE GIGABYTE Yes Recovery AC Shutdown 1 2 3 4...
Page 48: ...7 Windows Windows Windows UEFI UEFI Windows 5...
Page 49: ...8 GIGABYTE https www gigabyte com Support Laptop https www gigabyte com Support Faq...
Page 78: ...5 Ivrit y y EFI SHELL Windows...
Page 79: ...6 Ivrit Windows 10 Windows 10 Windows 10 y Windows y GIGABYTE GIGABYTE Yes 1 2 3 4...
Page 80: ...7 Ivrit Windows Windows Windows UEFI UEFI Windows 5...
Page 81: ...8 Ivrit GIGABYTE https www gigabyte com Support Laptop https www gigabyte com Support Faq...
Page 94: ...5 OS OS OS OS OS EFI SHELL Windows OS...
Page 95: ...6 Windows10 F9 Troubleshoot Continue 2 Reset this PC GIGABYTE Smart Recovery GIGABYTE 1 2 3 4...
Page 96: ...7 Windows Windows Windows UEFI UEFI Windows 5...
Page 97: ...8 GIGABYTE https www gigabyte com Support Laptop URL https www gigabyte com Support Faq...
Page 102: ...5 PC...
Page 105: ...8 https www gigabyte com kr Support FAQ https www gigabyte com kr Support Faq...
Page 158: ...5 EFI SHELL...
Page 161: ...8 GIGABYTE https www gigabyte com Support Laptop https www gigabyte com Support Faq...
Page 166: ...5 EFI SHELL Windows...
Page 169: ...8 https www gigabyte cn Support Laptop FAQ https www gigabyte cn Support Faq...
Page 182: ...5 EFI SHELL Windows...
Page 185: ...8 Control Center Control Center Control Center 1 2 3 F 1 2 3 4 1 2 1 2 3...
Page 198: ...5 EFI SHELL Windows...
Page 200: ...7 Windows Windows Windows UEFI UEFI Windows 5...
Page 201: ...8 GIGABYTE https www gigabyte com Support Laptop https www gigabyte com Support Faq...