Thank you for purchasing the GEOSat Mobile Wi-Fi
Solution and welcome to the world of wireless
networking on the water. Now you can take advantage
of the growing number of HotSpots along the
waterways of the U.S. and Canada as well as the
islands of the Bahamas and the Caribbean.
As a systems integrator, GEOSat’s engineers have
spent countless hours testing various configurations of
the mobile Wi-Fi hardware until they developed a
balanced package that delivers optimum performance
for mobile license-free local area network access.
Before you begin installation, remember that, with
the exception of your laptop or PC, the GEOSat
Mobile Wi-Fi Solution is sold as a complete package
only.
The antenna, antenna cable and the radio/
amplifier are a balanced system. Changing any one of
these elements will jeopardize performance, void the
Terabeam warranty and could result in a possible FCC
violation.
INTRODUCTION
Read through this entire section to understand how
to install the hardware. To configure the EC, please
refer to the ‘Configuration’ section.
Perform the following procedures once you have
determined the optimal location for the EC:
1. Mounting the EC – Make sure the location
you selected will support the weight of the
box. Select mounting hardware that is
appropriate in size and that will support the
weight of the EC in heavy seas.
CAUTION:
Make sure that the enclosure is
properly grounded for maximum lightning and
static protection.
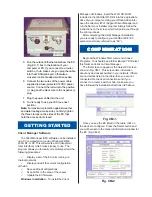
2. Plug the round connector of the outdoor
Ethernet cable into the jack on the bottom of
the EC, making sure the notch is correctly
aligned with the tab on the jack (Fig. EC-1),
then turn the round locking nut clockwise as
you push in until it securely fastens onto the
jack. Please verify that the round connector is
properly plugged into the jack of the EC
because it is possible to push it in the wrong
way if enough force is used.
Damage to the
EC or the connector will not be covered by
the warranty.
3. Mount the supplied 10 dBi antenna securely
being certain that the LMR 400 antenna cable
can be run with no severe bends.
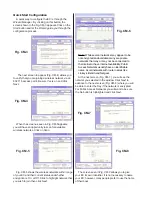
4. Connect one end of the antenna cable to the
antenna and the other end to the antenna
coupling on the bottom of the EC. (Fig. EC-2)
The GEOSat Mobile Wi-Fi Solution (EC) is a single
channel 802.11b compliant radio housed in a
weatherproof NEMA 4 rated outdoor enclosure. It
features an Ethernet Converter (EC-II) for use as a
CPE (the equipment necessary to obtain access to a
wireless network).
It is powered from an external 12 VDC source but it
will operate from a source of 11 to 14 VDC. An
integrated bidirectional amplifier provides increased
transmit power and receive signal sensitivity for the
longest possible range. The unit draws about 1.5 amps
peak.
The 28-bit WEP-Plus encryption, if enabled,
provides extra security above standard 802.11b WEP.
The EC will accommodate virtually an unlimited
number of client MAC addresses on each side of the
link.
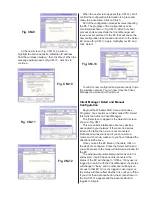
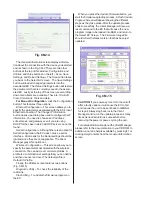
GEOSat Wi-Fi Kit Contents (Fig. EC-1)
1. The EC-AMP-12V radio and amplifier,
weatherproof outdoor enclosure.
2. DC Power cable - 10 feet with connector at one
end.
3. Outdoor Ethernet interface cable – 25 foot.
4. 10 dBi omni-directional marine antenna.
5. LMR 400 antenna cable –
25 foot.
6. CD-ROM with Windows - based Client Manager
software and documentation.
NOTE:
Optional
Ethernet Interface
Cables are available in
lengths up to 100 feet.
It is strongly
recommended that
you configure and test
the unit prior to
permanently mounting
the antenna or EC. It
is important that the
antenna be placed in
an unobstructed
location and within 25
feet of the EC. Per-
forming such a test will avoid the necessity of
relocating the antenna and rerouting cables.
ABOUT GEOSat WI-FI
Fig. EC-1
INSTALLATION


