background image

Zone20 H

 | 10

Description of the System

2

Description of the System

2.1

System Components

General description

The Zone20 H is a laser tool for general construction and levelling applications such as

Setting forms

Checking grades

Controlling depths for excavations

If set up within the self-levelling range, the Zone20 H automatically levels to create an accurate horizontal 
plane of laser light.
Once the Zone20 H has levelled, the head will start rotating and the Zone20 H is ready for use. 
30 seconds after the Zone20 H has completed the levelling, the H.I. Alert system becomes active and 
protects the Zone20 H against changes in elevation caused by movement of the tripod to ensure accurate 
work.

Available system 
components

The delivered components depend on the package ordered.

2.2

Zone20 H Laser Components

Zone20 H laser compo-
nents

011247_001

ZBR35

Zone20 H

Li-Ion/Alkaline

ZDR105

ZPR105

a) Carry Handle
b) LED Indicators
c) Buttons
d) Battery compartment
e) Charge LED (for Li-Ion battery pack)

011248_001

a

b
c

d

e

Summary of Contents for ZONE20 H

Page 1: ...GeoMax Zone20 H User Manual Version 1 0 English ...

Page 2: ...u need to contact your agency or GeoMax authorised service work shop Validity of this manual This manual applies to the Zone20 H lasers Differences between the models are marked and described Available documentation Refer to the following resources for all Zone20 H documentation software the GeoMax Zone20 H CD the GeoMax website http www geomax positioning com Name Description Format Zone20 H Quic...

Page 3: ...rs 12 3 3 Turning the Zone20 H on and off 13 3 4 Automatic Mode 13 3 5 Manual Mode 13 3 6 Elevation Alert H I Function 14 4 Receivers 15 4 1 ZRB35 Receiver 15 4 2 ZRP105 Receiver 16 4 3 ZRD105 Digital Receiver 17 5 Applications 19 5 1 Setting Forms 19 5 2 Checking Grades 19 5 3 Manual Grades 20 6 Batteries 21 6 1 Operating Principles 21 6 2 Battery for Zone20 H 21 7 Accuracy Adjustment 24 7 1 Chec...

Page 4: ... beam for the purpose of alignment The laser beam can be detected by means of a laser detector Remote control of product Data communication with external appliances Reasonably foreseeable misuse Use of the product without instruction Use outside of the intended use and limits Disabling safety systems Removal of hazard notices Opening the product using tools for example screwdriver unless this is p...

Page 5: ...e user manual particularly after the product has been subjected to abnormal use as well as before and after important measurements DANGER Because of the risk of electrocution it is dangerous to use poles levelling staffs and extensions in the vicinity of electrical installations such as power cables or electrical railways Precautions Keep at a safe distance from electrical installations If it is e...

Page 6: ...us gases are produced which may impair health If batteries are damaged or are heated strongly they can explode and cause poisoning burning corro sion or environmental contamination By disposing of the product irresponsibly you may enable unauthorised persons to use it in contraven tion of the regulations exposing themselves and third parties to the risk of severe injury and rendering the environme...

Page 7: ... These products are safe for momentary exposures but can be hazardous for deliberate staring into the beam The beam may cause dazzle flash blindness and after images particularly under low ambient light conditions Zone20 H Labelling a Laser beam According to IEC TR 60825 14 2004 02 products classified as laser class 1 class 2 and class 3R do not require laser safety officer involvement protective ...

Page 8: ...utions While the product is in use connecting cables for example product to external battery product to computer must be connected at both ends Radios or Digital Cellular Phones Use of product with radio or digital cellular phone devices WARNING Electromagnetic fields can cause disturbances in other equipment in installations in medical devices for example pacemakers or hearing aids and in aircraf...

Page 9: ...efollowingtwoconditions 1 This device may not cause harmful interference and 2 This device must accept any interference received including interference that may cause undesired operation Type ZRB35 Art No 835246 Power 9V 0 2A GeoMax AG CH 9443 Widnau Made in China Manufactured MM YYYY S No 1234567 011178_001 ZRP105 This device complies with part 15 of the FCC Rules Operation is subject to the foll...

Page 10: ...e20 H has levelled the head will start rotating and the Zone20 H is ready for use 30 seconds after the Zone20 H has completed the levelling the H I Alert system becomes active and protects the Zone20 H against changes in elevation caused by movement of the tripod to ensure accurate work Available system components The delivered components depend on the package ordered 2 2 Zone20 H Laser Components...

Page 11: ... surface Always check the tripod or laser trailer before attaching the Zone20 H Make sure all screws bolts and nuts are tight If a tripod has chains they should be slightly loose to allow for thermal expansion during the day Secure the tripod on extremely windy days a Zone20 H laser b Charger for Li Ion versions only c Li Ion battery pack or Alkaline battery pack d 4 x D cell battery for alkaline ...

Page 12: ...e Press once to change the X axis to Manual Mode with Y axis self levelling Press again to change the Y axis to Manual Mode with X axis self levelling Press again to change both axes to Manual Mode with no self levelling Press again to change back to Full Automatic Mode Note the changes in the LED indicators in the Manual Modes The red LED indicates that the corresponding axis is in Manual Mode a ...

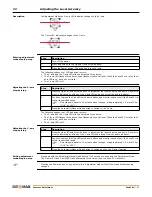
Page 13: ...n Automatic Mode the Zone20 H automatically levels if set up within the 5 self levelling range 3 5 Manual Mode Description of the Manual Mode After start up the Manual Mode can be activated In Manual Mode the self levelling will be deactivated The following options are available Change the X axis to Manual Mode Change the Y axis to Manual Mode Change to Full Manual Mode After turning the Zone20 H ...

Page 14: ... alert turn Zone20 H off and on again Check the height of the laser before beginning to work again The Elevation Alert function turns on automatically every time the Zone20 H is turned on Disable or enable the Elevation Alert function The Elevation Alert function can be disabled or enabled by pressing the following button combination With the Zone20 H turned on press and hold the Up and Down Arrow...

Page 15: ...ected towards the laser LCD window Front and rear LCD arrow indicate the detector s position Audio Speaker Indicates the detector s position High Fast beeping On grade Solid tone Low Slow beeping 011190_001 a b c d e f a Bracket Mounting Hole b Offset notch c Battery door d Serial number label e Product label Component Description Bracket Mounting Hole Location to attach the receiver bracket for n...

Page 16: ...er beam Three channel indication High Red On grade Green Low Blue Laser Reception window Detects the laser beam The reception windows must be directed towards the laser On grade Indicates the on grade position of the laser Keypad Power accuracy and volume functions 011193_001 a b c d e f g a Bracket Mounting Hole b Offset notch c Product label d Battery door Component Description Bracket Mounting ...

Page 17: ...on Indication LED Changes the brightness of the LED indicators Red and green LEDs High Low Off Red and Green LEDs change brightness to indicate this parameter BAT Turns on or off the Laser low battery indication on the receiver Green LED is on Laser low battery icon function is active The laser icon flashes to indi cate this parameter Red LED is on Laser low battery icon function is not active MEM...

Page 18: ... receiver on the rod until the on grade centre line position is indicated on the receiver by the centre bar the green flashing LED a solid audio tone 7 Set the rod with the attached receiver on top of the form 8 Adjust the height of the form until the on grade position is again indicated 9 Continue to additional positions until the forms are levelled to the rotating plane of the Zone20 H b a 4 011...

Page 19: ...ecise measurements with the digital receiver 7a Position is too high 7b Position is too low 7c Position is on grade Step Description Step Description 1 Set up the Zone20 H on a tripod 2 Set up the tripod at the base of the slope with the x axis pointing in the direction of the slope 3 Turn on the Zone20 H 4 Press the Grade button 5 Press the Up or Down button to enter grade for the x axis single s...

Page 20: ... on the charger or on a GeoMax product deviates signif icantly from the actual battery capacity available Operation Discharging The batteries can be operated from 20 C to 55 C 4 F to 131 F Low operating temperatures reduce the capacity that can be drawn high operating temperatures reduce the service life of the battery 6 2 Battery for Zone20 H Charging the Li Ion battery pack step by step The rech...

Page 21: ...ther information 1 Slide the locking mechanism on the battery compartment to the right and open the cover of the battery compartment 2 To remove the batteries Remove the batteries from the battery compartment To insert the batteries Insert the batteries into the battery compartment 3 Close the cover of the battery compartment and slide the locking mechanism to the left until it locks into position...

Page 22: ...m this procedure with two people on a relatively flat surface 7 1 Checking the Level Accuracy Checking the level accu racy step by step The Zone20 H is within its accuracy specification if the four marks are within 1 5 mm 1 16 from the centre Step Description 1 Place the Zone20 H on a flat level surface or tripod approximately 30 m 100 ft from a wall 2 Align the first axis so that it is square to ...

Page 23: ...s In Adjustment Mode the X axis LED indicates changes to the X axis The Y axis LED indicates changes to the Y axis 011294_001 X 011295_001 Y Step Description 1 Turn off the power 2 Press and hold both the Up and Down Arrow buttons 3 Press the Power button The active axis is the X axis Step Description 1 Press the Up and Down Arrow buttons to increment the laser beam up and down Each incre ment is ...

Page 24: ...matic Mode by pressing the Automatic Manual Mode button In Automatic Mode the X axis LED and the Y axis LED flash green while levelling In Manual Mode the X axis LED and or the Y axis LED are red Zone20 H does not turn on The batteries are low or dead Check the batteries and change or charge the batteries if necessary If the problem continues return the Zone20 H to an authorised service centre for...

Page 25: ...s when storing the equipment particularly in summer if the equipment is inside a vehicle Refer to 10 Technical Data for information about temperature limits Field adjustment After long periods of storage inspect the field adjustment parameters given in this user manual before using the product Li Ion and alkaline batteries For Li Ion and alkaline batteries Refer to Technical Data for information a...

Page 26: ...her liquids these can attack the polymer components Damp products Dry the product the transport container the foam inserts and the accessories at a temperature not greater than 40 C 104 F and clean them Remove the battery cover and dry the battery compartment Do not repack until everything is completely dry Always close the transport container when using in the field Cables and plugs Keep plugs cl...

Page 27: ...s on our web page http www geomax positioning com dgr to ensure that you are in accordance with the IATA Dangerous Goods Regulations and that the GeoMax products can be transported correctly Damaged or defective batteries are prohibited from being carried or transported onboard any aircraft Therefore ensure that the condition of any battery is safe for transportation 10 3 General Technical Data of...

Page 28: ... Lithium Ion battery pack Type Operating times at 20 C Lithium Ion Li Ion Pack 40 h Alkaline four D cells 60 h Operating temperature Storage temperature 10 C to 50 C 14 F to 122 F 20 C to 70 C 4 F to 158 F Protection IP67 IEC 60529 Dust tight Waterproof to 1 m temporary immersion Type Li Ion battery charger Input voltage 100 V AC 240 V AC 50 Hz 60 Hz Output voltage 12 V DC Output current 3 0 A Pol...

Page 29: ......

Page 30: ...GeoMax Zone20 H Series GeoMax AG www geomax positioning com 841853 1 0 1en Original text 2015 GeoMax AG Widnau Switzerland ...

Reviews: