background image


12 

3. G-Note operation instructions 

After you have completed the installation of the batteries and the notepad you 
can start in writing or drawings with the digital ink pen. Your notes will instantly 
be captured and stored in the memory of the G-Note as a series of digital pages 
in a G-Note file for later retrieval on your PC. This section will explain the main 
functions of the G-Note. 
 

3.1 Front panel buttons 


Note taking mode 

Configuration menu 


POWER


Power on/off 

MENU 

Call up menu 


NEW


Start new page 

ENTER 

Confirm 

U


UP


Previous page 

UP 

Select value up 

V


DOWN


Next page 

DOWN 

Select option down 

³


DELETE


Erase page in memory 

ESC 

Cancel and return 


3.2 Turning on the equipment 

Powering up the G-Note 


Press and hold the 

Power 

 button on the front 

panel for a few seconds until you see the power-on 
smiley appears on the LCD display. After a second the 
main screen of the G-Note will appear. 


13 

Testing the digital ink pen 


Make sure that you have installed the button cell battery in the digital pen 
before proceeding with the following tests (see section 1.6 for battery 
installation instructions). 


Hover the digital pen closely over the notepad. The pen icon on the LCD 
display will turn white to indicate that the pen is operational and within 
reading distance of the built-in digitizer of the G-Note. 


The pen icon on the main screen will turn black as soon as you touch the 
pen tip down on the notepad. The G-Note will now record all pen strokes 
that you write on paper. 


If the 

Pen

 icon does not appear while you are writing, verify if the 

button cell battery is properly installed and has not run out of power. 


You may use the digital pen as a normal ballpoint pen to write on any 
piece of paper. However, do not use a normal ballpoint pen to write 
on the G-Note as notes will not be recorded.   
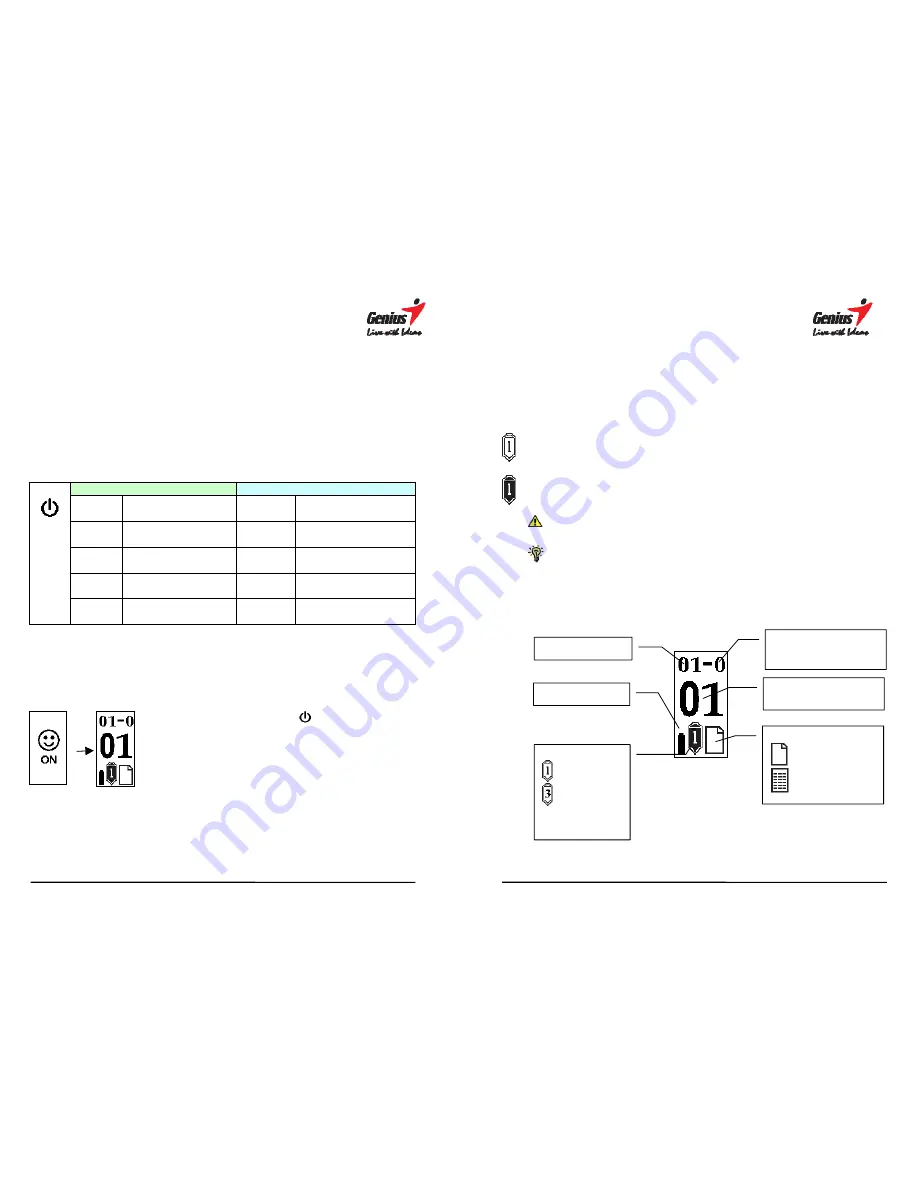
The LCD display 


Workbook 

Page counter 

(hundreds 0-1) 

Battery status 

Page status


New blank page 

 Page with contents 


Pen icon


Black ink 

Red ink 


Page counter 

(decimals 0-99) 

Summary of Contents for G-NOTE 7100

Page 1: ...orrect the interference by one or more of the following measures Reorient or relocate the receiving antenna Increase the separation between the equipment and receiver Connect the equipment to an outle...

Page 2: ...end timer 3 60mins 22 3 6 4 The remaining disk space battery capacity display 23 3 7 TURNING OFF THE G NOTE 23 4 THE DIGITAL ORGANIZER 24 4 1 INSTALLING THE DIGITAL ORGANIZER SOFTWARE 24 4 2 DOWNLOADI...

Page 3: ...ital note recorder 2 1 x A5 notepad 3 1 x black digital ink pen when connect to PC can be pen of G Note as Pen Tablet 1 x red digital ink pen 4 3 x black ink refills stored in the battery compartment...

Page 4: ...0 supports standard A5 notepad with a maximum thickness of 15mm Power on off LCD display Function buttons Normal paper USB port Pen slot Digital ink pen 7 G Note 7100 USB port Ink Refills Battery comp...

Page 5: ...hen the batteries run out of power remove them or insert new batteries 9 Four AAA alkaline batteries can use approximate 100 hours continuously Battery run time varies based on the usage pattern of an...

Page 6: ...and Do not try to force too large notepad into the G Note Working Area G Note 5000 G Note 7100 Maximum Thickness 0 mm 2 5 mm 5 7mm Wide 20mm Wide 10mm 11 2 4 Built in storage device The G Note is equi...

Page 7: ...ill appear 13 Testing the digital ink pen Make sure that you have installed the button cell battery in the digital pen before proceeding with the following tests see section 1 6 for battery installati...

Page 8: ...ress the Page Up button to browse previous sheets and make corrections or additional notes You may turn back several sheets at a time to check earlier notes However if you want to make additions on a...

Page 9: ...allows you to adjust the paper orientation from portrait to landscape or even use the G Note upside down Workbook Start a new workbook e g at the start of a new meeting or after changing a notepad Fo...

Page 10: ...3 6 2 2 The Workbook Format Disk command 1 Press V to select the workbook sub menu 2 Press ENTER to confirm 3 Press V to select the Format Disk command Press to confirm the operation After finish thi...

Page 11: ...econds it will return to note taking mode Enter Esc Return to main menu Return to note taking mode 21 3 6 2 4 The Workbook Tablet Function Selection 1 Press V to select the workbook sub menu 2 Press E...

Page 12: ...Press to confirm and return to the main menu Enter Esc Return to main menu Return to note taking mode 23 3 6 4 The remaining disk space battery capacity display 1 Press V to select the status menu 2...

Page 13: ...recommended and click OK 4 To proceed with the installation click OK wait until the install Latino is completed and click OK again 25 4 2 Downloading digital pages from the G Note 1 Take the G Note US...

Page 14: ...n a much the same way as the stylus of a traditional pen tablet a tablet PC or hand hold computer In pen tablet mode you can hover the pen over the writing area to navigate the cursor across the scree...

Page 15: ...e Notepad pane 29 4 6 The standard toolbar Located at the upper left of the screen the standard toolbar contains icons for all usual desktop functions like opening saving printing files cut copy or pa...

Page 16: ...section 4 8 under Selection techniques and click on the Delete icon in the Standard toolbar Make sure to make back ups of the digital pages in the flash memory of the G Note by copying them to a folde...

Page 17: ...To add files to your selection from other places on your hard disk click on the Add File button in the dialog box and browse to the files you want to add Click on the Move up or Move down buttons to...

Page 18: ...l then appear in a selection box You can now change pen tip colors and shapes and click the OK button to confirm 2 Select the pen tip shape Click the OK button to confirm 35 3 Select the pen color Cli...

Page 19: ...es Use this Pen Properties dialog box to modify the annotations in the Notepad pane 1 Start with selecting the objects you want to modify with the Select tool see above The selection will appear in a...

Page 20: ...mposed page at the point in time where you forgot to press the New page button The result will be two separate and perfectly readable pages again 39 Click on the Untangle icon to open a dialog box con...

Page 21: ...cript Notes FOR U 30 days Trial Version Genius free support MyScript Notes FOR U software that converts your handwritten notes from G Note into digital text support of 13 languages English UK English...

Page 22: ...bserve the following precautions Remove the batteries from the G Note if it is not expected to be used for long periods This will eliminate the possibility of battery liquid leaking from the batteries...

Page 23: ...CD display is either white or black see also section 3 2 in note taking mode to assure a proper reading height distance After you have switched on the device it may take a second or two for the page i...

Page 24: ...a computer in real time 47 Technical specifications G Note 5000 Digital notepad specifications Technology Electromagnetic digitizer Dimensions 281 L x 180 W x 15 H mm Weight 358g not including batter...

Page 25: ...Battery Life About 100 hours continuous use Work Current 3V 20mA 5mA Power Consumption 60mW 15mW Power saving Auto suspend after 15 min default idle time configurable Interface USB 1 1 Digital ink pe...

Reviews: