background image

SHUTTERS OPERATION

Drive for a crank with Cardan joint:

In blinds equipped with a crank lifting mechanism with a cardan gear, the crank is supplied with a blind. 

After installing the blind, place the crank rod in the gearbox through the hole in the roller shutter box. Next 

- depending on the type of blind installation - the crank should be screwed to the box or using wall plugs 

to the wall of the building. An additional element fixing the crank arm is a special clamp, which is screwed 

by means of screws (dowels) to the wall in the lower part of the crank arm. The design of the crank arm 

thanks to special joints allows you to "straighten" it for aesthetic purposes when the blind is not operated. 

To raise or lower the blind jacket, turn the crank in the right direction.


The operation of the crank lifting mechanism requires special care and feeling, as the gear used allows 

for obtaining large forces that may damage the shutter elements. Therefore, stop turning the crank when 

you  feel  resistance  or  notice  that  the  roller  shutter  has  stopped  when  lowering.  In  external  blinds,  the 

rotation  of  the  crank  clockwise  causes  lowering  of  the  roller  shutter,  while  the  rotation  of  the  crank 

counter-clockwise causes the roller blind to be lifted

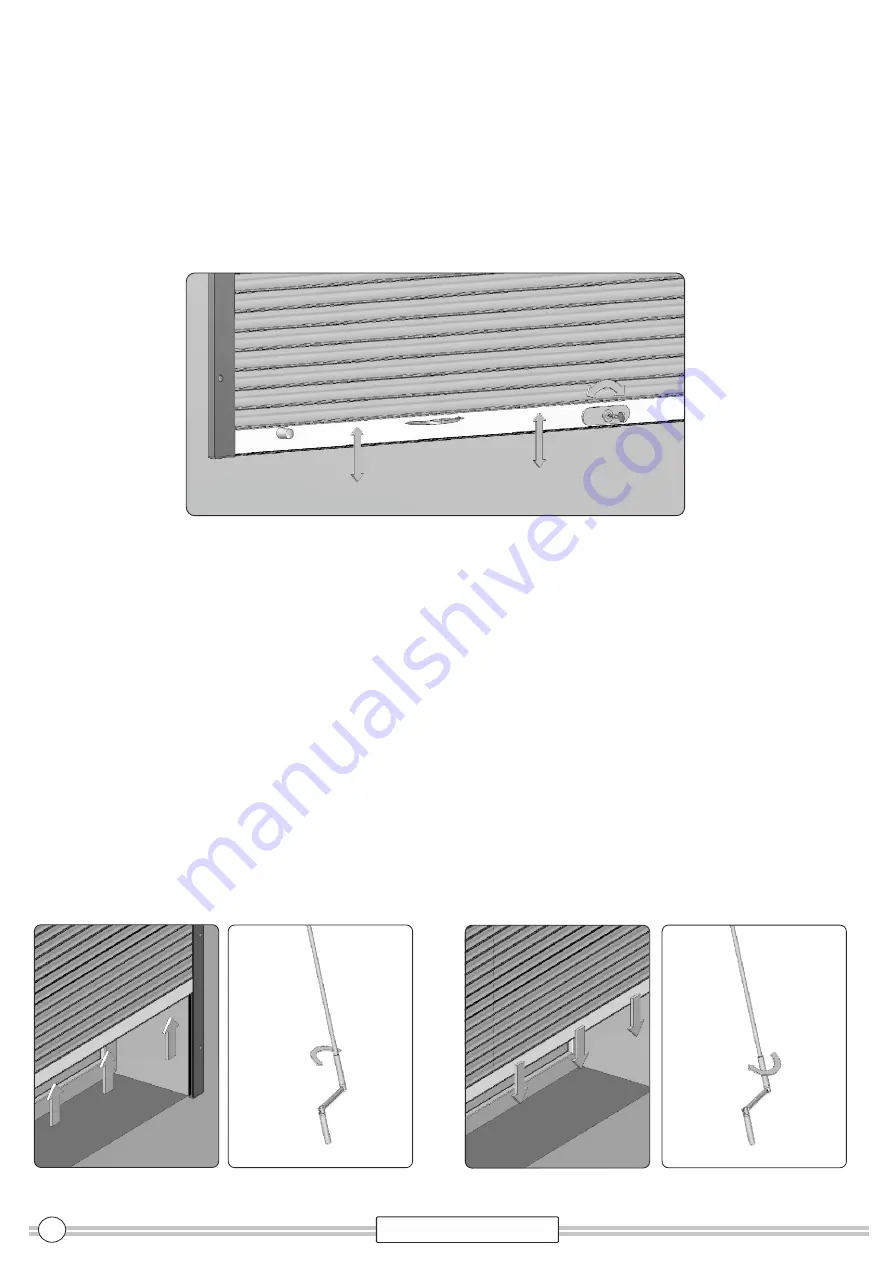
Spring drive:

1.

Raising the blind.

Grab the handle in the bottom strip and hold the 

blind

. Use the key to release the lock. Slowly release 

the 

blind

. The 

blind

 will roll up automatically and 

will stay

 open.

2.

Closing the blind:

Hold both handles in the lower bar with both hands and evenly pull the 

blind

 down. Hold the 

blind

 in the 

lower position and turn the key to lock the blind.

10

myeuropeanwindows.com

Summary of Contents for GBP-ST2000

Page 1: ...GBP ST2000 WITH MOSQUITO SCREEN MOUNTING INSTRUCTION ROLLER SHUTTER m y e u r o p e a n w i n d o w s c o m ...

Page 2: ...MOUNTING TYPE A MOUNTING TYPE B MOUNTING TYPE C EXTERNAL ROLLER SHUTTERS MOUNTING TYPES m y e u r o p e a n w i n d o w s c o m ...

Page 3: ...ambers and a drill with a diameter 10mm increase the opening in the first chamber only from the side outer guide MOUNTING TYPE A o 10 o o 8 15 mm 4 When installing the blind with automatic bolts drill through the central part of the guide with a drill bit 8 mm in distance 15 mm from the bottom edge o o 8 50 mm 5 When installing a blind with bolts drill a central one part of the guide with a drill ...

Page 4: ...ing drill with a diameter of 12mm from the power cord to the motor a drill with a diameter of 10mm 15mm 11 Screw and align the guides using a level on the surface With blinds with a mosquito net it is necessary pay attention to put the guides on the right side so that the latches of mosquito net or system hooks KLIK KLAK was located at the bottom of the guide X2 D1 D2 7 Place the drilled guides ag...

Page 5: ...uides then insert the caps If necessary mount the bottom plugs of the guides check proper functioning of the blind Check correctness operation of automatic bolts bolts or lock to make adjustments 13 Pass the tape cable or cord through the hole into building 19 The closing height of the mosquito net can be adjusted by sliding hooks closing the mosquito net which are located at the bottom of the gui...

Page 6: ...opening in the first chamber only from the outer side of the guide TYPE OF ASSEMBLY C increase the hole in the middle wall the guide 3 Place the drilled guides against the wall and mark the holes for screws on the window frame 4 Place the drilled guides to the wall and mark holes for mounting screws in the side of the opening 6 When installing external blinds with mosquito nets in installation typ...

Page 7: ...ndard guides or angular in the window opening 25 mm 7 With the type of mounting into the openings on the window frame as a manual drive the company GBP LLC recommends the rope retractor Place on the window frame drilling into a cable or cord Then drill the hole 2 5 cm under the upper part of the recess a cable a drill with a diameter of 12mm from the power cord to the motor a drill with a diameter...

Page 8: ...raps or rope should be cut for a length of 25 cm below the mounting location of the retractor After put the rope through the retractor hole and light with a lighter this will prevents it from unraveling the rope Close retractor and attach it to the wall see assembly instructions cable retractor 12 The retractor should be screwed to the wall or window frame vertically in relation to the cable outle...

Page 9: ...r and pull it towards you at an angle of about 20 degrees to release the retractor lock Then holding the tape it should be moved gently towards the window so that the falling blind will pull the tape inside Repeat the procedure several times until the blind is completely closed When lowering the shutter make sure it does not hit the bottom too much When lifting and lowering the blind it can be sto...

Page 10: ...t turn the crank in the right direction The operation of the crank lifting mechanism requires special care and feeling as the gear used allows for obtaining large forces that may damage the shutter elements Therefore stop turning the crank when you feel resistance or notice that the roller shutter has stopped when lowering In external blinds the rotation of the crank clockwise causes lowering of t...

Page 11: ...lling the blind KLIK KLAK system To adjust the hooks located in the bottom of the mosquito guide the key is used Allen head 3 mm by means of which the Allen screw should be loosened Then set both hooks at the same height so that the gasket of the bottom strip of the mosquito net is in contact with all of it length evenly to the window frame or window sill depending on the type of assembly and the ...

Page 12: ...tomatically rolls up Opening the mosquito net Closing the mosquito net KLIK KLAK System FISHING SYSTEM KLIK KLAK System FISHING System Hold both handles in the lower bar with both hands and evenly lower the mosquito net The mosquito net will close when the bolts lock into the guides Grab the bolts in the bottom of the mosquito net and move them gently in the inner side of the slat then gently lift...

Page 13: ... the water vapor to settle on the blind and as a result its subsequent freezing Therefore before opening the window the roller shutter blind should be completely raised 2 In the winter icing and freezing of the blind to the ground may occur An attempt to open the blind in such a situation may lead to the breaking of the blind especially with the electric drive In the period of snow or heavy frosts...

Page 14: ...lind during opening and closing 4 It should be noted that when leaving the blind from the box did not encounter any obstacle 5 When using the blind attention should be paid to the condition of the tape and the retractor Damage it may cause automatic fall of the blind and damage to the shutter elements 6 If any part of the blind is found to be damaged or its function is incorrect stop using it and ...

Page 15: ...m y e u r o p e a n w i n d o w s c o m ...

Page 16: ...THIS MANUAL IS ESSENTIAL FOR THE SAFETY OF PEOPLE SAVE THESE INSTRUCTIONS Genesis Building Products LLC 348 County Road 3521 Bullard Texas 75757 USA 1 903 600 5040 info myeuropeanwindows com www myeuropeanwindows com m y e u r o p e a n w i n d o w s c o m ...

Reviews: