36
If the largest reading at any portion of the
staightedge excees the limit, rework the surface by
rubbing it against emery paper laid flat on the
surface plate in a lapping manner. The surface must
ge smooth and perfectly falt in order to secure a tight
join: a leaky joint can be the cause of reduced power
output and increased fuel consumption.
CYLINDER
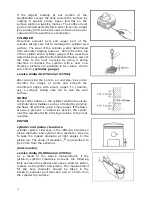
Decarbon exhaust port and upper part of the
cylinder, taking care not to damage the cylinder wall
surface. The wear of the cylinder wall is determined
from diameter reading taken at 20mm from the top
of the cylinder with a cylinder gauge. If the wear thus
determined exceeds the limit indicated below, rework
the bore to the next oversize by using a boring
machine or replace the cylinder with a new one.
Oversize pistions are available in two sizes: 0.5mm
and 1.0mm.
(cylinder gauge)
service limit
:
40.075mm(1.5778in)
after reworking the bore to an oversize, be sure to
chamfer the edges of ports and smooth the
chamfered edges with emery paper. To chamfer,
use a scraper, taking care not to nick the wall
surface.
NOTE
:
Minor surface flaws on the cylinder wall durto seizure
or similar abnormalities can be corrected by grinding
the flaws off with fine-grain emery paper. If the flaws
are deep grooves or otherwise persist, the cyliner
must be reworked with a boring machine to the next
oversize.
PISTON
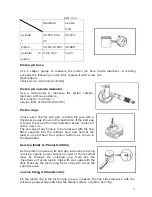
cylinder and piston clearance
cylinder –piston clearance is the difference between
piston diameter and cylinder bore diameter. Be sure
to take the maked diameter at right angles to the
piston pin. The value of elevation ,A is prescribed to
be 20mm from the skirt end.
(micrometer)
service limit
:
39.885mm(1.5703in)
As a result of the above measurement, if the
piston-to-cylinder clearance exceeds the following
limit, overhaul the cylinder and use an oversize piston,
replace both cylinder and piston. The measurement
for the bore diameter should be taken in the
intake-to-exhaust port direction and at 20mm from
the cylinder top surface.
Summary of Contents for XOR 50 ccm
Page 1: ......
Page 19: ...19 14...
Page 52: ...52 CHAPTER 4 FUEL AND LUBRICATION SYSTEM CONTENTS FUEL SWITCH CARBURETOR OIL PUMP...
Page 73: ...73 3 Disconnect throttle cable and oil pump cable 4 Remove rear brake cable adjusting nut...
Page 86: ...86...
Page 101: ...101 WIRE CABLE AND BRAKE HOSE ROUTING...
Page 102: ...102 carburetor...
Page 103: ...103...
Page 104: ...104 Ignition coil Starting relay CDI HORN POWER SWITCHH...
Page 106: ...106...

