background image


MU-A-RectiRail DL2-rev01a-Gb


41

 / 44


7.8.3 

Reading and comparing measurements 

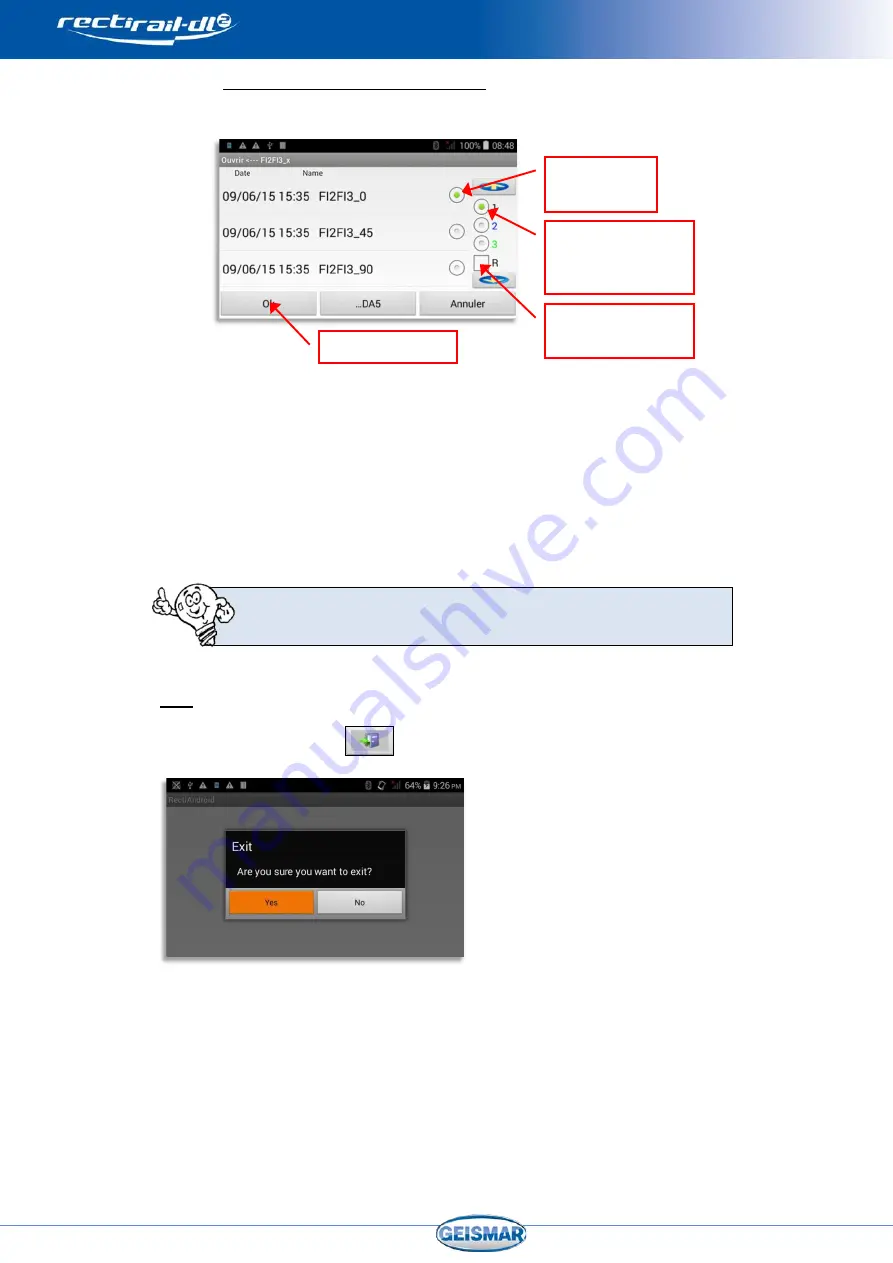
When reading a measurement, the following screen is displayed: 


Once the choice has been validated by  OK,  you can request reading of a 

second measurement. To do this, select “open”, then 

- Highlight the required curve 

- Select a 

different 

position 

Validate by OK: both curves are now displayed. Proceed likewise to visualise a 

3rd curve.  

If ticked, the “R” box lets you reset the display (deletion of the 

curves on the screen) 


Exit 

Click on the “Exit” button 

 to exit the software.  


Confirmation is required to exit the application. 

Exiting the application will automatically switch off the RectiRail. 

Select the 
measurement 

Select the required 
position for this 
measurement 

Validate by OK 

Delete the other 
measurements 

Summary of Contents for rectirail-dl2

Page 1: ...User Manual MU A RectiRail DL2 rev01a Gb ELECTRONIC RULE FOR MEASURING RAIL STRAIGHTNESS...

Page 2: ......

Page 3: ...78 45 France E mail commercial geismar com LOCAL REPRESENTATIVE Nous nous r servons le droit d apporter toute modification aux caract ristiques du mat riel ainsi qu sa mise en uvre son mode d entretie...

Page 4: ...or used for manufacturing or sales purposes or for any other use without GEISMAR s prior written consent The data in this manual are not binding on the manufacturer who reserves the right to modify th...

Page 5: ...ttings 20 5 2 Advanced settings 23 6 TAKING A MEASUREMENT IN NORMAL MODE __________________________________ 26 6 1 Parameter setting 26 6 2 Starting to measure 27 6 3 Backup 27 6 4 Reading 30 6 5 Zoom...

Page 6: ...als for which distance is to be measured from the sensor to be sufficiently conductive metals carbon fibre composites rubber composites etc RectiRail DL2 operates on oxidised metals and some paints wh...

Page 7: ...Resolution 12 5 m Storage capacity Limited only by PDA capacity Rule autonomy 800 Readings PDA autonomy 3 4 Hours Operating temperature 0 40 C EMC conformity Standard EN 50121 4 2000 Certificate 2005...

Page 8: ...MU A RectiRail DL2 rev01a Gb 6 44 3 USING THE HARDWARE 3 1 Overview Joystick PDA Bluetooth antenna Button Holding magnets Mechanical stops with indexing Insulating bl k...

Page 9: ...configuration is reached Rail profile measurement head Rail route measurement side 0 position 90 position Fillet measurement at 45 45 position Ground installation Rest position Note According to the m...

Page 10: ...the electric stops Measurement quality also depends on the quality of this contact Moreover these electric stops are made of hardened steel and have an aggressive shape They can be used to rub the rai...

Page 11: ...o browse in the PDA menus move through the menus Left and Right keys The joystick Up and Down keys can also be used to select in a list The indicator LED on the button is lit when the rule is in opera...

Page 12: ...blinking charging is complete During charging you can use the RectiRail DL2 4 Once the battery is charged unplug the charger from the mains supply and remove the socket from the device The RectiRail...

Page 13: ...MU A RectiRail DL2 rev01a Gb 11 44 Rule charging Charge connector Charge indicator...

Page 14: ...12 44 4 USING THE SOFTWARE 4 1 Menu overall organisation MAIN Connect Validate Cancel Measure Zoom Scan Back up Validate DA5 Cancel Open Validate DA5 Cancel Settings Option menu password Calibrate pa...

Page 15: ...iRail DL is linked to the language selected on the PDA Click on the icon 1 Settings of your PDA 2 Language and input 3 Language 4 Your language If the translation was not in your language the software...

Page 16: ...ail DL2 rev01a Gb 14 44 4 3 Main screen Rule battery level indicator Bluetooth connection indicator 4 3 Settings 0 Open File Start to measure Change Zoom Scan Mode Exit Switch off RectiRail 0 Back up...

Page 17: ...tiAndroid software the connection icon turns red such as shown below this means that the connection either failed or could not be initialised NOT CONNECTED CONNECTED On starting the software a message...

Page 18: ...this rule The rule is not in the list You then need to pair the rule with the PDA Click on Bluetooth devices scan and the rule will appear in New Bluetooth device Validate choice of rule by clicking...

Page 19: ...ectly visible in the Windows tree The measurements contained in a DA5 file are visible In the software via the open function providing access to a choice of DA5 files and to the files in this DA5 In R...

Page 20: ...ystick or directly on the screen To add a character highlight it and press the Validate key via the joystick or just click on it using a pen or finger Non Western characters can also be used in names...

Page 21: ...asurement Rule number Rule software version Calibration date Temperature Rule supply voltage Angle of the measurement you have chosen GPS position This information is visible in RectiPC via the Edit b...

Page 22: ...ent If the box is ticked the values are then displayed to the right of the main screen If several curves are displayed simultaneously see 0 the values are displayed with the same colour as the corresp...

Page 23: ...ding loading protection Access is protected by password Contact your GEISMAR representative for the password 5 1 3 Calibration password By validating the Calibration button you can access the RectiRai...

Page 24: ...by one The choose position option allows the user to select rule position see 0 Below is a copy of the main screen Refer to 0 6Taking a measurement in normal for a complete description of use This mod...

Page 25: ...1 In this case the radius is negative as measurement of straightness in the centre of the rule is increased by the rail curvature effect The measurement must thus be corrected by deducting from it the...

Page 26: ...lay is saved in scan mode 5 2 3 Switch off timeout This option defines the time after which the rule will be automatically switched off if there is no action on it so as to save the batteries If Timeo...

Page 27: ...r the 3rd and 98th sensors or the 1st and 100th sensors according to the chosen parameter setting In the 1st case the 3rd and 98th values will thus always be at 0 else the 1st and last points will be...

Page 28: ...ttings exit the menu by clicking on This screen lets the user define the position of the rule used for the measurement see 0 Rule position is saved on measurement backup and can be visualised in the R...

Page 29: ...the current position of the rule and start to measure A progress bar then indicates acquisition status After a few seconds acquisition is complete and the measurement is displayed on the screen 6 3 Ba...

Page 30: ...screen is displayed Click on OK and follow the steps described below to create a DA5 and save the measurement Click on DA5 Ref Name the DA5 Ref and validate by OK Ref Once the DA5 has been named selec...

Page 31: ...een displays the last measurement saved Ref Enter the name of the new measurement Ref Click on the folder Ref to choose the DA5 in which you want to save the measurement Choose the DA5 Ref and validat...

Page 32: ...downwards Arrow Next reading Validation button OK Display of the selected reading in the main screen Escape button Cancel Cancellation of the operator and back to the main screen Open a file Select th...

Page 33: ...displayed on the screen the display zoom scaling factor can be modified To do this select and validate the Zoom choice On each validation the current zoom moves to the next value Mode Scale scope Rect...

Page 34: ...3rd and 98th values will thus always be at 0 else the 1st and 100th values will be at 0 On the curves presented above the 3rd and 98th sensors are at 0 XX zoom This mode presents non rectified values...

Page 35: ...n These cursors can be moved using The RectiRail DL2 joystick The green and blue arrows on the PDA screen A pen by clicking on and dragging the blue or green lines 3 value pairs The values displayed t...

Page 36: ...he profile around a position for example a weld as it can display simultaneously and save together the measurements corresponding to the various positions 0 45 and 90 This mode is described in the fol...

Page 37: ...hen indicates acquisition status After a few seconds acquisition is complete and the measurement is displayed on the screen Click again on measurement to choose a different position and validate The s...

Page 38: ...nt then The DA5 will be my measurement_x DA5 The measurements contained will be automatically named my measurement _0 my measurement _45 my measurement _90 Once the 2 or 3 measurements have been taken...

Page 39: ...it may prove useful to reset the screen To do so follow the steps below In the main screen select measurement and in screen for choosing the position click on the Delete measurements box Ref and valid...

Page 40: ...ile group mode Click on reading Ref As explained in the above section these files are identified by the suffix _x automatically added to the DA5 name Ref The 2 or 3 measurements in the DA5 are display...

Page 41: ...ible via the button but is limited to the display of one curve Following validation of this mode the screen below lets you choose the curve you want to visualise Select the curve and validate by The s...

Page 42: ...en In the Settings menu remove the tick from the 1 file per group box Ref To validate the settings exit the menu by clicking on 7 8 1 Taking measurements Measurements are taken in the same way as in t...

Page 43: ...lect a different position Validate by OK both curves are now displayed Proceed likewise to visualise a 3rd curve If ticked the R box lets you reset the display deletion of the curves on the screen 8 E...

Page 44: ...e not jammed and that the stops are in contact with the rail NOISY MEASUREMENT is displayed when taking a measurement This means that several rule sensors are damaged or that the RectiRail has moved d...

Page 45: ...check the protection condition and cleanliness of the measurement area If necessary wipe with a clean non abrasive cloth do not use solvents Presence of foreign bodies water droplets etc or grease on...

Page 46: ...tion request Contenu Contents SOCI T TURRIPINOISE DE MECANIQUE Route d Italie 38352 La Tour du Pin France Tel 33 0 4 74 97 24 88 Fax 33 0 4 74 97 30 76 E mail sav stumec geismar com Raison du retour R...

Page 47: ...MU A RectiRail DL2 rev01a Gb 45 44 11 Notepad...

Page 48: ...SOCI T TURRIPINOISE DE MECANIQUE Route d Italie 38352 La Tour du Pin France Tel 33 0 4 74 97 24 88 Fax 33 0 4 74 97 30 76 E mail stumec geismar com...

Reviews: