background image

Loader Raising Procedure

To raise the skid loader so all four tires are not contacting the ground, use the
procedure below:

Do not rely on a jack or hoist to maintain the “raised”

position without additional blocking and supports. Serious personal
injury could result from improperly raising or blocking the skid loader.

1.

Using a jack or hoist capable of lifting the fully-equipped weight of the
loader (with all attached options), lift the rear of the loader until the rear
tires are off the ground.

2.

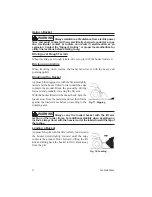
Stack wooden blocks under the flat part of the loader chassis. They should
run parallel with, but not touch, the rear tires (see Fig. 26).

3.

Slowly lower the loader until its weight rests on the blocks. If the tires still
touch the ground, raise the loader again, add more blocks and lower again.

4.

Repeat Steps 1 through 3 for the front end. When the procedure is
finished, all four tires will be off the ground so they can be removed.

Loader Lowering Procedure

When service or adjustment procedures are complete, the skid loader can be
taken down from the “raised” position. To lower the loader onto its tires:

1.

Using a jack or hoist, raise the front of the loader until its weight no longer
rests on the front blocks.

2.

Carefully remove the blocking under the front of the loader.

3.

Slowly lower the loader until the front
tires are resting on the ground.

4.

Repeat Steps 1 through 3 for the rear of
the loader. When the procedure is
finished, all four tires will be on the
ground and the blocks removed from
under the loader.

43

908268/BP0904

WARNING

Fig. 26: Blocked Loader

Summary of Contents for SL3635

Page 1: ...OPERATOR S MANUAL SL3635 SL3935 SKID STEER LOADER Form No 908268 BP0904 English SL3635 SN 00001175 LATER SL3935 SN 00001337 LATER...

Page 2: ...on the machine itself you are reminded to BE ALERT Your personal safety is involved Always fasten seatbelt snugly Always keep feet on the floor pedals when operating loader Never use loader without RO...

Page 3: ...edule 65 Specifications 68 Table of Common Materials and Densities 72 Index 74 Torque Specifications 76 Loader Model Number Loader Serial Number Engine Serial Number All Tach and Hydraloc are trademar...

Page 4: ...e manuals be given to the new owner The attachments and equipment available for use with this machine have a wide variety of potential applications Read the manual provided with the attachment to lear...

Page 5: ...hl Company Service Department with the owner s name and current address along with the machine model and serial number This will allow the registered owner information to be updated so that the owner...

Page 6: ...Front Work Lights Hand Holds Restraint Bar Tilt Cylinder Hitch Tires Hydraulic Auxiliary Couplers Lift Cylinder Upright Engine Cover Tail Lights Rear Door Lift Arm Roll Over Falling Object Protective...

Page 7: ...ral Safety Alert Chaincase Oil Seatbelt Lap Only Engine Air Filter Engine Oil Engine Oil Filter Engine Oil Pressure Fuel Filter Engine Coolant Temperature Hydraulic System Hydraulic Oil Temperature Hy...

Page 8: ...Notes 5 908268 BP0904...

Page 9: ...ty of the load poor maintenance and using the equipment for a purpose for which it is not intended or designed Gehl ALWAYS considers the operator s safety when designing its machinery and guards expos...

Page 10: ...llation instructions Modifications such as welding drilling or cutting can weaken the structure and reduce the protection it provides A damaged ROPS FOPS cannot be repaired it must be replaced To ensu...

Page 11: ...ttachments because they could fall or cause an accident Always look to the rear before backing up the skid steer loader Operate the controls only from the operator s seat Do not exceed the rated opera...

Page 12: ...d that a softer chip resistant material be used to cushion the blow Failure to heed could lead to serious injury to the eyes or other parts of the body Do not smoke or have any spark producing equipme...

Page 13: ...nds an exposure limit of 0 05 mg m3 as a time weighted average for up to a 10 hr workday during a 40 hr workweek NIOSH also recommends substituting less hazardous materials when feasible using respira...

Page 14: ...y Decals inside the ROPS 11 908268 BP0904 137628 Located on the manual box operator s right 137683 Located on ROPS left panel 137639 Located on ROPS left panel 137647 Located on operator s lower left...

Page 15: ...Safety Decals on the Outside of the Skid Loader 908268 BP0904 12 137720 Front of loader 137655 Front of loader 184214 Under ROPS 137637 Lift arm support device loader left side...

Page 16: ...Safety Decals in the Engine Compartment 13 908268 BP0904 137657 Right of hydraulic filter 137658 On radiator...

Page 17: ...number 3 Product plate with Product Identification Number and e g model type designation 4 Seat plate according to ISO 7096 5 Component plate rear drive axel with e g product and serial number 6 Comp...

Page 18: ...Notes 15 908268 BP0904...

Page 19: ...operating it Do not operate the loader unless all factory installed guards and shields are properly secured in place Operator Restraint Bar Lower the restraint bar after entering the operator s compa...

Page 20: ...f the auxiliary hydraulics anytime the restraint bar is raised or the keyswitch is OFF Testing the Safety Interlock System Before leaving a parked machine check the safety interlock system for proper...

Page 21: ...gages when the operator lifts the restraint bar leaves the operator s seat or shuts off the engine The brake can also be applied manually by using the switch located on the right control panel of the...

Page 22: ...partment Instead have someone store the support device for you Then contactyourGehldealerimmediatelytodeterminewhytheliftarmlowerswhile the keyswitch is OFF Engagement Always engage the lift arm suppo...

Page 23: ...pin through the support device and catch under the lift arm Once the pin is secure flip the lock pin loop so that it locks the pin in Accessory Plug Optional The optional accessory plug is located at...

Page 24: ...re Lights if the engine oil pressure drops too low warning the operator to immediately stop the engine and determine the cause for the pressure drop During normal operation this indicator should be OF...

Page 25: ...position theelectricstarterenergizes startingtheengine Releasethekey after the engine starts it returns to the RUN position by itself Note The engine cannot be started unless the operator sits in the...

Page 26: ...p turns do not move the control forward or rearward Moving the T Bar farther from neutral increases the speed steadily to the maximum travel speed Tractive effort decreases as speed increases To get m...

Page 27: ...the control counterclockwise Note The speed of the lift tilt motion is directly proportional to the amount of T Bar movement and engine RPM To place the lift arm in the detent float position push the...

Page 28: ...rsharpturns movethe handles in opposite directions Moving the handles farther from neutral increases the speed steadily to the maximum travel speed Tractive effort decreases as speed increases To get...

Page 29: ...ht pedal to tilt the attachment up or back use your heel to push down on the right pedal Note The speed of the lift tilt motion is directly proportional to the amount of pedal movement and engine RPM...

Page 30: ...farther forward to turn left move the right handle farther forward than the left handle For sharp turns move the handles in opposite directions Moving the handles farther from neutral increases the s...

Page 31: ...rotate the right control down Note The speed of the lift tilt motion is directly proportional to the amount of control movement and engine RPM To place the lift arm in the detent float position push t...

Page 32: ...efer to page 35 T Bar Controlled Loaders A foot pedal is used to control the direction of oil flow Pushing the right side of the foot pedal all the way to the right will put the control valve in the d...

Page 33: ...he attachment Rotate the levers until they are horizontal to engage the lock pins Rotate the levers until they are vertical to disengage the lock pins To prevent unexpected attachment release from the...

Page 34: ...Notes 31 908268 BP0904...

Page 35: ...ROPS hand holds to get into the operator s compartment 2 Fasten the seatbelt and lower the restraint bar 3 Verify the following the lift tilt drive and auxiliary controls are in their neutral positio...

Page 36: ...le s is are are in neutral position 2 Lower the lift arm and rest the attachment on the ground 3 Pull the throttle lever back to the idle position and or take your foot off the accelerator pedal for h...

Page 37: ...r cable to the positive battery terminal on the disabled loader first Do not allow the jumper s positive cable clamps to touch any metal other than the positive battery terminals Connect the other end...

Page 38: ...tch forward until the top edge of the hitch is below the flange on the back side of the attachment and centered between the vertical plates 5 Slowlydrivetheloaderforwardand atthesametime tiltthehitchb...

Page 39: ...y and attachment lines a Turn the key ON do not start the engine b With the restraint bar down move the auxiliary hydraulic control backandforth Thiswillrelievethepressureinthehydraulicsystem 4 With t...

Page 40: ...ed and the bucket tilted forward until the edge contacts the ground Break the ground by driving forward and gradually lowering the lift arm Withthebucketfilled tiltthebucketback backthe loader away fr...

Page 41: ...over the inside of the box After the material is dumped back away from the box tilting thebucketbackwhileloweringtheliftarm Dumping the Load Over an Embankment Do not drive too close to an excavation...

Page 42: ...stance obtain and use a properly rated trailer For short distance highway travel attach an SMV SlowMovingVehicle emblem purchasedlocally tothebackoftheloader For highway operation obtain and install d...

Page 43: ...equipment Ensure that the hauling vehicle meets all safety requirements before loading the skid loader 1 Place blocks at the front and rear of the hauling vehicle s tires 2 If the loader has an attac...

Page 44: ...e than the recommended intervals may be required under severe operating conditions You must decide if your operation requires more service Important Always dispose of waste lubricating oils and hydrau...

Page 45: ...ck mechanism handle toward the front of the loader Lower the ROPS slowly onto the chassis moving the control handles out of the way Reinstall the anchor bolts washers and locknuts Never operate the lo...

Page 46: ...s on the blocks If the tires still touchtheground raisetheloaderagain addmoreblocksandloweragain 4 Repeat Steps 1 through 3 for the front end When the procedure is finished all four tires will be off...

Page 47: ...amount of fuel in the fuel tank Check the fuel sender periodically to ensure that the mounting screws are tight and that there is no fuel seepage around the gasket If adjustment is required apply an R...

Page 48: ...or SAE grade motor oil Capacity each side 3635 4 5 U S gallons 17 liters 3935 5 0 U S gallons 19 liters Grease Fittings Use lithium based grease Engine Oil Below 32 F 0 C Use SAE Grade 10 or 10W 30Abo...

Page 49: ...ce the element s The outer element should be replaced only when the restriction indicator turns red The inner element should be replaced every third time the outer element is replaced unless the outer...

Page 50: ...ure that the element sealing surfaces are clean 3 Insert the element s making sure that they are seated properly 4 Secure the cover to the housing with the two clamps 5 Check the hose connections and...

Page 51: ...top the engine Check for leaks at the oil filter drain plug and remote oil drain hose Checktheoillevel Addoilifitisnotatthetopmarkonthedipstick Forareplacementelement refertothe ReplacementParts topic...

Page 52: ...e filter housing where the element seal contacts the housing Put clean oil on the rubber gasket of the new filter element 3 Install and tighten the filter element 3 4 of a turn past the point where th...

Page 53: ...ce lower the lift arm and stop the engine Allow the machine to cool 2 Open the rear door Lift the engine cover 3 Clean the radiator and oil cooler by blowing through the fins with high pressure water...

Page 54: ...id level Refer to the Maintenance Schedule chapter page 65 for change intervals Refer to the Lubrication topic page 44 for information on oil type and quantity Checking and Adding Oil 1 Park the loade...

Page 55: ...and Restraint Bar Switches Electrical switches in the seat and restraint bar must be closed operator sitting in the seat and restraint bar lowered to complete the circuit and start the engine Bucket C...

Page 56: ...ly reposition the tire on the rim lubricate both parts and re inflate Inflation pressure beyond 35 PSI with unseated beads may break the bead or rim with explosive force sufficient to cause death or s...

Page 57: ...and clamps with the same alkaline solution Explosive gas is produced while a battery is in use or being charged Keep flames or sparks away from the battery area ALWAYS charge the battery in a well ve...

Page 58: ...Notes 55 908268 BP0904...

Page 59: ...se or corroded Check circuit and locate trouble before resetting breaker Clean battery terminals and cables and retighten them Seatbelt buzzer not sounding when key turned to ON indicator lamps work p...

Page 60: ...ce battery Troubleshoot circuit Replace the starter solenoid Check wiring for poor connections broken leads repair wiring or connection Remove starter repair replace as needed Work lights not function...

Page 61: ...ll fuel tank Replace fuel gauge sender Check connection and voltage replace as needed Check electrical connections and voltage to shut off solenoid Install a pan heater Install a pan heater Contact yo...

Page 62: ...malfunctioning Disengage parking brake Check for low oil level in reservoir Add oil Check linkage connection at control levers and neutral centering mechanisms Reconnect linkage Contact your dealer C...

Page 63: ...s or hydrostatic pump s have internal damage or leakage Oil cooler fins are plugged with debris Loader being operated in a high temperature area with no air circulation Improve efficiency of operatio...

Page 64: ...tic pump malfunctioning Control rod linkage to rear hydrostatic pump disconnected Contact your dealer Contact your dealer Attach control rod linkage Right side doesn t drive in forward direction Relie...

Page 65: ...y contact your dealer Check electrical connections to restraint bar switch and repair connections as needed If switch is still not functioning properly contact your dealer Hydraulic cylinder action is...

Page 66: ...bes as needed No down pressure on the bucket Control valve in float position Tilt cylinders are malfunctioning Relief valve in control valve not functioning properly Squealing noise should be evident...

Page 67: ...or external Oil leaking past lift spool in control valve Self leveling valve malfunctioning Leaking hydraulic hoses tubes or fitting between control valve and cylinders Contact your dealer Contact yo...

Page 68: ...Engine Air Cleaner Restriction Indicator p45 l Check Engine Oil Level p46 l Check Hydraulic Oil Level p47 l Check Tire Pressures p52 l Grease Lift Arm Hitch and Cylinder Pivots p44 l Check Bucket Cut...

Page 69: ...Maintenance Log Date Hours Service Procedure 908268 BP0904 66...

Page 70: ...Maintenance Log Date Hours Service Procedure 67 908268 BP0904...

Page 71: ...Torque 1600 rpm 79 lb ft 107 N m Hydraulic System theoretical Main Hydraulic System Pressure 2750 psi 345 bar Standard Flow Rating 14 5 gpm 55 L min Capacities Chaincase each 3635 4 5 U S gal 17 L 39...

Page 72: ...Belly Plate and Access Cover Dual Element Air Cleaner with Visual Indicator Vandalism Lock Provisions Top and Rear Windows ROPS Spark Arrestor Muffler Headliner and Acoustical Interior Seatbelt Indic...

Page 73: ...0 x 15 HD Tires 48 3 1226 Overall Width less Bucket w 27 x 10 50 x 15 HD Tires 52 4 1331 52 4 1331 Overall Width less Bucket w 10 00 x 16 5 HD Tires 51 9 1318 L Bucket Width 48 1219 mm Dirt Const Buck...

Page 74: ...5 15 2 ft3 1524 1562 mm 0 43 m3 808250 335 lb 152 kg 800 lb 363 kg 1000 lb 454 kg Light Material Snow Bucket Description1 Part No Weight 3635 Rating 3935 Rating 65 66 5 18 ft3 1651 1689 mm 0 51 m3 80...

Page 75: ...sum crushed 115 1840 Iron Ore 145 2320 Lime 60 960 Lime Stone 90 1440 Manure liquid 65 1040 Manure solid 45 720 Peat solid 47 752 Phosphate granular 90 1440 Potash 68 1088 Quartz granular 110 1760 Sal...

Page 76: ...erratingis1250lb Multiplythedensityofclay 100lb ft3 by the capacity of the bucket 9 5 ft3 to achieve the weight being carried 100 lb ft3 x 9 5 ft3 950 lb This number is less than the machine rating so...

Page 77: ...aining Oil 51 Circuit Breakers 54 Cold Starting Procedure 33 Control Indicator Symbols 4 CONTROLS and SAFETY EQUIPMENT 16 Cooling System 50 Check Coolant Level 50 Clean 50 Drain Flush 50 D Dealer Serv...

Page 78: ...Self Leveling 36 SERVICE 41 Spark Arrestor Muffler 52 SPECIFICATIONS 68 Accessories 69 Loader Specifications 68 Standard Features 69 Starting the Engine 32 Before Starting the Engine 32 Stopping the L...

Page 79: ...9 16 12 9 16 18 50 55 70 80 35 40 55 60 75 90 1120 120 55 65 80 90 110 120 150 170 80 90 110 130 5 8 11 5 8 18 3 4 10 3 4 16 100 110 175 200 75 85 130 150 150 180 260 300 110 130 200 220 220 240 380 4...

Page 80: ...RRANTY SERVICE DOES NOT INCLUDE 1 Transportation to selling dealer s business location or at the option of the Original Retail Purchaser the cost of a service call 2 Used equipment 3 Components covere...

Page 81: ...ning or with lift arm up To park engage parking brake and put attachment flat on the ground Always carry attachments as low as possible Do not travel or turn with the lift arms raised Load unload and...

Page 82: ...e of this machine contact your dealer or the Gehl Company Service Department before starting or continuing operation 908268 BP0904 2004 GEHL COMPANY PRINTED IN USA All Rights Reserved Gehl Company 143...

Reviews: