background image

6

It is recommended to install 
the in�k300 on the outside 
edge of the hot tub, so that 
it is not subject to moisture 
trapped by the cover�

The back of the in�k300 should not be enclosed where 
water can gather, but instead cut out�

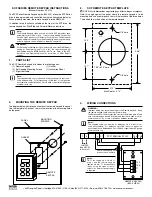
Keypad placement

Connecting in.k300 keypad to the spa pack

Vent hole on back of keypad should not be blocked�

Installation notes

Main keypad in�k300

Main keypad in�k300

in.xe & in.xm 2 

To connect the in�k300 keypad, simply insert its in�link 
connector into the appropriate keypad connector of the 
pack enclosure (as illustrated)�

in.ye & in.yt

To connect the keypad, remove the cover, then insert the 
in�link connector into the appropriate keypad connector
(as illustrated)� Route the cable through one of the molded 
strain relief channels on the bottom right side of the spa
pack (as illustrated)� Fill the remaining space with the 
foam gaskets supplied� Don’t forget to replace the cover 
and all screws (torque to 8 in� lb max (0�9 N�m))�

Summary of Contents for in.k300

Page 1: ...ns Qu bec Qc G2E 5W6 Canada 1 800 78 GECKO www geckoalliance com Printed in Canada 9919 101218 D Rev 02 2018 Groupe Gecko Alliance Inc 2018 All trademarks or registered trademarks are the property of...

Page 2: ...Off Mode 7 Programming steps 8 Program menu 8 Setting the clock 8 Programming the filter purge cycles 8 Setting filter or purge cycle start time 9 Setting filter cycle duration 9 Setting filter or pu...

Page 3: ...ETAILS HAZARDOUS CONDITION A CONDITION THAT IS POTENTIALLY DAMAGING AND OR DANGEROUS TO THE OPERATOR OR SURROUNDINGS THIS INCLUDES BUT IS NOT LIMITED TO FIRE FLOODING OR OTHER WATER DAMAGE DIELECTRIC...

Page 4: ...nough to be seen in day simple enough to use in the middle of the night affordable yet solidly built Item in k300 Static LCD size as measured diagonally 1 5 Optional mounting with wing nuts and spacer...

Page 5: ...e installation surface and peel the adhesive gasket from the back of the keypad Insert keypad and align it correctly then ensure it is properly glued by gently pressing evenly on the entire surface Ga...

Page 6: ...5 Drilling template 36 58 mm 144 02 mm 131 32 mm R 6 35 mm R 6 35 mm...

Page 7: ...00 Main keypad in k300 in xe in xm 2 To connect the in k300 keypad simply insert its in link connector into the appropriate keypad connector of the pack enclosure as illustrated in ye in yt To connect...

Page 8: ...red temperature The set point icon will appear at the top of the screen After 3 seconds without any change to the set temperature value the keypad will resume the normal display Off Mode Pressing Pump...

Page 9: ...s to adjust the hour Press the Light key to jump to the next parameter the minutes Setting the minutes Use the arrow keys to adjust the minutes Press the Light key to jump to the next parameter the fi...

Page 10: ...quency FF 0 no filtration 24 continuous filtration It is not recommended to set this to 0 Setting economy mode This mode allows you to lower the temperature set point of the spa by 20 F 11 C during a...

Page 11: ...hes when the purge is active Water temperature regulation Every 15 to 90 minutes the pump will run to ensure accurate water temperature readings as well as avoid heater activation in dry conditions Af...

Page 12: ...in xm2 in therm incompatible SC ER Learning mode error F1 in xm2 Fuse 1 is blown F2 in xm2 Fuse 2 is blown F3 in xm2 Fuse 3 is blown Hr Danger Thermal fuse error UPL The spa pack does not have valid...

Page 13: ...tal Operating temperature 68 F 20 C to 149 F 65 C Storage temperature 22 F 30 C to 185 F 85 C Humidity Up to 70 condensing Water ingress protection IPX 5 Mechanical Weight 0 69 lb 313 g Dimensions W x...

Page 14: ...ns Qu bec Qc G2E 5W6 Canada 1 800 78 GECKO www geckoalliance com Printed in Canada 9919 101218 D Rev 02 2018 Groupe Gecko Alliance Inc 2018 All trademarks or registered trademarks are the property of...

Reviews: