background image

Rendered PDF File  Page 51 of 73

DOC1710900, Rev:1

Disk Management 

Running 

Running – Disk Management 

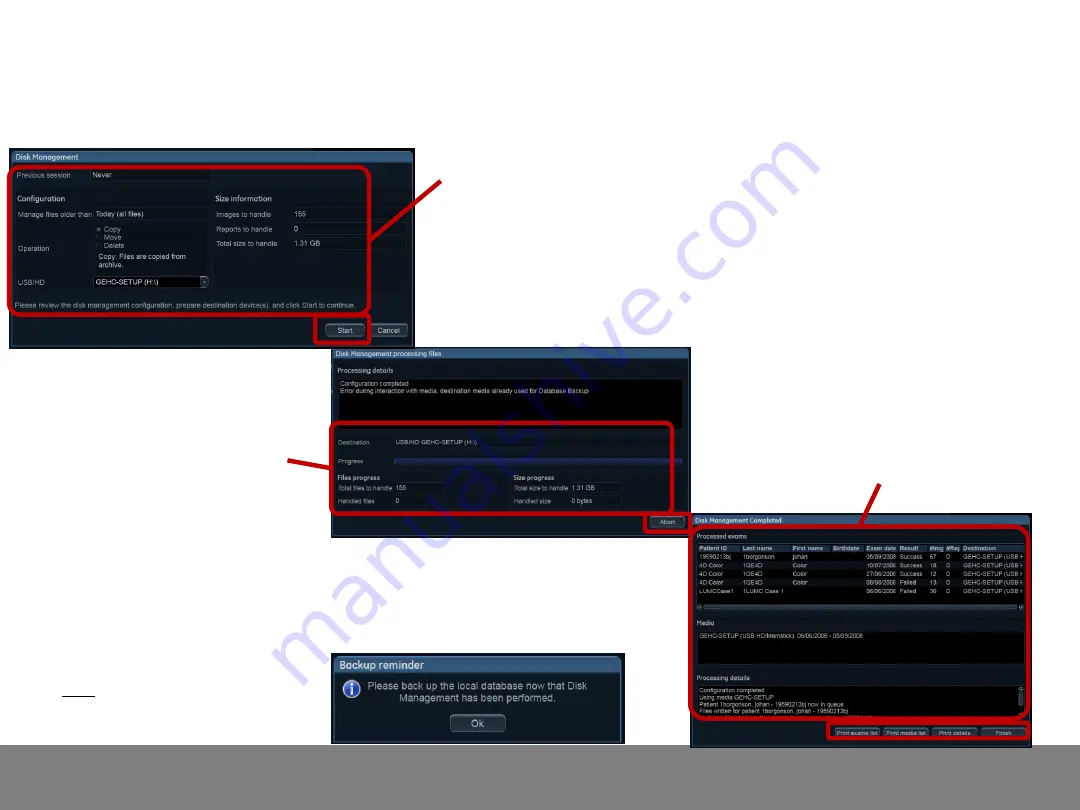
Disk Management requires an acknowledgement 
from User that the correct settings have been 
selected and the calculated data size is displayed. 
Press Start to run Disk Management 

Disk Management copies/moves the 
files found for the selected «Older 
Than» time window to the 
Destination device.  
There’s a possibility to Abort the 
operation and resume later. 

When Disk Management process 
completes, a summary status is displayed. 
There’s a possibility to print an Exams list, 
Media list or a complete summary.                                                                                                                                                                                                  

Note!  

After Disk Management is finished a 
Backup of the Patient Archive should 
be initiated      


DOC1710900 rev 01 

Released

Summary of Contents for VividE80

Page 1: ...Rendered PDF File Page 4 of 73 DOC1710900 Rev 1 VividE80 VividE90 VividE95 VividS60 VividS70 EchoPAC Quick Reference Guide Connectivity GE Healthcare g DOC1710900 rev 01 Released...

Page 2: ...Worklist DICOM Storage Query Retrieve Network Printer Remote Archive DICOM Printer DICOM USB EchoPAC PC SWO DICOM CD DVD Backup Restore Network Settings DICOM Activities Disk Management DICOM Spooler...

Page 3: ...E80 E90 E95 rear view Printer Ethernet Network 1000 Base TX Ethernet IEEE 802 3 Connections Vivid E80 E90 E95 Vivid E80 E90 E95 Connections Note The External Monitor output signal is DVI D Digital Do...

Page 4: ...ivid S60 S70 Vivid S60 S70 Connections Note The External Monitor output signal is DVI D Digital Do not connect an analog monitor to this port USB 2 0 only not 3 0 Devices w o external power Insulated...

Page 5: ...t DICOM device Network requirements To achieve a successful connection to the different devices the following is required EchoPAC SWO Remote Device EchoPAC SWO Remote Device DICOM Server DICOM device...

Page 6: ...rieve SCP Radiology Information System modality worklist SCP Service Object Pair SOP Class the specification of the network or media transfer service of a particular type of data object the fundamenta...

Page 7: ...m HL7 Health Level 7 Standard IHE Integrating the Healthcare Enterprise IOD Information Object Definition IPv4 Internet Protocol version 4 IPv6 Internet Protocol version 6 ISO International Organizati...

Page 8: ...oday s scheduled exams from and report completed exams to the same system In basics it sends confirmation to the MWL when the exam has started finished DICOM SR what is it Structured Reporting provide...

Page 9: ...s to change Dataflows and TCP IP log in as ADM Administrator with appropriate password Log in window Getting Started Go to Connectivity Page Go to Connectivity Page Getting Started Touch Screen Vivid...

Page 10: ...ectivity Page Go to Connectivity Page Dataflow workflow selections Dataflow workflow Overview Input Output TCP IP settings Hide show dataflow Store Image directly or to buffer Go to Connectivity Page...

Page 11: ...ospital IT policy TCP IP Network Settings Save Settings Always select this button whenever there is a change made on this page Detailed DICOM Log Enable when troubleshooting on DICOM devices only Remo...

Page 12: ...ch dataflow defines the transfer of patient information and images from an input source to the unit and from the unit to one or several output sources A dataflow is a set of pre configured settings Se...

Page 13: ...f the measurements are stored if DICOM SR is turned on Search in the DICOM Modality Worklist the patient found is copied into local database The patient information and the examination results are sto...

Page 14: ...Images are stored to an image network volume DICOM Worklist REMOTE ARCHIVE Store pure and raw DICOM images to a DICOM device Worklist DICOM Server DICOM Server Search in the DICOM Modality Worklist Im...

Page 15: ...Selections Search in a DICOM Modality Worklist retrieve images and Private SR from a DICOM server Images are stored to a DICOM server Some of the measurements are stored if DICOM SR is turned on Selec...

Page 16: ...CD DVD Internal CD DVD Vivid Read and write to database located on a CD DVD drive This destination should be used when the transferred data is intended to be imported in a Vivid E9 or an EchoPAC Soft...

Page 17: ...are found in the pulldown list Per default only a few dataflows are listed in the Search Create Patient Screen Unselect Hidden in the Connectivity tab to display more Dataflows Note For some dataflows...

Page 18: ...t for the images and results Echo initiates a connection with the DICOM SCP posts a Verification request and closes the connection It also responds to incoming Verification requests for service use Wo...

Page 19: ...08 R2 If site has EchoPAC SWO Must upgrade to EchoPAC SWO 201 x x However there are no Dicom Share on EchoPAC SWO 201 x x If DICOM Share is needed use EchoPAC SWO 113 x x A DirectX 11 compliant GPU is...

Page 20: ...fields Enter correct AE title as it is case sensitive and Port No IP Addr must be selected from the pulldown menu and Name is optional but recommended If IP Addr is not in pulldown menu go to TCPIP t...

Page 21: ...for MWL in the past must be US to start an exam Search Criterias can be used to narrow the search in a Worklist A Search Criteria properties window appears In the Select Tag pulldown menu select the...

Page 22: ...dataflow overview window select Worklist DICOM ping passed 3 attempts DICOM ping failed 3 attempts Per default Worklist dataflows are hidden Uncheck the Hidden checkbox in the dataflow page to include...

Page 23: ...age Device Configuration Scenarios Note In a DICOM workflow enable Private SR data to store all measurements and other exam data in the SR This information is retrieved when the exam is loaded on the...

Page 24: ...ed fields must be filled out Other fields might need to be adjusted Enter correct AE title as it is case sensitive and Port No IP Addr must be selected from the pulldown menu and Name is optional but...

Page 25: ...be sent without images different server for Images Signed Doppler Velocities unchecked Use older SR version unchecked Verify these default Dicom SR Settings Reopen pr Image unchecked Verify this defau...

Page 26: ...Storage Service to inform your scanner that it has successfully stored your images without corruption Enter correct AE title as it is case sensitive and Port No IP Addr must be selected from the pull...

Page 27: ...lling system that an ultrasound procedure has been completed and can be billed Enter correct AE title as it is case sensitive and Port No IP Addr must be selected from the pulldown menu and Name is op...

Page 28: ...DICOM Storage service is available at selected server Selected server cannot provide DICOM Storage service Select Check button From the dataflow overview window select DicomStorage DICOM ping passed...

Page 29: ...erties Select Dicom CD DVD from the Dataflow Overview window The DICOM Media Properties window for the DICOM CD DVD read dataflow will appear DICOM CD DVD dataflow DICOM CD DVD read dataflow The DICOM...

Page 30: ...ult Image Settings Allow Raw Data unchecked RAW Compr greyed out Allow Multiframe checked Only Black White unchecked Max Framerate 25 Full Compression JPEG Quality 95 Adjust these Image Settings if ne...

Page 31: ...roperties Select DICOM USB from the Dataflow Overview window The DICOM Media Properties window for the DICOM USB read dataflow will appear DICOM USB dataflow DICOM USB read dataflow The DICOM Media Pr...

Page 32: ...Image Settings Allow Raw Data unchecked RAW Compr greyed out Allow Multiframe checked Only Black White unchecked Max Framerate 25 Full Compression JPEG Quality 95 Adjust these Image Settings if needed...

Page 33: ...device in the Workflow Dataflow and the Vivid must be registered as a user on the Q R DICOM Server Dicom QR configuration on EchoPAC might also require Firewall modifications Enter correct AE title as...

Page 34: ...on the Q R DICOM Server Search Criterias can be used to narrow the search in a Query Retrieve Select Search Criterias A Search Criteria properties window appears In the Select Tag pulldown menu selec...

Page 35: ...ataflow DicomQR service is available at selected server Selected server cannot provide DicomQR service Select Check button From the dataflow overview window select DicomQR DICOM ping passed 3 attempts...

Page 36: ...M spooler displays the current DICOM output jobs and is used for checking the current job s status when a job is saved or displays an error To remove the DICOM Spooler Job window select To check statu...

Page 37: ...n Available outputs select the device you want to use as output Verify that the device you selected disappears in the Selected devices window Add In Selected devices window select the device you want...

Page 38: ...rt No IP Addr must be selected from the pulldown menu and Name is optional but recommended Required fields Select Dicom Print in the Selected Output window Select Properties If IP Addr is not in pulld...

Page 39: ...dow select to test the DicomPrint service If DicomPrint service failed or printout is not satisfying verify the service configurations in the Densities Settings and Job tabs DicomPrint service is avai...

Page 40: ...inter A Standard Windows Printer installation program will start Note Ensure the Network Printer is powered on and connected to the site network before adding the Printer Click to continue Follow the...

Page 41: ...dy installed but Printer IP Add needs to be reconfigured In the Network Printer section enter the correct IP address of the Network Printer When the new IP address is set the button is enabled Select...

Page 42: ...in the Printer Setup section for the Printer Queue window to appear Printer Setup section Select in the Printer Queue window to get to Printer Properties Printer Queue window Printer Pull down menu S...

Page 43: ...will appear if DNS is not set up on the network select the Note On EchoPAC SWO Windows administrative rights are needed to do this Enter correct IP address of the Remote Archive server The other field...

Page 44: ...X of X OK Image Shared folder is found 0 of X OK Image Shared folder is not found In the Cardiology_3_1_4_ArchiveService Properties window select to ping the remote server Remote server IP Address is...

Page 45: ...n not be used for storing images When Remote Path is selected the system will use the default user password or the configurable user password from the tab Select tab from the Admin menu Backup window...

Page 46: ...user to restore previous backup data thus the similar pop up windows will appear To start Restore select from the Config menu From the Restore window there is a possibility to restore to Factory defa...

Page 47: ...er Than Select the time for how old your image files should be before a backup is required Recommended Interval is 1 week Operation Select between 3 types of operations Copy Move and Delete Recommende...

Page 48: ...n Disk Management Disk Management copies moves the files found for the selected Older Than time window to the Destination device There s a possibility to Abort the operation and resume later When Disk...

Page 49: ...inter EchoPAC SWO Remote Device EchoPAC SWO Remote Device EchoPAC SWO Echo Server Select the Local Archive Int HD Shared dataflow As an Echo Server Select the Local Archive Int HD dataflow As a Remote...

Page 50: ...Vue Export From dataflow name pulldown list select the appropiate Misc Export dataflow Select MPEGVueService from the Selected Outputs Select Properties Select the Destination from the drop down menu...

Page 51: ...EGvue Select Properties button If Remote path was selected Check result Successfully logged into remote destination write access confirmed User and or password incorrect or no write access to destinat...

Page 52: ...re Configure XML Export From dataflow name pulldown list select the appropiate Misc Export dataflow Select XmlExportService from the Selected Outputs Select Properties Select the Destination from the...

Page 53: ...rtService Select Properties button If Remote path was selected Check result Successfully logged into remote destination write access confirmed User and or password incorrect or no write access to dest...

Page 54: ...er If present go to the tab and select the appropriate dataflow From ViewPoint Obtain the ViewPoint IP Address AE Title and Port No The AE Title and Port No is available on ViewPoint at the ViewPointA...

Page 55: ...indow A Service configuration window will appear Add a new client Edit an existing client Delete a client Select to add a new DICOM Server client The Modality Setting window will appear Modality Setti...

Page 56: ...PAdmin window Select the DICOM Server in the services list VPAdmin window ID Mapping tab External ID 2 Properties window Check and select The External ID 2 Properties window will appear From the pull...

Page 57: ...plete refer to Network Settings section Verify for VividE9 an HTTPS Secure Sockets Layer internet connection via port 443 If proxy server is used then ask Hospital IT for IP address port number and pr...

Page 58: ...the Configuration page all items in bold are mandatory CRM No System ID Continent Country City State Prov Institution Enterprise Server Select OTHER and type in the URL addresses Enterprise Server ht...

Page 59: ...ll appear 10 Select Home screen Service Connectivity Status will change to Checked Out 9 Close Service Desktop and Reboot the system Repeat steps 1 3 11 All new connected systems to Insite should be r...

Page 60: ...ct Users and Add User in the Permanent Users section 1 Select Insite icon 2 Select Request for Service These Configuration steps are needed for the Auto Request For Service feature and must be repeate...

Page 61: ...tion 6 Verify that there is a User marked in red in the Permanent Users section If not activate the desired user in the list and select Set Default Machine Contact 4 Complete all records marked with 5...

Page 62: ...id Power Connection Configuration Verify that all connected devices are powered on Verify that all connected devices have an Ethernet cable connected Verify that all connected devices have been config...

Page 63: ...Reseat Network cable Replace Network cable Verify TCP IP settings in Connectivity page Verify Troubleshooting Remote Archive and Troubleshooting EchoPAC sections Contact Hospital IT for support Interm...

Page 64: ...s Port nr and AE Title are correct Change to Correct DICOM Workflow Adjust timeout in DICOM connectivity settings Adjust DICOM SR settings for the DICOM Device Not able to load DICOM Image Images are...

Page 65: ...work cable Configure Printer with correct IP Address Verify default printer is correct Restore Printer Driver Reload Software Replace Printer Bad image printout Report printout incorrect Low Ink Print...

Page 66: ...ets reload SW Contact Service Perform a Disk Management Move Not able to store to Remote Archive Not able to store to DVD Network down Incorrect Network settings Incorrect CD DVD disks used DVD Drive...

Page 67: ...Image Vault software EchoPAC must be at a version as high or higher than the version on the Vivid File Destination Check Possible causes for failing File and Printer Sharing is disabled on the Remote...

Page 68: ...n If not Local Archive will not work Note On Windows 7 or newer EchoPAC will not as default run with administrate rights even if user has administrative rights To run EchoPAC with administrative right...

Page 69: ...media If the DICOMDIR file is missing or corrupted the DICOM Images are unreadable Select the appropriate USB Memorystick or RW CD DVD from the Media pulldown menu If media do not show select Refresh...

Page 70: ...are not able to connect to LocalArchive Int HD dataflow Use service dongle to log onto Windows on scanner Stop the SQL Anywhere LocalArchive10 service Move or rename the database files db dbs txt from...

Reviews: