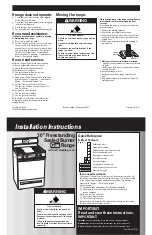
HOW TO CONVERTA SEALED BURNER RANGE
FOR USE WITH
GAS OR
GAS
This
range leaves the factory set for use with natural
gas. If you convert to
gas, keep these instructions
and orifices in case you want to convert back to
natural gas.
The conversion should be done by a qualified
technician or installer.
TOOLS REQUIRED:
1/2” open-end wrench
Flat blade screwdriver (small)
Nut drivers: 9/32” or 7mm
❑
RANGE FOR CONVERSION
(1) Turn off gas supply at the wall.
(2) Turn off
power
the range.
If range has not yet been connected to gas supply,
or if flexible connection was made, range maybe
pulled out from the wall to make conversion easier.
❑
CONVERT THE PRESSURE
Do not remove the pressure
regulator from
range.
1. Remove the storage drawer, broiler drawer or
kick panel and locate the pressure regulator at
rear of the range,
Remove Screws
Access Cover
On some models, you may have to remove an
access cover also.
40
❑
THE PRESSURE
this protective cap’
Cap Assembly
except for conversion
2. Unscrew the plastic-protected hex-nut cap
from the regulator.
3. Carefully pry the protective plastic cap off
the threaded metal cap. Gently pull the plastic
washer off the threads on the other side of the
metal cap.
4. Push the plastic cap onto the end of the metal
cap displaying the type of gas you are converting
to. Press the attached plastic washer onto the
threads on the other side of the metal cap.
5. Screw the hex-nut cap back into the regulator.
Do not
CONVERTING SURFACE BURNERS
— Grate
1.
Remove grates, burner caps and burner heads.
2. Remove the brass orifice
spud inside the chimney of
each burner using a 9/32”
or 7mm nut driver.
3. Install the orifice spuds
according to one of the
following diagrams (see
❑
or
❑
), for gas or
natural gas, depending on
which
you are
converting to.
spud