background image

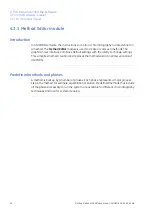
Method Editor panes

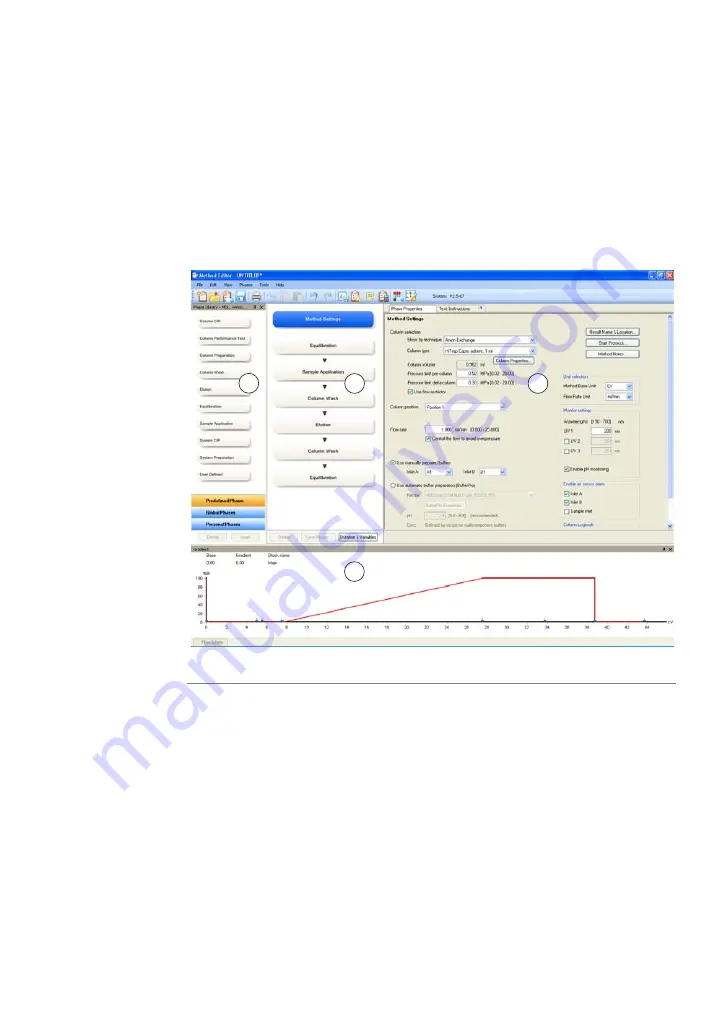
As illustrated below, four panes show in the Method Editor by default. Available phases
are found in the Phase Library (1), and an overview of the phases included in the active
method is displayed in a Method Outline (2). Detailed information about the method is
presented in the upper right-hand pane (3), containing the two tabs Phase Properties
and Text Instructions. The gradient used in the method is displayed in a Gradient
illustration (4).

1

3

2

4

Getting Started with ÄKTAavant and UNICORN 6 28-9440-69 AB

41

4 The instrument and the software

4.3 UNICORN software modules

4.3.1 Method Editor module

Summary of Contents for AKTA avant

Page 1: ...GE Healthcare Getting Started with KTAavant and UNICORN 6...

Page 2: ......

Page 3: ...Files and folders in UNICORN 48 5 1 Navigator overview 51 5 2 Handling files and folders 55 6 Create a method 56 6 1 Guide to method creation 57 6 1 1 Create and edit methods 65 6 1 2 Predefined meth...

Page 4: ...edures 115 9 Evaluate and print the results 116 9 1 View the results 120 9 2 Peak integration 125 9 3 Print the results 130 10 Maintenance 131 10 1 Maintenance program 4 Getting Started with KTAavant...

Page 5: ...he guide and provides regulatory information relevant for KTAavant system Contents This chapter contains the following sections See page Section 6 1 1 Get started 10 1 2 Regulatory information Getting...

Page 6: ...topics Basic features of KTAavant and UNICORN Create methods Prepare the system for runs Perform runs Make simple evaluations Print reports For best results follow the guide from page to page in fron...

Page 7: ...nual instrumentmodulesand functions KTAavant and UNICORN 6 User Manual calibration UNICORN 6 Method Manual predefined methods UNICORN 6 Method Manual column handling UNICORN 6 Method Manual manual met...

Page 8: ...t See definitions below Warnings WARNING WARNING indicates a hazardous situation which if not avoided could result in death or serious injury It is important not to proceed until all stated conditions...

Page 9: ...the File menu Hardware items are identified in the text by bold text e g Power switch Text entries that UNICORN generates or that the user must type are represented by a monotype typeface e g Program...

Page 10: ...tic Compatibility EMC Directive 2004 108 EC Radio Equipment and Telecommunications Terminal Equipment Directive 1999 5 EC CE marking The CE marking and the corresponding declaration of conformity is v...

Page 11: ...nciples for design EN ISO 12100 1 12100 2 Harmonized with 2006 42 EC Safety of machinery Principles of risk assessment EN ISO 14121 1 14121 2 Software declaration of conformity UNICORN 6 is technicall...

Page 12: ...how to handle the KTAavant instrument in a safe way Contents This chapter contains the following sections See page Section 13 2 1 Safety precautions 20 2 2 Labels 23 2 3 Emergency procedures 12 Gettin...

Page 13: ...erate the KTAavant instrument in any other way than described in the KTAavant and UNICORN manuals Operation and user maintenance of the KTAavant instrument should be performed by properly trained pers...

Page 14: ...actionateflammable liquids When running RPC methods or other procedures using solvent based buffers collect fractions through the outlet valve Personal protection Warnings WARNING To avoid hazardous s...

Page 15: ...avoid injuries Installing and moving the instrument Warnings WARNING To avoid personal injury when installing or moving the KTAavant instrument follow the instructions below Heavy object The KTAavant...

Page 16: ...Net 9 connectors at the rear panel should not be mistaken for Firewire connectors Do not connect any external equipment to the UniNet 9 connectors Do not disconnect or move the UniNet 9 bus cable Syst...

Page 17: ...ding a Superloop always plug the Syr port on the Injection valve with a Stop plug With a Superloop connected to the valve an over pressure may be created during injection Hazardous chemicals during ru...

Page 18: ...ace containers with a volume of more than 10 liters on the top tray The total allowed weight on the top tray is 40 kg Max size of bottles on front panel Do not fasten bottles with a volume of more tha...

Page 19: ...to the instrument before replacing any component on the instrument unless stated otherwise in the user documentation Hazardous chemicals during maintenance When using hazardous chemicals for system or...

Page 20: ...e KTAavant instrument For information about marking of the computer equipment refer to the manufacturer s instructions Labels on the KTAavant instrument The illustrations below show the labels that ar...

Page 21: ...corresponds to the marking on the instrument before connecting the power cord Warning Do NOT fractionate flammable liquids Fraction collector Do not fractionate flammable liquids When running RPC meth...

Page 22: ...Please contact an authorized representative of the manufacturer for information concerning the decommissioning of equipment This symbol indicates that the product contains hazardous materials in exce...

Page 23: ...ilure or network interruption Emergency shutdown In an emergency situation follow the steps below to stop the run Action Step Press the Pause button on the instrument display This will stop all pumps...

Page 24: ...r failure The result of a power failure depends on which unit is affected will result in Power failure to The run is interrupted immediately The data collected up to the time of the power failure is a...

Page 25: ...ent may close down during a temporary overload of the processor This may appear as a computer failure The run continues and you can restart the UNICORN client to regain control Computer Uninterruptibl...

Page 26: ...our user profile is already created For information about how to set up and define users user groups and access rights please refer to UNICORN 6 Administration and Technical Manual Contents This chapt...

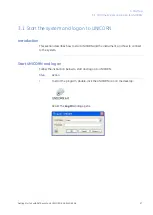
Page 27: ...onnect to the system Start UNICORN and log on Follow the instruction below to start and log on to UNICORN Action Step To start the program double click the UNICORN icon on the desktop 1 Result The Log...

Page 28: ...oxes for each of the UNICORN modules are displayed in the Log On dialog In the Log On dialog 3 Select which UNICORN modules to start by clicking the corresponding checkboxes Click OK Result The select...

Page 29: ...Action Step Switch on the instrument by pressing the Power switch to the I position 1 Open the the System Control module in UNICORN and click the Connect to Systems icon 2 Result The Connect to Syste...

Page 30: ...log 3 Select the instrument Select Control mode Click OK Result The selected instrument can now be controlled by the software 30 Getting Started with KTAavant and UNICORN 6 28 9440 69 AB 3 Start up 3...

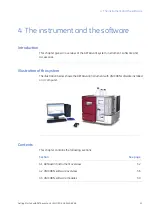
Page 31: ...he illustration below shows the KTAavant instrument with UNICORN software installed on a computer Contents This chapter contains the following sections See page Section 32 4 1 KTAavant instrument over...

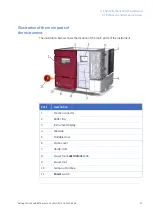
Page 32: ...isplay is placed on the front From this side the built in Fraction collector is handled as well as the sample The rest of the modules are placed on the right hand side of the instrument This side can...

Page 33: ...iption Part Fraction collector 1 Buffer tray 2 Instrument display 3 Wet side 4 Foldable door 5 Pump cover 6 Holder rails 7 Swivel foot Lock Unlock knob 8 Swivel foot 9 Swing out toolbox 10 Power switc...

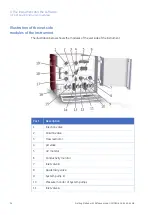
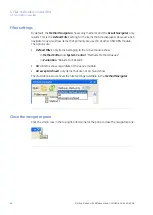
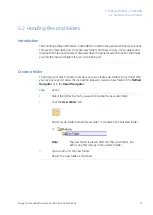
Page 34: ...ion Part Injection valve 1 Column valve 2 Flow restrictor 3 pH valve 4 UV monitor 5 Conductivity monitor 6 Inlet valve B 7 Quaternary valve 8 System pump B 9 Pressure monitor of System pumps 10 Inlet...

Page 35: ...itor of Sample pump 14 Sample pump 15 Pump piston rinsing system tubes 16 Sample inlet valve 17 Outlet valve 18 Holder rails 19 Getting Started with KTAavant and UNICORN 6 28 9440 69 AB 35 4 The instr...

Page 36: ...escribed in the table below Main functions Module Perform user and system setup system log and database administration Administration Create and edit methods Method Editor Start view and control runs...

Page 37: ...UNICORN module press the F1 key with the item of interest selected and in focus Note To find information about a phase make sure that the Phase Properties tab is selected before pressing the F1 key o...

Page 38: ...OC pane expand the heading UNICORN online documentation portal and select Online documentation overview in the PDF manuals section click one of the text links click the illustration or the text link o...

Page 39: ...The Administration module and its icons are described in UNICORN 6 Administration and Technical Manual Contents This section contains the following subsections See page Section 40 4 3 1 Method Editor...

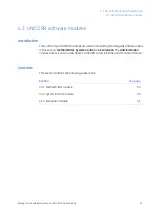
Page 40: ...ces the method wizard in earlier versions of UNICORN Predefined methods and phases A method is built up by a number of phases Each phase represents a major process step in the method for example equil...

Page 41: ...layed in a Method Outline 2 Detailed information about the method is presented in the upper right hand pane 3 containing the two tabs Phase Properties and Text Instructions The gradient used in the me...

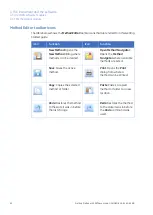
Page 42: ...created Print Opens the Print dialog from where a method can be printed Save Saves the active method Paste Pastes a copied method or folder to a new location Copy Copies the selected method or folder...

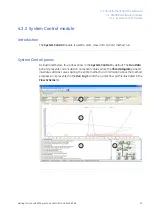
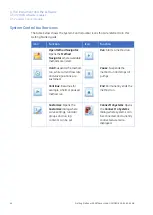
Page 43: ...1 presents current data in numerical values while the Chromatogram pane 2 illustrates data as curves during the entire method run Information about the method progression is presented in the Run Log 3...

Page 44: ...od run while current flow rate and valve positions are sustained End Permanently ends the method run Continue Resumes for example a held or paused method run ConnecttoSystems Opens the Connect to Syst...

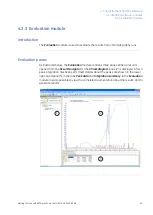
Page 45: ...atogram pane 2 is displayed After a peak integration has been performed details about the peaks are shown in the lower right hand pane 3 in the tabs Peak data and Integration summary In the Evaluation...

Page 46: ...d to the state it was in before the last change Paste Pastes a copied result or folder to the selected folder View Documentation Opens the Documentation dialog that contains the complete documentation...

Page 47: ...lly be located The files and folders are displayed in Navigator panes This chapter briefly describes the Navigator panes available in the different modules It also describes how to handle the files an...

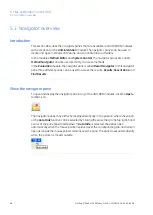
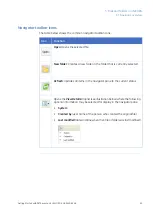
Page 48: ...the results Results Recent Runs and Find Results Show the navigator pane To open and display the navigator pane in any of the UNICORN modules click the Open toolbar icon The navigator panes may either...

Page 49: ...ator pane to the current status Opens the View Details droplist see illustration below where the following optional information may be selected for display in the navigator pane System Created by user...

Page 50: ...ve module show In Method Editor and System Control Methods Method Queues In Evaluation Results DoE Results All all items show regardless of the active module All except Archived only items that are no...

Page 51: ...sub folders in any folder that you have access to Follow the instruction below to create a new folder in the Method Navigator or in the Result Navigator Action Step Select the folder in which you want...

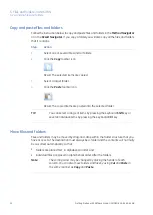
Page 52: ...keyboard Shift key or several individual items by pressing the keyboard Ctrl key Move files and folders Files and folders may be moved by drag and drop within the folder structure that you have access...

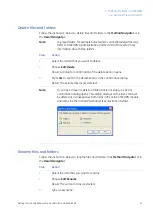
Page 53: ...dialog 3 Result The selected items are deleted Note If you have chosen to delete a folder that is not empty a special confirmation dialog opens This dialog displays all the items that will be deleted...

Page 54: ...ching levels described below Match whole word only Matches only whole words and disregards partial matches Match case Matches the case of the Find what field entry Select a Direction for the search Up...

Page 55: ...erdescribesmethod creation based on predefined methods and also how to print a method Contents This chapter contains the following sections See page Section 56 6 1 Guide to method creation 68 6 2 Prin...

Page 56: ...rificationmethodsand maintenance methods You can also add a maintenance phase at the end of a purification method For further information about method creation see UNICORN 6 Method Manual Contents Thi...

Page 57: ...d of a number of phases Each phase represents a major process step in the method for example equilibration or elution If desired a predefined method can be edited by adding deleting and or rearranging...

Page 58: ...nd edit a chromatographic method based on a predefined method Action Step Open the Method Editor module and click the New Method icon 1 Result The New Method dialog opens Select System and Predefined...

Page 59: ...alculates correct settings for volume flow rate and pressure limits based on the selected column type 3 The illustration below shows the Method Outline pane and the Phase Properties pane of the Method...

Page 60: ...esult location by clicking the Browse button and select a folder in which to save the results By default the results will be saved in your home folder Select Result name With the default selection Met...

Page 61: ...k OK to confirm and close the dialog Select the next phase in the Method Outline pane by clicking it and choose appropriate parameter values in the Phase Properties pane 6 Repeat step 6 until all phas...

Page 62: ...rget folder to enable the Save button Type a Name for the method Select a System from the list Click the Save button Result The created method is saved in the selected folder 62 Getting Started with K...

Page 63: ...ete in the Method Outline pane 1 Note The Method Settings phase cannot be deleted Click the Delete button located below the Method Outline pane 2 Result The selected phase is excluded from the method...

Page 64: ...solution 20 Ethanol Column CIP Leave column in storage solution TIP CIP Cleaning In Place and preparation of columns and system may be run either as separate predefined methods or as phases included i...

Page 65: ...t buffer Cation Exchange Chromatography CIEX After equilibrationand sample application elutionis performed using a pH gradient The proteins separateand eluteaccording to their isoelectric points Final...

Page 66: ...dsorb to the column ligand After a wash to remove unboundsample elutionisperformedbygeneratingagradient of a non polar organic solvent such as Acetonitrile Finally the column is washed and re equilibr...

Page 67: ...e use by removing the storage solution and equilibrating the column By adding steps several preparation solutions can be used sequentially Column Preparation Cleans the column after purificationruns b...

Page 68: ...a method Follow the instruction below to print a method Action Step Open the Method Editor module and click the Open Method Navigator icon in the toolbar 1 Result The Method Navigator pane opens Selec...

Page 69: ...he Print icon 3 Result The Print dialog opens In the Print dialog 4 select Printer click OK Result The method is printed Getting Started with KTAavant and UNICORN 6 28 9440 69 AB 69 6 Create a method...

Page 70: ...ion and maintenance of KTAavant system Contents This chapter contains the following sections See page Section 71 7 1 Before you prepare the system 72 7 2 Prepare the flow path 78 7 3 Prime buffer inle...

Page 71: ...which column type to use which column position to use which sample application technique to use that the pH electrode is connected if applicable if it is a reversed phase chromatography RPC run WARNIN...

Page 72: ...the flow path before a run Illustration of the flow path The illustration below shows the flow scheme as illustrated in the System Control module The individual instrument modules are presented in th...

Page 73: ...pump B 7 Injection valve 8 Capillary loop or Superloop 9 Column valve 10 Column 11 UV monitor 12 Conductivity monitor 13 pH valve with pH monitor and flow restrictor 14 Outlet valve 15 Fraction colle...

Page 74: ...ngertight connector 1 16 PEEK o d 1 16 i d 0 50 mm Tubing to connect columns Fingertight connector 1 16 Tefzel o d 1 8 i d 1 0 mm Waste tubing Inlet ports The table below shows the inlet ports of Inle...

Page 75: ...ns Valves and ports Inlet valve B Inlet ports B1 B7 Sample inlet valve Inlet ports S1 S7 Buff Getting Started with KTAavant and UNICORN 6 28 9440 69 AB 75 7 Prepare the system for a run 7 2 Prepare th...

Page 76: ...valve pH valve and Outlet valve Illustrations Valves and ports Injection valve Waste ports W1 W2 pH valve Waste port W3 Outlet valve Waste port W 76 Getting Started with KTAavant and UNICORN 6 28 9440...

Page 77: ...to be used 1 Immerse all inlet tubing that is to be used during the method run in the correct buffers 2 Immerse the waste tubing from the Injection valve the pH valve the Outlet valve and the Fractio...

Page 78: ...g the method run has to be primed Action Step Make sure that all buffer inlet tubing that is to be used during the method run is immersed in the correct buffers 1 Make sure that the waste tube connect...

Page 79: ...g Select Pumps and pressures Pump wash and select the inlet to be primed from the Inlet A or Inlet B drop down list If several inlets are to be used click Insert to insert a selected inlet in the Inst...

Page 80: ...inge 6 Close the purge valve by turning it clockwise Disconnect the syringe and discard its contents 7 Click the Continue button on the Instrument display to start a pump wash of the next inlet in the...

Page 81: ...ing System pump A with start buffer The instrument is then ready for start of a method run Action Step In the Manual instructions dialog 1 Select Pumps and pressures Pump wash and select one inlet fro...

Page 82: ...rn Draw 5 10 ml of liquid slowly into the syringe with a rate of about 1 ml s 3 Close the purge valve by turning it clockwise Disconnect the syringe and discard its contents 4 Connect the syringe to t...

Page 83: ...column to excessive pressure make sure that the pressure limit is set to the specified maximum pressure of the column Methods automatically include a pressure alarm based on the tolerance of the chose...

Page 84: ...posite parts of the Column valve using appropriate tubing and connectors Action Step Choose a column according to the column selections made in the method to be run 1 Attach an appropriate column hold...

Page 85: ...ructions 5 Result The Manual instructions dialog opens In the Manual instructions dialog 6 Select Flow path Column position Choose the Position used for connection of the column in this example Positi...

Page 86: ...in Click Result A system flow of 0 2 ml min starts When buffer leaves the tube on port 2A in a continuous mode and the top part of the column is filled with buffer connect the tube to the top of the c...

Page 87: ...inuous mode connect this tube to the Column valve Use the port opposite to the one already connected to the column in this example port 2B 10 Click the End icon in the System Control toolbar to end th...

Page 88: ...o reach the operating temperature before use Note Do not run a system flow during pH calibration Calibrate the pH monitor Follow the instruction below to perform the calibration Action Step Open the S...

Page 89: ...so values for Calibrated electrode slope and Asymmetry potential at pH 7 Is the Calibrated electrode slope 80 and the Asymmetry potential at pH 7 inside the interval 60 mV 10 If Yes Click to switch th...

Page 90: ...using solvent based buffers collect fractions through the outlet valve Prepare the Fraction collector Follow the instruction below to prepare the Fraction collector before a run Choose deep well plat...

Page 91: ...well plates are rotated so that the well marked A1 is positioned above the A1 marking on the cassette 2 Close the cassettes that have the QuickRelease function 3 Getting Started with KTAavant and UNI...

Page 92: ...de see illustration below faces the front of the tray marked with the GE logo 4 Open the Frac drawer by pressing the handle upwards and pulling out the drawer 5 92 Getting Started with KTAavant and UN...

Page 93: ...scans the Cassette type code of each cassette to identify the cassette types If deep well plates are used the instrument also identifies the types of deep well plates WARNING Moving parts in Fraction...

Page 94: ...the content of the Fraction collector open the System control module and select View Fraction Collector Content 94 Getting Started with KTAavant and UNICORN 6 28 9440 69 AB 7 Prepare the system for a...

Page 95: ...e the system after the run Contents This chapter contains the following sections See page Section 96 8 1 Before you start 98 8 2 Applying the sample 101 8 3 Start a method run 106 8 4 Monitor the run...

Page 96: ...essel size and vessel material no tubing is twisted and the flow path is free from leakage Hold pause or stop the run At the end of a method the run stops automatically All pumps stop and the system m...

Page 97: ...s during run When using hazardous chemicals run System CIP and Column CIP to flush the entire system tubing with distilled water before service and maintenance WARNING Hazardous biological agents duri...

Page 98: ...ications techniques see User Manual Description Stage The capillary loop is filled with sample Load The sample is injected onto the column Inject Sample application through a capillary loop A capillar...

Page 99: ...ary loop Follow the instruction below to fill the capillary loop with sample Action Step Connect a suitable capillary loop to Injection valve ports LoopF fill and LoopE empty 1 Fill a syringe with sam...

Page 100: ...until the sample has been injected onto the column during the run 4 TIP It is recommended to overload the loop to make sure that the loop is completely filled Excess of sample will leave the valve th...

Page 101: ...ease refer to UNICORN 6 Method Manual Choose and start a method The instruction below describes how to open a method and start a run Action Step Open the System Control moduleand clickthe icon Open Me...

Page 102: ...teps 5 9 If column logging was not chosen at installation of UNICORN and or no column type was selected at method creation the run starts directly Is the column to be used already registered 5 If No c...

Page 103: ...e column Press and hold the trigger to create a beam When the 2D Barcode scanner beeps the column ID is registered and displayed in the dialog Alternatively manually enter the column ID that you find...

Page 104: ...chnique and Column type from the drop down lists click OK TIP Alias can be used for easy identification of a column Result The entered information is saved and the dialog closes 104 Getting Started wi...

Page 105: ...tively choose Select ID and select the column individual to be used in the run from the drop down list Click OK Result The run starts All necessary actions occur automatically according to the method...

Page 106: ...on is also shown on the Instrument display This section describes the data shown in System Control during a run the layout of the module and the procedure to customize the view of the different panes...

Page 107: ...parameters to display in the pane Click the Customize icon to open the Customize dialog Under the Run Data Groups tab select the parameters to display Click OK to close the dialog Customize Chromatogr...

Page 108: ...emoved from the result View details in Chromatogram Follow the instructions below to view selected parts of the chromatogram then If you want to position the mouse pointer over the curve of interest i...

Page 109: ...con to open the Customize dialog Under the Run Log tab select the items to display Click OK to close the dialog Note These operations determine which data are shown in the Run Log pane during a run Al...

Page 110: ...plied as shown in the table below Real time data from monitors are also displayed in the flow scheme See illustration below Indication Color Open flow path Green Closed flow path Grey Alarm Red not sh...

Page 111: ...hods or as phases included in a chromatographic method WARNING Hazardouschemicalsduringmaintenance Whenusinghazardous chemicals for system or column cleaning wash the system or columns with a neutral...

Page 112: ...e storage Follow the instruction below to fill the pH flow cell with storage solution The calibration function is used to switch the pH valve However no calibration is performed Action Step Open the S...

Page 113: ...5 Press 6 Result The pH valve switches back to the default position and the Calibration dialog closes No calibration is performed Log off or exit UNICORN Follow the instruction below to log off or exi...

Page 114: ...ot saved when you try to exit or log off UNICORN you will see a warning Click Yes to save No to exit without saving or Cancel to stay logged on Shut down the instrument Switch off the instrument by pr...

Page 115: ...results of a run For further information please refer to UNICORN 6 Evaluation Manual Contents This chapter contains the following sections See page Section 116 9 1 View the results 120 9 2 Peak integ...

Page 116: ...on below to open a result Action Step Open the Evaluation module and click the Open Result Navigator icon 1 Result The Result Navigator opens Select the Results tab 2 Select the result to open and cli...

Page 117: ...tomize Chromatogram To change the chromatogram properties Click the Customize icon to open the Customize dialog Make appropriate selections under the tabs described in the table below Getting Started...

Page 118: ...es can never be modified or removed from the result View details in Chromatogram Follow the instructions below to view selected parts of the chromatogram then If you want to position the mouse pointer...

Page 119: ...icon to open the Documentation dialog Select the tab of interest Which tabs are displayed depends on the settings in the active method Click OK to close the dialog Getting Started with KTAavant and U...

Page 120: ...urther information on peak integration please refer to UNICORN 6 Evaluation Manual Perform peak integration Follow the instruction below to integrate the curves in a result Action Step Open the Evalua...

Page 121: ...the result Select Calculate baseline from the Baseline list Click OK Result The Peak Table is displayed beneath the active chromatogram and the start and end points of each peak are marked by vertical...

Page 122: ...Chromatogram and Peak Table The illustration below shows a Chromatogram pane including a Peak Table 122 Getting Started with KTAavant and UNICORN 6 28 9440 69 AB 9 Evaluate and print the results 9 2 P...

Page 123: ...other peak data Click the Customize icon to open the Customize dialog Under the Peak Table tab Select which data to display in the peak tables from the Select peak table columns list Click OK to displ...

Page 124: ...le for the same retention value 2 On the same row find the property of interest e g Area 3 Save results Follow the instruction below to save your changes then If you want to click the Save icon in the...

Page 125: ...o show what is needed in the report printout Customize the chromatogram and or peak table and view details in the chromatogram according to the instructions above Before printing check that correct cu...

Page 126: ...ion module and open a result 1 Click the Print icon 2 Result The Print Chromatograms dialog opens In the Print Chromatograms dialog 3 Select Printer and Print Format Click the Preview button Result A...

Page 127: ...log and choose another print format In the Customize Report window click the Print icon 5 Result The Print dialog opens In the Print dialog select Printer from the list and click OK 6 Result Your chro...

Page 128: ...dialog 3 Select any of the predefined formats from the list Click the Preview button Result A preview of the report displays in the Customize Report window Are you satisfied with the layout 4 If Yes c...

Page 129: ...Print icon 5 Result The Print dialog opens In the Print dialog select Printer from the list and click OK 6 Result Your report is printed Getting Started with KTAavant and UNICORN 6 28 9440 69 AB 129 9...

Page 130: ...function and results Refer to KTAavant and UNICORN 6 User Manual for detailed instructions WARNING Always use appropriate personal protective equipment during operation and maintenance of KTAavant sy...

Page 131: ...equired Periodic maintenance program The following periodic maintenance should be performed by the user of KTAavant Maintenance action Interval Calibrate the pH monitor Daily Calibrate pressure monito...

Page 132: ...the pH electrode Clean the conductivity flow cell Calibrate the Conductivity monitor Calibrate the UV monitor Replace mixer Replace online filter Replace o ring in mixer Replace UV flow cell Replace f...

Page 133: ......
Page 134: ...within GE Healthcare which supplies them A copy of these terms and conditions is available on request Contact your local GE Healthcare representative for the most current information www gelifescience...

Reviews: