INSTALLATION
❑
lNSTALLCABINETIN
WALL (continued)
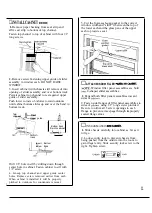
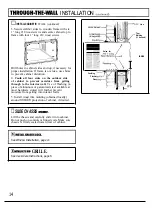
3. Secure
sides to wooden frame with six
1“ long #10 wood screws and secure cabinet top to
frame with four 1“ long #10 wood screws.
Drill holes in cabinet sides and top, if necessary for
proper installation. If frame is oversize, use shims
to prevent cabinet distortion.
4.
Caulk all four sides on the outdoor side
of cabinet to prevent moisture from getting
through to the interior wall.
Use of flashing (a
piece of aluminum or galvanized steel available at
most hardware stores) will further prevent
moisture from getting into interior walls.
5. Install wood trim molding (obtained locally)
around
projection of cabinet, if desired.
❑
SLIDE CHASSIS
Lift the chassis and carefully slide it into cabinet.
Do not push on controls or finned coils. Make sure
chassis is firmly seated toward rear of cabinet.
See Window Installation, page 11.
GRILLE.
See Use &Care Instructions, page 6.
Line
Trim
Molding
(if desired)
I
Holes for
I
I
Caulking
Flashing Lip
I
—
Flashing
i
‘
:
I
.
I
INSIDE
14

