background image

Fecha / Hora

1.  Asegúrese de que su teléfono esté en 

OFF

 (no en modo hablar).

.  Presione el botón 

MENU

 para ir al menú principal y utilice el 

botón 

CID/vOL

 (

+ o -

) para desplazarse a 

Fecha /Tiempo

.

.  Presione el botón 

MENU

 para entrar al menú. 

Año 2007

 se 

muestra en la pantalla.

.  Use el teclado numérico de tonos para ingresar los últimos dos 

dígitos del año actual (rango: 00 a 99).

5.  Presione el botón 

MENU

 para guardar la selección de año y 

proceda a la selección de fecha.

6. 

Fecha 01/01


se muestra en la pantalla. Use el teclado numérico 

de tonos para ingresar los últimos dos dígitos para el mes y el 

día actuales respectivamente.

7.   Presione el botón del 

MENU

 para guardar la selección de 

mes/fecha y proceda con la selección de la hora.

8. 

Tiempo 12:01p 

se muestra en la pantalla. Use el teclado 

numérico de tonos para ingresar los últimos cuatro dígitos para 

la hora actual y use el botón 

CID/vOL

 (

+ o -

) para alternar entre 

“p” (pm) y “a” (am).

9.  Presione el botón 

MENU

 para guardar la configuración. 

Guardado

 se muestra en la pantalla.

NOTA: si usted se suscribe a un servicio de Identificador 

de Llamada, la fecha/hora actual es establecida 

automáticamente cuando usted reciba su primer registro CID 

y modificará la fecha/hora establecida manualmente.

Registración

NOTA: Los procedimientos siguientes pueden ser efectuados 

SOLAMENTE con los auriculares accesorios 27950 o 27951.

Summary of Contents for 27950

Page 1: ...Model 27950 27951 DECT6 0 Cordless Handset with Answering System Speakerphone User s Guide Model 27951 Model 27950 ...

Page 2: ...al telephone company A plug and jack used to connect this equipment to the premises wiring and telephone network must comply with the applicable FCC Part 68 rules and requirements adopted by the ACTA A compliant telephone cord and modular plug is provided with this product It is designed to be connected to a compatible modular jack that is also compliant See installation instructions for details N...

Page 3: ...phone company must give you adequate notice in writing to allow you to maintain uninterrupted service Interference Information This device complies with Part 15 of the FCC Rules Operation is subject to the following two conditions 1 This device may not cause harmful interference and 2 This device must accept any interference received including interference that may cause undesired operation This e...

Page 4: ...ing Office Washington D C 20402 Please specify stock number 004 000 00345 4 when ordering copies Notice The changes or modifications not expressly approved by the party responsible for compliance could void the user s authority to operate the equipment Hearing Aid Compatibility HAC This telephone system meets FCC standards for Hearing Aid Compatibility Licensing Licensed under US Patent 6 427 009 ...

Page 5: ... 16 Voice Instructions 16 Programming the Telephone 17 Answer on off 24 Answer System 24 Area Code 21 Auto Talk 20 Base Station Setup 21 Date Time 22 De register 24 Dial Mode 22 Handset Name 20 Handset Setup 18 Language 18 Programming Functions 17 Register 23 Registration 23 Ring to Answer 25 Ring Volume 18 Security Code 25 Standby Screen 17 Tones 19 Voice Language 25 Telephone Operation 26 Answer...

Page 6: ...ok 40 Deleting a Phone Book Record 39 Dialing a Phone Book Record 40 Editing a Phone Book Record 39 Reviewing Phone Book Records 38 Answering System Operation 41 Answering System Remote Access 43 Leaving a Memo 44 Memory Full 44 Message Indicator 41 Messages Playback 42 Changing the Battery 44 Battery Safety Precautions 45 Display Messages 46 Handset Sound Signals 47 Troubleshooting Guide 48 Batte...

Page 7: ... them for future reference IMPORTANT Because cordless phones operate on electricity you should have at least one phone in your home that isn t cordless in case the power in your home goes out Before You Begin Parts Checklist 27950 Make sure your package includes the items shown here Base Handset Handset back cover Telephone line cord AC power adaptor Handset battery pack Handset wall mount cradle ...

Page 8: ...power adaptor Telephone Jack Requirements To use this phone you need an RJ11C type modular telephone jack which might look like the one pictured here installed in your home If you don t have a modular jack call your local phone company to find out how to get one installed Modular telephone line jack Wall plate Handset battery pack ...

Page 9: ...with interference please refer to the owner s manual for these devices on how to properly set channels to avoid interference Typical devices that may use the 1 9 GHz frequency for communication include wireless audio video senders wireless computer networks multi handset cordless telephone systems and some long range cordless telephone systems Important Installation Guidelines Avoid sources of noi...

Page 10: ...talk end button cid vol 6 caller ID volume 6button pause button flash exit button mute ringer on off button ph book phonebook button cid vol 5 caller ID volume 5button menu button redial button format button tone button ...

Page 11: ...ndicator volume 5 6 button memo button annc announce button charge in use indicator speaker button rev review button announce button play stop button SKIP button volume 5 6 button memo button ANS ON OFF button speaker button page button charge in use indicator DELETE button REVIEW review button message counter indicator Handset wall mount latch ...

Page 12: ...Locate battery which is packaged inside a plastic bag and is separate from the handset 2 Locate the battery compartment on the back of the handset 3 Plug the battery pack cord into the jack inside the compartment NOTE To ensure proper battery installation the connector is keyed and can be inserted only one way 4 Insert the battery pack 5 Close the battery compartment by placing the handset back co...

Page 13: ...educe risk of personal injury fire or damage use only the 5 2757 power adaptor listed in the user s guide This power adaptor is intended to be correctly orientated in a vertical or floor mount position Note If you subscribe to DSL service through your telephone line you will need to connect a DSL filter between your phone and the wall jack refer to DSL Filter Installation section for more detail 4...

Page 14: ...o DSL service through your telephone line you will need to connect a DSL filter between your phone and the wall jack refer to drawing for correct connection You may order the filter from our Accessories Information Section Model 27950 Model 27951 ...

Page 15: ...dset wall mount cradle into the socket at the back of the base To uninstall the wall mount cradle turn over the base press and hold the button on the bottom of the base and pull out the cradle at the same time 3 Plug the AC power adaptor into the electrical outlet and the DC connector into the jack on the bottom of the base ...

Page 16: ...dicator lights when the answering system is on The indicator blinks when you have new messages NOTE The answering system displays when it is off Voice Instructions If you need additional assistance while in standby mode press the REVIEW button on the base and follow the voice instructions Speaker Volume Use the volume 5 or 6 buttons to adjust speaker volume on the base to a comfortable level L1 is...

Page 17: ...tandby Screen The handset displays the handset name date time signal and battery status NOTE If the clock is not set the date and time display will blink The blinking will stop when user updates the date time from the Handset menu or the base receives a call with CID having date and time stamp Programming Functions The system uses a menu structure to give you access to all of the built in features...

Page 18: ... VOL or button to scroll to Setup HS 4 Press menu button to confirm and you may program the following items Ring Volume Tones Auto Talk Handset Name and Language Language From the Setup HS Menu 1 Press the CID VOL or button to scroll to the Language sub menu 2 Press menu button to enter the menu 3 Use the CID VOL or button to select English Français or Espanol The default setting is English 4 Pres...

Page 19: ... button to scroll to the item you want to program and press menu button to enter Low Battery You may set the warning beep to On when your handset battery is low so as to alert you to charge the battery Press the CID VOL or button to scroll to On or Off then press menu button to save the setting The default setting is On No Coverage You may set the warning beep to On or Off when the handset is out ...

Page 20: ...r selection Handset Name From the Setup HS Menu 1 Press the CID VOL or button to scroll to the Handset name sub menu 2 Press menu button to enter the menu The default setting is Handset 3 Use the touch tone pad to enter a name up to 13 characters More than one letter is stored in each of the number keys For example to enter Bill Smith press the 2 key twice for the letter B Press the 4 key 3 times ...

Page 21: ...Press the menu button to go to the main menu 3 Press CID VOL or button to scroll to Setup BS 4 Press menu button to confirm and you may program the following items Area Code and Dial mode Area Code The telephone uses the pre programmed area code to determine the number format to display when a valid Caller ID record is received The pre programmed area code is also used for the Dialback feature Fro...

Page 22: ...t two digits of the current year range 00 to 99 5 Press menu button to save the year setting and proceed to date setting 6 Date 01 01 shows in the display Use the touch tone pad to enter two digits for current month and day respectively 7 Press menu button to save the month date setting and proceed to time setting 8 Time 12 01p shows in the display Use the touch tone pad to enter four digits for c...

Page 23: ...enu button to go to the main menu and use CID VOL or button to scroll to Registration 3 Press menu button to confirm and you may program the following items Register and Remove handset Register From the Registration Menu 1 Press the CID VOL or button to scroll to the Register sub menu 2 Press menu button to enter the menu 3 Press and hold the page button on base for 5 seconds 4 The charge in use i...

Page 24: ...ndset shows on the display 3 Press menu button again to confirm de registration Answer System 1 Make sure your phone is OFF not in talk mode 2 Press the menu button to go to the main menu 3 Press CID VOL or button to scroll to Answer system 4 Press menu button to confirm and you may program the following items Answer on off Ring to answer Voice language and Security code Answer on off This menu al...

Page 25: ...5th ring if there are NO new messages Then when you access the answering system from another remote location you may hang up after 4 rings to save long distance charges Voice Language From the Answer System Menu 1 Press the CID VOL or button to scroll to the Voice language submenu 2 Press menu button to enter the menu and use the CID VOL or button to select the desired language 3 Press menu button...

Page 26: ...lert you to an incoming call during paging or registration The indicator will remain lit when a handset is in the base charging or when the line is in use Making a Call 1 Press the TALK END button Dial the desired number OR Dial the number first then press the TALK END button 2 When finished press the TALK END button or put the handset back into the base cradle to hang up NOTE If you want to delet...

Page 27: ...ase cradle during the conversation Inserting a Pause in the Dialing Sequence Press the pause button twice to insert a delay in dialing sequence when a pause is needed to wait for a dial tone for example after you dial 9 for an outside line or to wait for a computer access tone Pause shows in the display as a P and each pause counts as one digit in the dialing sequence Redial To quickly redial a nu...

Page 28: ...VOL or button to move the cursor forward or backward Use the touch tone pad to add digits or press the MUTE ringer on off button to backspace and delete one digit at a time 7 After editing press TALK END to dial the modified redial number Storing a Redial Record in Phone Book 1 Make sure the phone is OFF not in talk mode 2 Press the REDIAL button first then use the CID VOL or button to scroll to t...

Page 29: ...display NOTE Press the FLASH exit button to return to the standby mode without deleting any redial records Deleting All Redial Records 1 Make sure the phone is OFF not in talk mode 2 Use the CID VOL or button to display any redial record 3 Press the menu button 4 Use the CID VOL or button to scroll to Delete all 5 Press the menu button Confirm shows in the display 6 Press the menu button again to ...

Page 30: ... will hear a beep to indicate another call is waiting on the line and Caller ID information for the waiting call shows on the handset display To connect to the waiting call press the FLASH exit button on the handset and your original call is put on hold To switch between the two calls press the FLASH exit button TIP Do not press the TALK END button on the handset to activate a custom calling servi...

Page 31: ... choose from VOL 1 is minimum and VOL 5 is maximum Intercom Operation The intercom feature allows you to have a conversation with another registered handset without tying up the telephone line allowing you to still receive incoming calls NOTE The function is applicable only with additional handsets Handset to Handset Intercom Call 1 Make sure the originating phone is OFF not in talk mode 2 Press t...

Page 32: ... open line 1 When the phone rings press the TALK END button on the handset and press the speaker button on the base 2 Conference shows on the handset display And when the conference starts all the 3 parties will hear conference alert tone 3 When finished press the TALK END button or put the handset back into the base cradle and press the speaker button again to hang up NOTE If the phone system is ...

Page 33: ...nformation will override the telephone Date Time setting Caller ID name Caller ID phone number CID display on handset TALK AM NEW Call Waiting Caller ID Provided you subscribe to Call Waiting Caller ID service from your phone company if you receive an incoming call and you are using the GE multi handset system a beep indicates the presence of a Call Waiting call on the line The Call Waiting Caller...

Page 34: ... oldest Caller ID record 1st call is automatically deleted You may review the stored information at any time Calls received since your last review show as NEW in the display Calls that have not been previously reviewed but were received from the same number more than once show as RPT in the display Reviewing CID Records As calls are received and stored the display is updated to let you know how ma...

Page 35: ...format of the incoming caller s stored phone number before making the call press the FORMAT button to adjust the number and try again 1 Make sure the phone is OFF not in talk mode 2 Use the CID VOL or button to scroll to the desired CID record 3 Press the FORMAT button to scroll to the desired format 4 Press the TALK END button The formatted number dials automatically Available formats include Num...

Page 36: ...ode You may now change the name if desired Please refer to section Handset Name for name editing method NOTE If the CID record does not include a name Enter name shows in the display 6 Press the menu button to save NOTE If Memory full shows in the display and the unit emits 3 beeps you should delete one or more unnecessary records and repeat above steps to continue the call record storage NOTE Pre...

Page 37: ...he display NOTE Press the FLASH exit button to return to the standby mode without deleting any CID records Deleting All CID Records 1 Make sure the phone is OFF not in TALK mode 2 Use the CID VOL or button to display any CID record 3 Press the menu button 4 Use the CID VOL or button to scroll to Delete all 5 Press the menu button Confirm shows in the display 6 Press the menu button again to confir...

Page 38: ...phone number TIP Press the pause button twice to insert a pause in a number if necessary 6 Press the menu button Enter name shows in the display Please refer to section Handset Name for name editing method 7 Press the menu button to save NOTE If Memory full shows in the display you should delete one or more unnecessary records and repeat above steps to continue the call record storage Reviewing Ph...

Page 39: ...refer to section Handset Name for name editing method 5 Press menu button to save NOTE Press the FLASH exit button to keep the previous setting making no changes and return to the standby mode Deleting a Phone Book Record 1 When reviewing the phone book records list use the CID VOL or button or the number keys to scroll to the desired record 2 Press menu button and use the CID VOL or button to scr...

Page 40: ...s the TALK END button The number dials automatically If you want to edit the number before dialing 1 Press the menu button when reviewing phone book records 2 Use the CID VOL or button to scroll to Select and press the menu button enter edit mode 3 When finished editing press TALK END to dial the number Chain Dialing from Phone Book Use this feature to make calls which require a sequence of number...

Page 41: ...lay steadily Answerer is off d F flashing on the display Memory is full e CL flashing on the display Clock is not set since power up or after power failure f Six horizontal bars flashing on the display MEMO is recording g AN flashing on the display The system is answering an incoming call and recording an incoming call h LA displays steadily The answering system is being accessed remotely i SP dis...

Page 42: ... and release the skip button to go to the next message Press the delete button to erase the current message Erasing Messages You may erase messages in the following two ways To erase a message while it is playing 1 Press and release the play stop button 2 Press the REVIEW and skip buttons to select and play the message you want to erase 3 Press the delete button the current message is erased and t...

Page 43: ...er to which the answering system is connected 2 Enter the security code during the outgoing announcement or after you hear the tone 3 Follow the voice menu to use the answering system s remote functions The remote feature lets you perform the following functions To Press this button Review message 1 Play back messages 2 Stop message playback 2 Erase message 0 during message playback Skip message 3...

Page 44: ... to 2 minutes long to store as an incoming message 1 Press and hold the memo button 2 Begin speaking after it announces Record message 3 Release the memo button when finished Changing the Battery CAUTION To reduce the risk of fire or personal injury use only the Thomson Inc approved Nickel metal Hydride Ni MH battery model 5 2734 that is compatible with this unit 1 Make sure the telephone is OFF n...

Page 45: ...other batteries of this type toxic materials could be released which can cause injury To reduce the risk of fire or personal injury use only the Nickel metal Hydride battery listed in the User s Guide Keep batteries out of the reach of children Remove batteries if storing over 30 days NOTE The RBRC seal on the battery used in your Thomson Inc product indicates that we are participating in a progra...

Page 46: ...he end of the list ENTER NAME Prompt telling you to enter a name ENTER NUMBER Prompt telling you to enter a telephone number NEW CALLS Indicates call or calls which have not been reviewed HANDSET NAME Prompt telling you to enter a user name for the handset UNAVAILABLE The handset is not yet registered or is out of range No line Indicates that the telephone line is not connected Line in use Indicat...

Page 47: ...ame number was received more than once Unknown Indicates incoming call is from an area not serviced by CID or the CID information was not sent Handset Sound Signals Signal Meaning A long warbling tone with ringer on Signals an incoming call Three short beeps several times Page signal One beep every 14 seconds Low battery warning ...

Page 48: ...handset may be out of range of the base Move closer to the base Make sure the battery is properly charged for 14 hours Dial tone is ok but can t dial out Make sure the type of phone service you are subscribed to is TONE or PULSE and that the unit is SET TO MATCH the dialing mode Handset does not ring Make sure the handset ringer is set to on The handset may be out of range of the base Move closer ...

Page 49: ...p and no communication between the base and cordless handset Unplug the power adaptor from the electrical outlet and the bottom of the base Remove the handset battery Wait for 30 seconds and plug the power adaptor back into the base and electrical outlet Reconnect the battery and charge for 14 hours Searching shows in the handset display Move the handset closer to the base Make sure the base power...

Page 50: ...he power adaptor from the base and reconnect it No Caller ID You must be subscribed to the standard Name Number Caller ID service from your local telephone company to receive CID information Battery If you experience any of the following problems even after recharging the battery you may need to replace the battery pack Short talk time Poor sound quality Limited range ...

Page 51: ... ship the phone at a later date Periodically clean the charge contacts on the handset and base with a clean pencil eraser Causes of Poor Reception Aluminum siding Foil backing on insulation Heating ducts and other metal construction that can shield radio signals You re too close to appliances such as microwaves stoves computers etc Atmospheric conditions such as strong storms Base is installed in ...

Page 52: ...pproved by Thomson Inc could void the user s authority to operate this product For instructions on how to obtain a replacement unit refer to the warranty included in this guide or call customer service at 1 800 448 0329 Or refer inquiries to Thomson Inc Manager Consumer Relations P O Box 1976 Indianapolis IN 46206 Attach your sales receipt to this booklet for future reference or jot down the date ...

Page 53: ...ally provided with the product We recommend using the original carton and packing materials Proof of purchase in the form of a bill of sale or receipted invoice which is evidence that the product is within the warranty period must be presented to obtain warranty service For rental firms proof of first rental is also required Also print your name and address and a description of the defect Send via...

Page 54: ...ustments Batteries Damage from misuse or neglect Products which have been modified or incorporated into other products Products purchased or serviced outside the USA Acts of nature such as but not limited to lightning damage Product Registration Please complete and mail the Product Registration Card packed with your unit It will make it easier to contact you should it ever be necessary The return ...

Page 55: ...ach of any express or implied warranty on this product This disclaimer of warranties and limited warranty are governed by the laws of the state of Indiana Except to the extent prohibited by applicable law any implied warranty of merchantability or fitness for a particular purpose on this product is limited to the applicable warranty period set forth above How state law relates to this warranty Som...

Page 56: ......

Page 57: ...ace order have your Visa MasterCard or Discover Card ready and call toll free 1 800 338 0376 A shipping and handling fee will be charged upon ordering We are required by law to collect appropriate sales tax for each individual state country and locality to which the merchandise is being sent Items are subject to availability ...

Page 58: ... Phone Book Record 39 Deleting a Redial Record 29 Deleting All CID Records 37 Deleting All Redial Records 29 De register 24 Dial Mode 22 Dialing a CID Number 35 Dialing a Phone Book Record 40 Digital Security System 9 Display Messages 46 DSL Filter Installation 14 E Editing a Phone Book Record 39 Editing a Redial Record Before Dialing 28 Equipment Approval Information 2 F FCC RF Radiation Exposure...

Page 59: ...ing the Outgoing Announcement 16 Redial 27 Register 23 Registration 23 Reviewing CID Records 34 Reviewing Phone Book Records 38 Ring to Answer 25 Ring Volume 18 Ringer On Off 30 S Security Code 25 Speaker Volume 16 Standby Screen 17 Storing a Redial Record in Phone Book 28 Storing CID Records In CID Memory 34 Storing CID Records into Phone Book 36 T Telephone Jack Requirements 8 Telephone Operatio...

Page 60: ...Model 27950 27951 00021472 Rev 0 Dom E S 07 31 Printed in China Thomson Inc 101 West 103rd St Indianapolis IN 46290 1102 2007 Thomson Inc Trademark s Registered Marca s Registrada s ...

Page 61: ...Modelo 27950 27951 DECT6 0 Auricular Inalámbrico con Sistema de Contestadora y Altavoz Guía del Usuario Modelo 27950 Modelo 27951 ...

Page 62: ...nea no debe exceder 5 Para estar seguro del número total de artefactos que Ud pueda conectar a su línea determinado por el REN Ud deberá ponerse en contacto con su compañía telefónica local Cualquier enchufe y conexión que se utilice para conectar este equipo al cableado del edificio y a la red telefónica debe estar en conformidad con el reglamento de la FCC Parte 68 que ha sido adoptado por la AC...

Page 63: ...laciones de l a FCC Si estos cambios pudieran alterar el uso o el funcionamiento de su equipo telefónico la compañía telefónica deberá darle aviso adecuado en escrito para que Ud goce de un servico ininterrumpido Información de Interferencias Este artefacto cumple con la Parte 15 de las Reglas de la FCC Su funcionamiento es sujeto a las dos condiciones siguientes l Este artefacto no puede causar i...

Page 64: ...visión Este folleto se puede obtener del U S Goverment Printing Office Washington D C 20402 Favor de especificar el número 004 000 00345 4 cuando haga su pedido Aviso Los cambios o las modificaciones no no expreso aprobados por el partido responsable de conformidad podían anular la autoridad del usuario para funcionar el equipo Compatibilidad con Audífonos CCA Se juzga que este teléfono es compati...

Page 65: ... Regionales 22 Código de Seguridad 27 Contestador 25 Contestadora on off 25 Des Registrar 24 Fecha Hora 23 Funciones de Programación 18 Idioma 19 Llamada Automática 20 Modo de Marcación 22 Nombre del Auricular 21 Pantalla de Alerta 17 Para Seleccionar el Idioma de Instrucciones de Voz 26 Programación el Auricular 18 Programación el Base 22 Registración 23 Registrar 24 Timbre para Responder 26 Tono...

Page 66: ...e el Directorio Telefónico 44 Para Agregar Entradas al Directorio Telefónico 41 Para Editar un Registro del Directorio Telefónico 42 Para eliminar un registro del Directorio Telefónico 43 Para Marcar un Registro del Directorio Telefónico 43 Revisión de Registros en el Directorio Telefónico 42 Operación del Sistema Contestador 44 Acceso Remoto del Sistema Contestador 46 El Contador de Mensajes 44 M...

Page 67: ...E Como los teléfonos inalámbricos operan con electricidad usted debe tener por lo menos un teléfono en su casa que no sea inalámbrico en caso de una interrupción de corriente Antes de Comenzar Lista de Partes 27950 Asegúrese de que su paquete incluye los artículos mostrados aquí Base Auricular Cable de línea telefónica Adaptador de corriente CA Paquete de baterías del auricular Cubierta posterior ...

Page 68: ...necesitar un enchufe modular telefónico tipo RJ11C como el ilustrado aquí instalado en su hogar Si usted no tiene este tipo de enchufe llame a su compañía telefónica local para preguntar cómo conseguirlo Enchufe telefónico modular Placa de pared Auricular Cable de línea telefónica Adaptador de corriente CA Paquete de baterías del auricular Cubierta posterior del auricular ...

Page 69: ...esorios para la comunicación pueden utilizar frecuencias de 1 9 GHz DECT para comunicarse y si no están adecuadamente instalados estos aparatos pueden interferir entre sí o con su aparato de teléfono nuevo Si usted teme tener problemas con esta interferencia refiérase al manual de instrucciones de dichos accesorios para ver cómo puede programar los canales para evitar esta interferencia Los acceso...

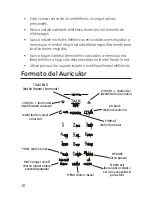
Page 70: ...dos a menos que la línea telefónica haya sido desconectada en la interfaz de la red Utilice precaución cuando instale o modifique líneas telefónicas Formato del Auricular cid vol 6 botón del identificador volumen redial botón volver a marcar TONE botón tono format botón formato PAUSE bóton pausa menu bóton menú mute ringer on off botón mudo timbre encend apagado ph book botón directorio cid vol 5 ...

Page 71: ...olver volume 5 6 botón volumen 5 6 altavoz charge in use indicador en uso cargando page botón buscar speaker botón bocina annc botón de anuncio memo botón delete botón borrar ans on off botón activar la función contestar play stop botón reproducir detener page botón buscar indicador de conteo de mensajes play stop botón reproducir detener charge in use indicador en uso cargando indicador de conteo...

Page 72: ...MH modelo 5 2734 aprobado por Thomson Inc eso es compatible con esta unidad 1 Localice la batería que está empacada dentro de una bolsa de plástico separada del auricular 2 Localice el compartimento de la batería en la parte posterior del auricular 3 Conecte el cable de la batería en el conector dentro del compartimento NOTA Para asegurar la instalación apropiada de la batería el conector está dis...

Page 73: ...50 puede ser también montado en la pared 2 Conecte un extremo de la línea telefónica dentro del enchufe marcado TEL LINE en la base y el otro extremo dentro de un enchufe modular de pared 3 Conecte el adaptador de la corriente eléctrica AC dentro del enchufe eléctrico y el conector DC dentro del enchufe en la parte inferior detrás de la base PRECAUCION Para reducir el riesgo de lesión personal fue...

Page 74: ...ato está cargando 5 Deje que el teléfono se cargue durante 14 horas antes de utilizarlo por primera vez Si usted no carga adecuadamente el teléfono el funcionamiento de la batería podría deteriorarse Instalación de Filtro DSL Si usted se suscribe al servicio DSL a través de su línea telefónica usted necesitará conectar un filtro DSL entre su teléfono y el receptáculo de la pared para la conexión c...

Page 75: ... del auricular y gire 180 2 Inserte la base de montaje de pared del auricular en el enchufe en la parte inferior de la base Para desinstalar la base de montaje de pared voltee la base presione y sostenga el botón en la parte inferior de la base y jale hacia afuera la base al mismo tiempo ...

Page 76: ... incluida Programación del Sistema Contestador Esta sección le muestra cómo programar su sistema para recibir llamadas entrantes Antes de empezar el proceso de programación usted debe encender su sistema contestador Presione el botón ANS ON OFF su sistema contestador El indicador mensajes se ilumina cuando el sistema contestador está activado El indicador parpadea cuando usted tiene mensajes nuevo...

Page 77: ... de que escuche el tono 3 Suelte el botón ANNOUNCE cuando usted haya terminado su anuncio NOTA Si usted elige no grabar un anuncio saliente el anuncio de fábrica se reproduce en su lugar Para volver al anuncio de fábrica después de que usted ha grabado su propio anuncio saliente presione el botón ANNOUNCE y suéltelo cuando escuche el bip O presione el botón DELETE mientras se revisa el anuncio NOT...

Page 78: ...mación Ud puede presionar el botón MUTE ringer on off en cualquier momento para salir del submenú y regresar al menú o presione FLASH exit para salir de la programación y regresar a la pantalla de espera NOTA si ninguna tecla es presionada en 60 segundos el auricular saldrá automáticamente de la programación y regresará a la pantalla de espera Programación el Auricular 1 Asegúrese de que su teléfo...

Page 79: ...cer HS 1 Presione el botón cid vol o para moverse al submenú Volumentimbre 2 Presione el botón MENU para entrar al menú y use el botón cid vol o para moverse a su selección VOL 3 es la selección de fábrica 3 Presione el botón MENU para guardar su selección y SAVED se muestra en la pantalla NOTA El timbre puede ser desactivado presionando el botón mute ringer on off en modo en espera por favor cons...

Page 80: ...elección de fábrica NOTA cuando el auricular esté en el modo inactivo apagado y esté fuera de rango de la unidad base la pantalla mostrará Buscando Si el botón TALK END es presionado la pantalla muestra brevemente No disponible y luego regresa a Buscando Tono de tecla usted puede configurar el tono de tecla en On u Off cuando presione los botones Utilice los botones cid vol o para seleccionar On o...

Page 81: ... 3 veces para la segunda letra L y presione la tecla 1 para insertar un espacio entre el nombre y el apellido Presione la tecla 7 cuatro veces para la letra S presione la tecla 6 una vez para la letra M presione la tecla 4 3 veces para la letra I presione la tecla 8 para la letra T presione la tecla 4 dos veces para la letra H NOTA Si usted comete un error presione el botón cid vol o para mover el...

Page 82: ... Llamada válido El código de área preprogramado es también usado para la característica de Regreso de Llamada Del Menú del Establecer BS 1 Presione el botón cid vol o para moverse al submenú Códigodeárea 2 Presione el botón MENU para entrar al menú Código área se muestra en la pantalla 3 Use el teclado numérico para ingresar su código de área de 3 dígitos 4 Presione el botón MENU para guardar la c...

Page 83: ...para el mes y el día actuales respectivamente 7 Presione el botón del MENU para guardar la selección de mes fecha y proceda con la selección de la hora 8 Tiempo 12 01p se muestra en la pantalla Use el teclado numérico de tonos para ingresar los últimos cuatro dígitos para la hora actual y use el botón cid vol o para alternar entre p pm y a am 9 Presione el botón MENU para guardar la configuración ...

Page 84: ...tón MENU para confirmar y Ud puede programar los siguientes elementos Registrar y Remover auric Registrar Del Menú del Registro 1 Presione el botón cid vol o para moverse al submenú Registrar 2 Presione el botón MENU para entrar al menú 3 Presione y sostenga el botón PAGE en la base por 5 segundos 4 El indicador charge in use parpadeará lentamente por 2 minutos lo cual muestra que la base está en ...

Page 85: ...a confirmar Contestador 1 Asegúrese de que su teléfono esté en OFF no en modo hablar 2 Presione el botón MENU para ir al menú principal 3 Presione cid vol o para desplazarse a Rspuest máquina 4 Presione el botón MENU para confirmar y Ud puede programar los siguientes elementos Respuest on off Timbres rspuest Idioma de voz y Código sguridad Contestadora on off Este menú le permite apagar y encender...

Page 86: ...A REDUCI la unidad responde después del 3er timbre si hay NUEVOS mensajes O la unidad responde después del 5th timbre si NO hay mensajes nuevos Esto permite al usuario accesar su contestadora desde otra ubicación y luego colgar después de 5 timbres para ahorrar cargos por larga distancia Para Seleccionar el Idioma de Instrucciones de Voz Del Menú del Rspuest máquina 1 Presione el botón cid vol o p...

Page 87: ...esar el nuevo código de seguridad de 3 dígitos La selección de fábrica es 1 2 3 4 Presione el botón MENU para guardar su selección Operación Básica del Teléfono Carga En Uso Indicador en la Base El indicador de carga en uso en la base parpadeará para indicarle de una llamada entrante durante la búsqueda o el registro El indicador permanecerá iluminado cuando un auricular esté en la base cargando o...

Page 88: ... llamada entrante directamente sin presionar botón alguno NOTA Ajuste el volumen del auricular utilizando los botones cid vol o durante una llamada NOTA si usted presiona el botón SPEAKER para responder una llamada mientras el auricular no esté en la base de carga la llamada no será terminada aún si se coloca el auricular de regreso a la base durante la conversación Para Introducir una Pausa en la...

Page 89: ...léfono esté en OFF no en modo hablar 2 Presione primero el botón redial luego use el botón cid vol o para seleccionar el número que se desea volver a marcar NOTA Ud puede elegir de los últimos diez números marcados 3 Presione el botón MENU El número es marcado automáticamente Editando un Registro de Remarcación Antes de Marcar 1 Asegúrese de que su teléfono esté en OFF no en modo hablar 2 Presione...

Page 90: ...r 3 Presione el botón MENU 4 Presione cid vol o para desplazarse a Guardar número 5 Presione el botón MENU para entrar al modo de edición 6 Entrar Nombre se muestra en la pantalla Ingrese un hombre Por favor refiérase a la sección Nombre del Auricular para el método de edición de nombre NOTA Un nombre debe ser ingresado de otra manera el registro no puede ser almacenado 7 Presione el botón MENU pa...

Page 91: ... remarcación 3 Presione el boton MENU 4 Presione cid vol o para desplazarse a Suprimir todo 5 Presione el boton MENU Confirmar se muestra en la pantalla 6 Presione el botón MENU otra vez para confirmar la eliminación Todo suprimido se muestra en la pantalla NOTA Presione el botón FLASH exit para regresar al modo de espera sin eliminar registros de remarcación Temporizador de Llamadas Después de qu...

Page 92: ...a línea mientras que la información del Identificador de Llamadas para la llamada en espera aparece en la pantalla del auricular Para conectar con la llamada en espera oprima el botón FLASH exit en el auricular y su llamada original se pone en espera Para pasar de una a otra llamada oprima el botón FLASH exit SUGERENCIA No presione el botón TALK END en el teléfono inalámbrico para activar un servi...

Page 93: ...N en modalidad para hablar usted puede ajustar el volumen oprimiendo los botones cid vol o Escoja entre los cinco niveles de volumen El nivel más bajo es VOL 1 y el volumen más alto es VOL 5 Operación del Interfono La función del interfono le permite tener una conversación con otro auricular registrado sin ocupar la línea telefónica permitir que usted todavía reciba llamadas entrantes NOTA La func...

Page 94: ...ue no hay respuesta unavailable en la pantalla 7 Cuando haya terminado oprima el botón TALK END en cualquier auricular para desactivar el interfono Conferencia de Tres Vías Usted puede tener una conversación de 3 vías usando el auricular la base y una línea abierta 1 Cuando el teléfono suene presione el botón TALK END en el auricular y presione el botón SPEAKER en la base 2 Conferencia se muestra ...

Page 95: ...cador de Llamada en Espera Caller ID with Call Waiting Para saber quién llama mientras usted está en el teléfono usted debe suscribirse al Servicio de Identificador de Llamada en Espera Caller ID with Call Waiting Este aparato recibe y muestra información transmitida por su compañía telefónica local La información puede incluir el número telefónico fecha y hora o el nombre número telefónico fecha ...

Page 96: ...nal Recibir Archivos del Identificador de Llamadas Cuando usted recibe una llamada la información es transmitida entre el primero y el segundo timbre La información del Identificador de Llamadas aparece en la pantalla mientras el teléfono timbra dándole a usted la oportunidad de ver la información y decidir si quiere o no contestar la llamadal Almacenar Archivos del Identificador de Llamadas en la...

Page 97: ...segúrese que el teléfono esté desactivado OFF no en el modo hablar 2 Presione el boton cid vol o para revisar la llamada más antigua y desplazarse hacia las llamadas más recientes 3 Presione el boton cid vol o para revisar la llamada más nueva y desplazarse hacia las llamadas más antiguas NOTA Cuando usted alcance el final de los registros Fin de lista se mostrará en la pantalla NOTA si no se han ...

Page 98: ...eléfono esté desactivado OFF no en el modo hablar 2 Utilice le cid vol o para llegar al archivo deseado 3 Presione el boton FORMAT para desplazarse al formato deseado 4 Presione el boton TALK END El número se marca automáticamente Los formatos disponibles incluyen Número de dígitos Explicación Ejemplo Once dígitos clave de larga distancia 1 1 317 888 8888 3 dígitos de clave de área 7 dígitos de nú...

Page 99: ... favor refiérase a la sección Nombre del Auricular para el método de edición de nombre NOTA Si el registro CID no incluye un nombre Entrar Nombre se muestra en la pantalla 6 Presione el botón MENU para guardar NOTA Si Memoria llena se muestra en la pantalla y la unidad emite 3 bips usted deberá eliminar uno o más registros innecesarios y repetir los pasos anteriores para continuar el almacenamient...

Page 100: ... el botón FLASH exit para regresar al modo en espera sin eliminar alguno de los registros CID Borrar Todos los Archivos del Identificador de Llamadas 1 Asegúrese que el teléfono esté desactivado OFF no en el modo hablar 2 Utilice los botones cid vol o para mostrar el archivo deseado 3 Presione el boton MENU 4 Presione cid vol o para desplazarse a Suprimir todo 5 Presione el boton MENU Confirmar se...

Page 101: ...o 4 Presione el boton MENU Entrar número se muestra en la pantalla 5 Use el teclado numérico de tonos para ingresar un número de teléfono SUGERENCIA Presione el botón PAUSE dos veces para insertar una pausa en un número si es necesario 6 Presione el boton MENU Entrar Nombre se muestra en la pantalla Por favor refiérase a la sección Nombre del Auricular para el método de edición de nombre 7 Presion...

Page 102: ...fónico 1 Al revisar la lista de registros del directorio telefónico use el botón cid vol o o las teclas numéricas para desplazarse al registro deseado 2 Presione el boton MENU y utilice el boton cid vol o para desplazarse a Editar 3 Presione el botón MENU para entrar al modo de edición Usted puede ahora cambiar el número si lo desea 4 Presione el botón MENU para proceder al cambio de nombre Usted ...

Page 103: ...emente oprima el botón FLASH exit o espere un minuto para salir del modo en espera automáticamente Para Marcar un Registro del Directorio Telefónico Marque un registro del directorio telefónico mientras está en el modo hablar 1 Asegúrese de que el teléfono esté en ON en modo hablar presionando el botón TALK END 2 Presione el botón ph book para accesar el directorio telefónico 3 Use el botón cid vo...

Page 104: ...e números como el usar una tarjeta para llamar por teléfono o un número de larga distancia al que usted llama frecuentemente Usted puede almacenar cada parte de la secuencia de marcación tal como Número de Acceso de Larga Distancia Código de Autorización y un número de larga distancia frecuentemente llamado en el directorio telefónico y simplemente repetir el paso del 2 al 4 en Marcación de un reg...

Page 105: ...ación de MEMO g AN parpadeando en la pantalla Está respondiendo llamadas entrantes y grabando una llamada entrante h LA exhibidas constantemente La máquina contestadora está siendo accesada remotamente l SP exhibidas constantemente El altavoz de la base está activado j Ar parpadeando en la pantalla El mensaje se está grabando o reproduciendo NOTA Mientras los mensajes son reproducidos el contador ...

Page 106: ...ione y suelte el botón PLAY STOP 2 Presione el botón REVIEW y SKIP para seleccionar y reproducir el mensaje que usted quien borrar 3 Presione el botón DELETE el mensaje actual es borrado y el siguiente mensaje es reproducido Para borrar todos los Mensajes reproducidos previamente en un buzón 1 Asegúrese de que su teléfono está en OFF no en modo hablar 2 Presione y sostenga el botón eliminar hasta ...

Page 107: ...borrar mensajes 0 durante su reproducción Para saltar el mensaje 3 Para activar desactivar contestador 4 Para revisar las opciones del menú 7 Memoria Llena Cuando la memoria del sistema de contestadora está llena el sistema responde después de 10 timbres anuncia La memoria esta saturada y espera que usted ingrese el código de seguridad de 3 dígitos Usted tiene 7 segundos para inscribir su código d...

Page 108: ...é desactivado OFF no en el modo hablar antes de cambiar la batería 2 Quite la tapa del compartimiento de la batería 3 Desconecte el cable que está conectado al paquete de las baterías en el enchufe dentro del compartimiento de las baterías y sáquelo del auricular 4 Introduzca el nuevo paquete de baterías y conecte el cable en el enchufe dentro del auricular 5 Vuelva a poner la tapa del compartimie...

Page 109: ...participando en un programa para recolectar y reciclar batería s recargable s Para más información vaya al sitio web de RBRC en www rbrc org o llame al 1 800 8 BATTERy o contacte a su centro de reciclado local Indicadores de Mensajes Los siguientes mensajes muestran el estado del teléfono proveen la información del Identificador de Llamadas o le ayudan a programar y a utilizar su teléfono Llamada ...

Page 110: ...de alcance Sin linea Indica que la línea del teléfono no está conectada Vacío No hay archivos del identificador de Llamadas en la memoria Buscando Indica que el auricular está demasiado lejos de la base y el auricular está buscando la base Locali Alguien presionó el botón page en la base REPT Mensaje de llamada repetido Indica que hay una llamada nueva fue recibida más de una vez desde el mismo nú...

Page 111: ...té conectado a la base del aparato y a un enchufe de pared Conecte otro teléfono al mismo enchufe Si continúa sin haber tono de marcar en el segundo teléfono el problema puede estar en el cableado o en el servicio local El auricular puede estar fuera del rango de la base Acérquese a la base Asegúrese de que la batería ha sido cargada adecuadamente 14 horas El tono de marcación está bien pero no pu...

Page 112: ...sté conectada en un o saliente enchufe con otro aparato eléctrico Si fuera necesario mueva la base a otra localización Asegúrese de que la batería ha sido cargada adecuadamente 14 horas La función de Marcar por Memoria no sirve Siguió la secuencia adecuada para marcar El aparato se traba y no hay comunicación entre la base y el auricular inalámbrico Desconecte el cable de corriente del enchufe elé...

Page 113: ...sté conectado en un enchufe que no pueda desactivarse con un apagador Desconecte el cable de corriente de la base y vuelva a conectarlo No sirve el Identificador de Llamadas Caller ID Usted debe estar suscrito al servicio estándar de Nombre número a través de su compañía telefónica local para recibir información Identificador de Llamadas Batería Si usted experimenta cualquiera de los siguientes pr...

Page 114: ...ue esto dañará el acabado Retenga el empaque original en caso de que necesite embarcar el auricular en el futuro Periódicamente limpie los contactos de carga del auricular y de la base con una goma de lápiz limpia Causas de una Mala Recepción Recubrimiento externo de la casa con aluminio Aislación con revestimiento de papel de aluminio Conductos de calefacción y otras construcciones de metal que p...

Page 115: ...nte por Thomson Inc podría ser motivo de anulación de la autoridad del usuario para operar este producto Para las instrucciones en cómo obtener una unidad del reemplazo refiera a la garantía incluida en este servicio de cliente de la guía o de la llamada en 1 800 448 0329 O envíe sus preguntas a Thomson Inc Gerente Servicio al Consumidor P O Box 1976 Indianápolis IN 46206 Adjunte su recibo al foll...

Page 116: ...dentro del periodo de garantía debe ser presentado para obtener servicio bajo garantía Para compañías de arrendamiento se requiere como evidencia el primer contrato de renta También escriba claramente su nombre dirección y la descripción del defecto Mande vía UPS o un servicio de paquetería equivalente a Thomson Inc 11721 B Alameda Ave Socorro Texas 79927 Pague cualquier cargo que le facture el Ce...

Page 117: ...e especifica bajo esta garantía es el remedio exlusivo del consumidor Thomson Inc no se hace responsible por daños incidentales daños derivados como consecuencia del uso este producto o como resultado del incumplimeinto de cualquier garantía implícita o expresa de este producto La invalidez de las garantías o las garantías limitadas están reglamentadas por las leyes del estado de Indiana Excepto p...

Page 118: ...ra on off 25 Control de Volumen del Auricular 33 Cuidado General del Producto 54 D Declaración de la FCC sobre Exposición a la Radiación RF 4 Des Registrar 24 Directorio Telefónico 41 E Editando un Registro de Remarcación Antes de Marcar 29 El Contador de Mensajes 44 Enmudecedor 32 Estación para la Base 13 F Fecha Hora 23 Formato de la Base 11 Formato del Auricular 10 Funciones de Programación 18 ...

Page 119: ...7 Para Hacer una Llamada 27 Para Introducir una Pausa en la Secuencia de Marcado 28 Para Marcar un Registro del Directorio Telefónico 43 Para Seleccionar el Idioma de Instrucciones de Voz 26 Para Volver a Marcar 29 Pautas Importantes de la Instalación9 Precauciones de Seguridad para la Batería 49 Programación del Sistema Contestador 16 Programación del Teléfono 17 Programación el Auricular 18 Prog...

Page 120: ...0 338 0376 Se aplicará un cargo por envío al ordenar La ley nos requiere que cobremos el impuesto sobre la venta apropiado para cada estado condado y área individuales a las cuales se envíe la mercancía Los artículos están sujetos a disponibilidad Modelo 27950 27951 00021472 Rev 0 Dom E S 07 31 Impreso en China Thomson Inc 101 West 103rd St Indianapolis IN 46290 1102 2007 Thomson Inc Trademark s R...

Reviews: