gCreate gMax Printer 1.5+ Quick Start Manual Download Page 8

Page  8  


N e x t   S t e p s  

Make sure to keep an eye on your print until it finishes. Every file you print has its own characteristics 
and sometimes it will surprise you what happens. Also the beginning of the print is critical to the final 
results and you should make sure it adheres correctly. 

Note : As print starts, keep an eye on the filament spool to ensure it 
does not bind or wrap around the brackets. This is especially true for 
new spools of filament. 


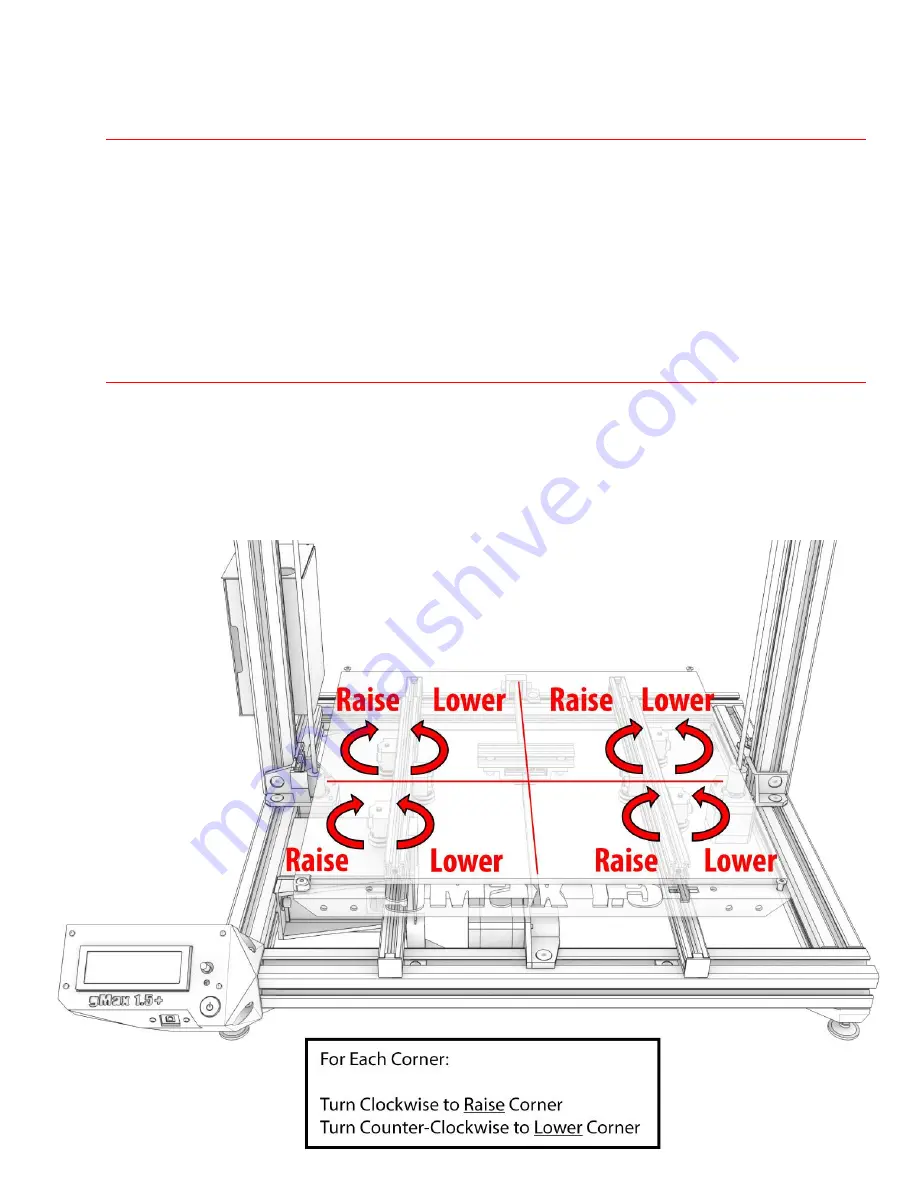
L e v e l i n g   T h e   B e d  

If you notice your bed may not be level, use the guide below to adjust the height of each v-slot wheel 
which will raise or lower the respective corner. 

To level bed, turn each v-slot wheel, under the bed, using an 8mm open wrench or 4mm hex key. Use 
the large bed leveling print to determine if each corner is high or low and adjust accordingly. Make 
sure to adjust one corner at a time. 

Summary of Contents for gMax Printer 1.5+

Page 1: ...inter in the future To jump straight to bed leveling check out page 8 Machine Specifications For Reference 1 Max Hotend Temperature 243C Do not set your max temperature above 235C to prevent a MAXTEMP...

Page 2: ...ely turn on and display text Below is a diagram of what each portion of the LCD screen represents Note This is for dual extruders and single extruder setups will not have a Hotend 2 reading Note If yo...

Page 3: ...will result in the creation of a gcode file Note A gcode file is a text file filled with commands used to run the printer It can be opened with a simple text editor such as Microsoft Notepad and edit...

Page 4: ...nd of the filament by gently bending it This will make it much easier to insert into the extruder Insert the filament as shown here 4 Pinch the extruder arm above the spring and insert filament into t...

Page 5: ...b this is your accept button and scroll down to Print from SD and push in the knob again 4 Select the file you wish to print and push the knob Your first Print 1 First you will see the extruder move t...

Page 6: ...layer Refer to the chart on the next page You can do this by using the LCD screen Quickly go to Tune Babystep Z then turn the knob This will raise or lower the extruder by very small amounts so you c...

Page 7: ...slightly above print bed allowing filament to be evenly spread onto the surface The filament should be a clean continuous line throughout the whole print Solution Nothing Keep an eye on the print and...

Page 8: ...he filament spool to ensure it does not bind or wrap around the brackets This is especially true for new spools of filament Leveling The Bed If you notice your bed may not be level use the guide below...

Page 9: ...ext print Note To access the set screw you must raise the extruder by 5 6 This can be done by using the LCD screen and going to Prepare Move Axis Move 1mm Move Z Then simply turn the knob Tips During...

Page 10: ...the filament change command at specific spots in the print Removing the print David vs Goliath After the print finishes you can immediately pop it off unless it s very small in which case you may wan...

Page 11: ...de you can carefully use a blade to remove the plastic or in some cases it just flakes off Note A heat source such as a lighter works great to heat the plastic to fix any problem areas and to smooth v...

Reviews: