Replacing or adding drives
33
4
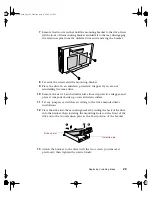
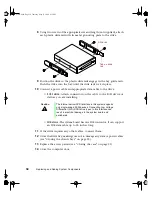
Using the hole in the front of the metal EMI shield, pull out on the left
side of the shield to disengage it from the chassis. Remove and save the
shield.
5
Open the drive bay (see “Opening the chassis bays” on page 20) to gain
access to the back of the 5.25-inch drive bay.
6
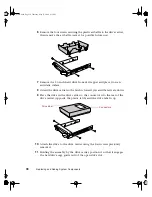
Remove the drive from its protective wrapper, and place it on an antistatic
surface.
7
Set any jumpers or switches on the drive according to the drive
manufacturer’s instructions.
Important
System EMI integrity and cooling are both protected by
having drives installed in the bays or filler panels and EMI
shields covering the bays. When you install a drive, save
the panel and shield to reinstall in case you should later
remove the drive and not reinstall one in the same bay.
Important
Installing a DLT tape backup drive requires the use of two
5.25-inch drive bays and therefore the removal of two EMI
shields. A DLT drive also requires special drive rails,
available from Gateway.
Hole in EMI
metal shield
05895.book Page 33 Thursday, May 11, 2000 1:11 PM
Summary of Contents for 8400
Page 1: ...8400 Server System Manual A MAN US 8400 SYS GDE R0 5 00 ...
Page 5: ...iv 05895 book Page iv Thursday May 11 2000 1 11 PM ...
Page 9: ...viii 05895 book Page viii Thursday May 11 2000 1 11 PM ...
Page 87: ...78 Using the BIOS Setup Utility 05895 book Page 78 Thursday May 11 2000 1 11 PM ...
Page 121: ...112 Troubleshooting 05895 book Page 112 Thursday May 11 2000 1 11 PM ...
Page 137: ...128 Safety and Regulatory Information 05895 book Page 128 Thursday May 11 2000 1 11 PM ...
Page 146: ...8400 Server System Manual A MAN US 8400 SYS GDE R0 5 00 ...


