38
Replacing and Adding System Components
6
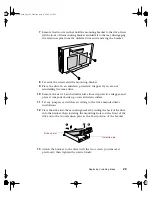
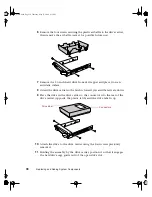
Remove the four screws securing the plastic air baffle to the drive carrier,
then remove the air baffle (save it for possible future use).
7
Remove the 3.5-inch hard drive from its wrapper and place it on an
antistatic surface.
8
Orient the drive carrier so the latch is toward you and the rails are down.
9
Place the drive in the drive carrier so the connector is to the rear of the
drive carrier (opposite the plastic latch) and the drive label is up.
10
Attach the drive to the drive carrier using the four screws previously
removed.
11
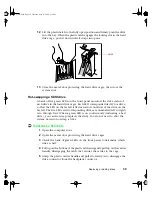
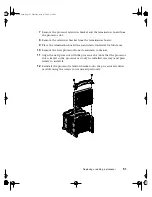
Holding the assembly by the drive carrier, position it so that it engages
the hard drive cage guide rails of the open drive slot.
Connectors
Drive label
05895.book Page 38 Thursday, May 11, 2000 1:11 PM
Summary of Contents for 8400
Page 1: ...8400 Server System Manual A MAN US 8400 SYS GDE R0 5 00 ...
Page 5: ...iv 05895 book Page iv Thursday May 11 2000 1 11 PM ...
Page 9: ...viii 05895 book Page viii Thursday May 11 2000 1 11 PM ...
Page 87: ...78 Using the BIOS Setup Utility 05895 book Page 78 Thursday May 11 2000 1 11 PM ...
Page 121: ...112 Troubleshooting 05895 book Page 112 Thursday May 11 2000 1 11 PM ...
Page 137: ...128 Safety and Regulatory Information 05895 book Page 128 Thursday May 11 2000 1 11 PM ...
Page 146: ...8400 Server System Manual A MAN US 8400 SYS GDE R0 5 00 ...


