background image

96/96C Owner’s Manual 

M

aIn

 p

aGeS

 > 


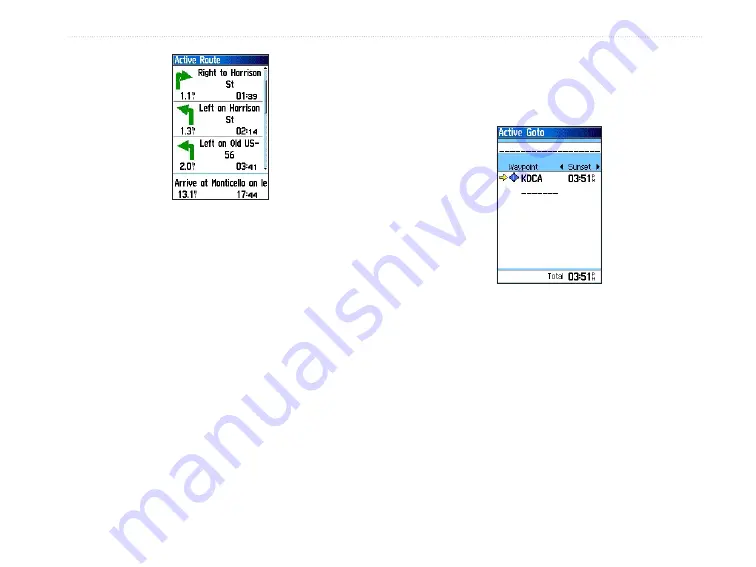
Active Route Page 

You can scroll through the entire list by moving the 

scroll bar up or down. Highlight any of the turns on 

the list, and press 

ENTER

 to view the Next Turn page 

for that turn. The Current Route and Next Turn page 

show similar information, just in a different layout. 

The Next Turn page shows your next turn on a map.
For additional details on the Active Route Page, see 

the “Creating and Using a Route” 

page 49

 section of 

the “Basic Operation” chapter.

The Active Route Page becomes an Active Go 

To Page when navigating to a destination with no 

waypoints in between you and the destination.

Active GoTo  

(Aviation Mode)

Summary of Contents for GPSMAP 96 - Hiking

Page 1: ...GPSMAP 96 96C portable aviation receiver pilot s guide...

Page 2: ...int one copy of this manual or of any revision hereto provided that such electronic or printed copy of this manual must contain the complete text of this copyright notice and provided further that any...

Page 3: ...such as an overview of the unit features and how to turn on and adjust the backlight The Basic Operation section provides you with information about navigation The Main Pages section reviews in detail...

Page 4: ...to Operate Unit Features 8 Selecting Options and Entering Data 10 Using Additional Map Data 12 Simulator Mode 12 Using DIRECT TO Key 14 Go To User and Recent 20 Understanding Vectors 21 Go To Page Opt...

Page 5: ...Clock 115 Nav Sonar Alarms Page 116 Calculator 118 Stopwatch 118 Sun and Moon 120 Hunt and Fish 121 Messages 122 Appendix 123 Specifications 123 Accessories 124 What are Map Datums 125 What is Positi...

Page 6: ...s controls while driving Pull over in a safe and legal manner before attempting such operations When navigating carefully compare information displayed on the GPSMAP 96 96C to all available navigation...

Page 7: ...Although the GPSMAP 96 96C is a precision navigation device any navigation device can be misused or misinterpreted and therefore become unsafe Map Data Information One of the goals of Garmin is to pr...

Page 8: ...used apply the liquid to the cloth and then gently wipe the screen with the moistened cloth Storage Do not store the GPSMAP 96 96C where prolonged exposure to temperature extremes can occur such as in...

Page 9: ...viation automotive and marine navigator perfect for air land or water This portable GPS navigator features a 256 color TFT screen a built in basemap Jeppesen aviation database and auto routing to prov...

Page 10: ...nd Hold to turn unit On Off Press and Release to adjust backlighting Contrast GPSMAP 96 QUIT Key Press and release to cancel data entry or exit a page ROCKER Key Move Up Down or Right Left to move thr...

Page 11: ...rn the D Ring 1 4 turn counter clockwise and then pull 2 Insert the batteries observing the proper polarity A polarity diagram can be found molded into the battery compartment 3 Reinstall the battery...

Page 12: ...POWER key 2 Press the ROCKER up to increase the brightness or down to decrease the brightness 3 Press ENTER or QUIT to close GPSMAP 96C Backlight Adjustment GPSMAP 96 Backlight and Contrast Adjustment...

Page 13: ...P 96 96C 1 Press and hold the Power key When the unit powers on a tone sounds and the first page appears 2 After a few seconds a Warning Information Page appears To acknowledge that you have read and...

Page 14: ...atellite is identified by its assigned number The sky view represents a theoretical dome directly over your current location with a pointer to indicate orientation While viewing the Satellite Page a s...

Page 15: ...formation from and is fixed on at least three satellites the unit is Ready to Navigate and you can advance to the Map Page Status Bar At the top of each page a Status Bar provides the current status f...

Page 16: ...og A message filter allows you to identify the types of messages for review For more detailed information about using the Message Log feature refer to page 122 How to Operate Unit Features The GPSMAP...

Page 17: ...roll Bar when viewing a list of items too long to shown on the screen a scroll bar appears along the right side of the list The position of the scroll bar indicates which portion of the list is curren...

Page 18: ...and press ENTER to start Options Menu Options that are grayed out are not available To select and start an option 1 With any page shown press MENU An Options Menu appears with a list of optional featu...

Page 19: ...us character field If there are two lines of data keep pressing right to drop down to the next line To clear the entire data field move the cursor to the left most character field and press left once...

Page 20: ...e CD ROM data to the unit To aid in learning to use the GPSMAP 96 96C please use the Simulator Mode Simulator Mode is also helpful for practicing with the unit indoors or when no satellite signals are...

Page 21: ...Page 4 On the System Setup Page highlight the GPS field and press ENTER 5 Select Simulator and press ENTER Press QUIT to return to your previous page To put the unit into Simulator Mode using the Sate...

Page 22: ...and facility information for airports VORs NDBs and more Updates to the Jeppesen database are available every 28 days online www garmin com The update program is designed to operate on Windows compati...

Page 23: ...waypoint as your destination When a Go To or route is currently in use pressing DIRECT TO D key shows a detailed information page for the active waypoint In Marine or Automotive Mode press DIRECT TO D...

Page 24: ...e than one entry exists in the database for the characters you have entered a window appears listing the entries Use the ENTER and ROCKER keys to select a waypoint from the duplicate list 3 Press ENTE...

Page 25: ...ation and airport position latitude longitude Use the third field to change between multiple runway information Go To Approach The Go To Approach Page shows identifier approach name final approach fix...

Page 26: ...ws you to quickly retrieve and select available approaches This option overrides your current route The original route is still available for later use The approaches provided in the Jeppesen database...

Page 27: ...w To cancel vectors and or an approach from the Go To Approach Page 1 Access the Go To Approach Page 2 Press MENU Highlight Cancel Approach or Cancel Vectors and press ENTER To cancel vectors and or a...

Page 28: ...right or left until Recent or User is selected User List for Waypoints 2 Use the ROCKER to highlight a waypoint from the list From User you can also select the top waypoint name line and then spell o...

Page 29: ...til you are established on this final approach course The Map Page shows an extension of the final approach course using a bold magenta line The HSI automatically slews rotate to show the direction to...

Page 30: ...ts you to the Find Menu Find Near Here allows you to find other places near the waypoint or point of interest specified Declutter On Off activates three layers of map detail Select this option multipl...

Page 31: ...ind Menu so you can easily search the stored Waypoints Cities Aviation and Recent Find Loading MapSouce data provides additional search options Airport nine nearest with identifier bearing to and dist...

Page 32: ...en an airspace alert is shown press and hold DIRECT TO D to automatically show nearest airspace information Press and hold DIRECT TO D a second time to quickly show the nearest airports list Additiona...

Page 33: ...highlight Go To and press ENTER Go To page for selected Airport Setting Airport Criteria From the Nearest Airport selection an options window allows you to filter out airports that do not meet a defi...

Page 34: ...ay regardless of surface type Hard Only shows only runways with a concrete asphalt or similar surface Hard or Soft shows all runways except water landing facilities Water Only shows only water landing...

Page 35: ...cally show nearby airspace information This information includes name time to entry if applicable and status Normally only one or two airspace alerts occur at a time but with sectorized controlled air...

Page 36: ...ies button and press ENTER 4 To return to the Nearest Pages select the on screen OK button and press ENTER Navigating in Automotive Mode Auto Routing is a feature that makes it simple to navigate to a...

Page 37: ...Active Route Page appears with a graphic list of the turns Highlight any turn field and press ENTER to view the Preview Page for that turn Two other Main Pages the Position Page and Pointer Page prov...

Page 38: ...shows a list of the waypoints on the route and indicates the next point on the route Man OverBoard MOB The Man OverBoard MOB feature functional only in the Marine Mode lets you simultaneously mark and...

Page 39: ...on from the Map Page using the ROCKER to position the Arrow Text Entry allows you to enter a new waypoint s position coordinates manually To mark your present position 1 Press and hold ENTER MARK unti...

Page 40: ...ve the Arrow to a map point or map feature 3 Press and quickly release ENTER to capture the map point Pressing and holding ENTER marks your present position not the map Panning Arrow s location If you...

Page 41: ...tem from the list then press ENTER to show the information page and then select SAVE To change any information on the New Waypoint Page highlight the appropriate field and press ENTER After entering a...

Page 42: ...w the Project Waypoint Page 4 To set the distance that the new waypoint is be projected beyond the original waypoint highlight the Distance portion of the From field and press ENTER Use the ROCKER to...

Page 43: ...everal sample location measurements for the waypoint and recalculate for a more accurate position reading You can only average the location for a waypoint you are currently marking where you have a fi...

Page 44: ...ning Arrow at a new reference point Press ENTER to change the reference and return to the waypoint page Use Panning Arrow to define a new reference Change Reference Page To set a proximity alarm for a...

Page 45: ...ation See the section on Sun and Moon tables for detailed information View Sun and Moon To view Hunt and Fish predictions for a waypoint location Select View Hunt and Fish and press ENTER to show Hunt...

Page 46: ...ted on a map database feature or MapSource or BlueChart feature the Information Page includes additional information about that location From the Waypoint Information Page you can change the name symb...

Page 47: ...l shows only waypoints with the same symbol from the list Change Reference changes the location for which nearest waypoints appear Delete deletes by symbol or all waypoints from the unit Note Once a w...

Page 48: ...se No or press QUIT to stop the deletion Delete Waypoint Options Searching for a Waypoint The Waypoints List is your storage location for all created and saved waypoints Waypoints can be created from...

Page 49: ...ypoints of a specific type Change Reference allows you to use the Panning Arrow to select a point on the map other than your current location 4 A waypoint information page can be viewed by pressing EN...

Page 50: ...es nearest a new location on the map Find Cities List 3 If using find By Name begin spelling the name of the city by using the ROCKER When you have entered enough characters to define the name a match...

Page 51: ...Near Here takes you to lists of map items near the airport identified by the Aviation Go To Page Add To Route list of current saved routes Select one or create a new route 2 The Aviation Go To Page s...

Page 52: ...are creating see page 22 Searching for a Marine Point The Find Marine Point feature allows you to search for the marine items such as marinas navaids services wrecks and obstructions If using BlueChar...

Page 53: ...show the information page for that tide station At the bottom of the Information Page are on screen buttons for Go To Map and Save To find a Wreck or Obstruction 1 Select the Marine Points icon and t...

Page 54: ...highlight each information category and press ENTER to show additional information Searching for an Address The Find Addresses feature allows you to search for an address within the coverage of downlo...

Page 55: ...Enter Number using the ROCKER Find Address Matches 6 Finally press ENTER to show the street list Use the ROCKER to enter enough of the street name to show a match on the list below When finished a li...

Page 56: ...an enter city field appears on the Crossroads Page Highlight the field and press ENTER to show the city list Select a city from the list and press ENTER to insert the city 5 Highlight Enter Street 1...

Page 57: ...al chain only the nearest restaurant to your location is shown when you search using the Find Nearest method If you search using the By Name method then all of the locations for that chain in the mapp...

Page 58: ...ht the on screen Use button and press ENTER to place it on the Route Waypoint List 5 To add more points to the route repeat the process 6 Press QUIT to save it to the Saved Routes list Or Press MENU h...

Page 59: ...your destination Turns on roadways are added to the active route page and is preceded by a guidance message with a graphic screen of the turn If there are not enough roads at your location to calculat...

Page 60: ...age Active Route Page 4 To view the list of turns on the route press PAGE to show the Active Route Page The view any individual turn on the list use the ROCKER to highlight it and press ENTER List of...

Page 61: ...Copy Route option and press ENTER The copied route show and is named the same but followed by a numeral 1 Saved Routes Options To delete a route or all routes 1 From the Saved Routes Page press MENU 2...

Page 62: ...te and press ENTER To edit the route on the map 1 With the Options Menu shown highlight the Edit on Map option and press ENTER to show the route on the map Use the ROCKER to move the panning arrow to...

Page 63: ...ight the Reverse Route option and press ENTER To select an approach Aviation Mode only With the Options Menu shown highlight Select Approach to show options for the destination airport To set speed an...

Page 64: ...VFR navigation instrument and is not intended for instrument approaches As you approach the initial descent point the time to vertical navigation field ETV indicates the time to reach the initial desc...

Page 65: ...T a reference waypoint enter a distance of zero VNAV Waypoint allows you to select any waypoint along the currently active route or Go To as your reference waypoint The reference waypoint defines the...

Page 66: ...for a page press MENU Aviation Mode features five main pages Satellite Page Position Page Map Page HSI Page and Active Route Go To Page An example of each page in Aviation Mode appears below Each of...

Page 67: ...course The Map Page shows digital cartography map information that includes airspace boundaries airports navaids lakes rivers coastlines cities and highways An on screen pointer Panning arrow lets you...

Page 68: ...how any one of the possible data options You can also add an HSI field which replaces two data fields on the page or select Map Only without data fields using the Map Page Options Menu Panning the Map...

Page 69: ...1 When you are finished panning the Map press QUIT 2 The unit automatically returns to position mode The arrow can also be used to snap to on screen waypoints and map items allowing you to review a s...

Page 70: ...feature an Information Page appears showing details about the feature The on screen buttons Delete Map or Go To appear Select an on screen button and press ENTER or press QUIT to exit the Waypoint Inf...

Page 71: ...is shown at the bottom left of the map screen To select a map scale zoom in and out Press the OUT key to zoom out and the IN key to zoom in Overzoom No additional data available Using MapSource downlo...

Page 72: ...tions following options have instructions on how to use the option The Options Menu varies slightly between the Usage Modes Stop Navigation turns off active route navigation Recalculate recalculates a...

Page 73: ...an adjust the level of declutter by pressing ENTER repeatedly To declutter the Map Page in Aviation Mode 1 Press PAGE repeatedly until the Map Page is shown 2 Press MENU 3 Use the ROCKER to highlight...

Page 74: ...bearing and distance from the reference point and cursor coordinates are shown in the data window at the top of the screen 4 Press QUIT to finish To set up the page layout 1 Highlight Set Up Page Layo...

Page 75: ...p of the ring The course pointer or course deviation pointer indicate the your course and the distance you are off course A bug indicator provides course to steer information guiding you to the destin...

Page 76: ...is indicated by a bearing pointer in the middle of the Pointer ring A bearing bug on the outside of the Pointer ring in Marine mode only The Pointer ring and bearing indicators work independently to...

Page 77: ...one of several data options and the data window layout can be customized to change the actual size of the data shown To show the HSI Pointer Page Options Menus 1 Press MENU to show the Options Menu 2...

Page 78: ...page Refer to the Appendix for data descriptions Active Route Page Whenever you have started a route while in Aviation or Marine Mode the Active Route Page shows each point waypoint or map item of th...

Page 79: ...Current Route and Next Turn page show similar information just in a different layout The Next Turn page shows your next turn on a map For additional details on the Active Route Page see the Creating...

Page 80: ...existing GPS RNAV VOR NDB localizer or ILS approach procedures All approach procedures are flown as a sequence of waypoints in the route In order to select an approach and add the waypoints to the ro...

Page 81: ...for reset options Big Numbers allows you to change the data fields to show fewer data fields with larger numbers for easier viewing Change Data Fields allows you to specify the type of data shown in...

Page 82: ...The Map Setup Page The Map Page for your GPSMAP 96 96C can be customized A factory set of default settings currently controls the Map Page screen The Map Setup Pages allow you to determine how map fea...

Page 83: ...has a menu of general options This menu can be accessed by pressing MENU with the page shown General Setup The first page of the Map Setup feature is the General Settings Page Use this page to select...

Page 84: ...ks and active track logs You can set the number of track points for recording a track select either a bearing or course line for navigating a track and set the heading line to off and to show in dista...

Page 85: ...set it to Auto or select a value from 20 feet to 500 miles The Points Zoom Map Setup Page Points Text Setup Use the Map Points Text Page to select the text size for descriptions of items on the Map Pa...

Page 86: ...les The Airport Zoom Map Setup Page Airport Text Setup The Airport Text Page of the map setup feature allows to select the text size for descriptions of airports and runways on the Map Page You can se...

Page 87: ...y light gray and white for the GPSMAP 96C and GPSMAP 96 respectively References to obstacle icon gray tones for GPSMAP 96 units are in parentheses for this section Standard aeronautical chart symbols...

Page 88: ...e or black with white lettering white with black lettering indicating a yellow light gray obstacle The obstacle warning remains on the screen until the flight path has cleared the obstacle or you have...

Page 89: ...n also be accessed from the Map Page Options Menu To setup obstacle data 1 Access the Obstacle Data Setup Page 2 Highlight the first field and press ENTER to show the options for setting the minimum d...

Page 90: ...e the graphic shows the direction you should move to stay on course to the point Five scale settings allow you to zoom in or out on the highway To navigate using the Highway Page 1 While navigating ac...

Page 91: ...g for cities airports Tracks This feature allows you to maintain a record of your movements track log Routes Create a list of points that you wish to navigate to and save for later use E6B Calculates...

Page 92: ...w a list of messages received This feature also includes filters to exclude messages by type Highway A useful graphic perspective with configurable data fields for navigating a route Find The Find Fea...

Page 93: ...ll categories Pressing and holding DIRECT TO key also shows this category at any time when in Automotive or Marine Mode The options menu for each map item group offers its own unique search options su...

Page 94: ...s your last found location at the top of the list When you exceed the number of entries the list can hold the oldest is deleted To return to a recently found item 1 With the Find Menu shown use the RO...

Page 95: ...for a Waypoint Selected as a destination If selecting an item as a destination the three buttons appear as Save Delete Add to or Remove from the Waypoints list Map show on the Map Page Go To start a...

Page 96: ...2 Use the ROCKER to highlight the an option and press ENTER start Average Location used with waypoints only it samples a waypoint location over time and averages the result for a more accurate positi...

Page 97: ...rmation about downloading detailed maps Change Reference point to a new location on the map Page using the Panning Arrow and press ENTER Set Proximity program an alarm to sound when you are within a s...

Page 98: ...sure the area of any space you encircle with a track Retrace your path in either direction Tracks Page with Saved Track Log To create a Track Log 1 Press MENU twice to show the Main Menu Use the ROCKE...

Page 99: ...Set the interval for setting track points You can choose from distance time or frequency values 7 The last item is the Active Track Color Options list 8 When completed press QUIT to return to the Tra...

Page 100: ...reen buttons at the bottom of the page allow you to Save the track OK Delete View it on the Map and TracBack Saved Track Page To view a Track on the Map 1 With the Saved Tracks Page for the track or t...

Page 101: ...g Arrow to a point on the map and press ENTER to start navigating the TracBack 3 Select either Follow Road to route back to the selected point using available roadways or Follow Track to retrace your...

Page 102: ...inds Aloft Head Wind Tail Wind Wind From and Wind Speed based upon information you enter To open the E6B Page of the Main Menu 1 Press MENU twice to open the Main Menu 2 Highlight the E6B icon from th...

Page 103: ...ading and true airspeed Density Altitude calculated figure from entry of indicated altitude baro pressure and total air temperature To calculate true airspeed and density altitude 1 From the E6B Page...

Page 104: ...eed field 2 Use the ROCKER to highlight the Heading field and press ENTER 3 Use the ROCKER to enter the aircraft heading shown on your directional gyro or Pointer Press ENTER when finished The figures...

Page 105: ...s continuously updated as your flight progresses If you land and groundspeed drops below 30 knots the flight entry is saved and a new entry is recorded when you depart the airport Touch and goes or br...

Page 106: ...e Timers icon and press ENTER to show the Timers Page User allows you to set the timer to Count Up or Count Down You can also Reset the timer and turn it Off Enter a time to use when counting up or do...

Page 107: ...ss ENTER to highlight the first character User the ROCKER to enter a value Aircraft Profile The Aircraft Profile Page consists of two separate sections Aircraft Profile and Weight Balance Aircraft Pro...

Page 108: ...DELETE button and press ENTER If Rename is selected use the ROCKER and ENTER to enter a new tail number Weight Balance Weight Balance can be used during your pre flight preparations to verify the weig...

Page 109: ...top of the page 2 Use the ROCKER to highlight a weight field and press ENTER 3 Use the ROCKER to enter the weight figure Press ENTER when finished 4 Use the ROCKER to highlight the corresponding arm...

Page 110: ...s that can be changed to meet your requirements To access the Setup Menu 1 From the Main Menu select the Setup icon and press ENTER 2 With the Setup Menu shown select the feature you want to modify an...

Page 111: ...and Options Display Setup The Display Setup Page allows you to select a screen display color scheme for day and night viewing You can set the backlight timeout and the level of brightness which can s...

Page 112: ...to exchange waypoint route track log and MapSource data with a PC GARMIN DGPS the proprietary format used with a Garmin differential beacon receiver e g GBR 21 Provides for tuning of the beacon recei...

Page 113: ...the USB cable is connected to the GPSMAP 96 96C it is automatically detected and communicates only in Garmin Format When the USB is connected Garmin format does not communicate through the Serial conn...

Page 114: ...allows you to customize the signal tones for a variety of unit features Tones Setup Page To use the Tones Setup feature 1 Access the Tones Setup Page 2 Use the ROCKER to highlight the feature for whi...

Page 115: ...ge highlight the page and press ENTER Select Remove and press ENTER Routing Setup The Routing Setup Page allows you to customize how the routing functions behave There are setup and option menus for r...

Page 116: ...ollow Road Options on screen button and press ENTER to choose from a page of options Airspace Alarms Setup Page You can select and start the following airspace alarms Class B CTA Class C TMA Towers Cn...

Page 117: ...mits five 5 beeps Press ENTER to acknowledge Time Setup The Time Setup Page allows you to set the time for your location To use the Time Setup feature 1 Access the Time Setup Page 2 Highlight the Time...

Page 118: ...the vertical tab list Then select Location from the row of tabs along the top of the page Refer to the Appendix of this guide for more information about location formats and map datum Also visit the N...

Page 119: ...isted in the Appendix you should only change the datum if you are using a map or chart that specifies a different datum WARNING Selecting the wrong map datum can result in substantial position errors...

Page 120: ...d You must periodically update the magnetic variation as your position changes Failure to update this setting can result in substantial differences between the information shown on your unit and exter...

Page 121: ...point from the Waypoints List or from any other group of map points in the Find Menu and press ENTER to show the Information Page for that item 4 Highlight the Use button at the bottom of the page and...

Page 122: ...eek is shown 2 To add a flight plan use the ROCKER to highlight the day you want and press ENTER to show the Page for that day 3 Press MENU to show the Options Menu Highlight Add Route and press ENTER...

Page 123: ...GPSMAP 96 96C as an alarm clock You can choose from different alarm tones and use the Snooze feature to delay the alarm for an additional seven minutes To set the Alarm Clock 1 Access the Alarm Clock...

Page 124: ...cle between the pages press the ROCKER left or right When an alarm is started the alarm message appears on the screen and the unit emits five 5 beeps When you select an alarm to be persistent the alar...

Page 125: ...Auto for the unit to provide an Arrival alarm at its discretion Off Course sets an alarm to sound when you are off course Place a check mark in the box then enter a distance Anchor Drag sets an alarm...

Page 126: ...lculator 1 Access the Calculator from the Main Menu 2 Use the ROCKER and ENTER keys to operate the calculator Stopwatch This feature allows you to use the GPSMAP 96 96C as a stopwatch which includes a...

Page 127: ...tance Use the ROCKER to highlight the Options Menu and press ENTER Choose Lap by Distance and press ENTER To return to Lap by Button Press repeat these same steps Setting Lap By Distance To set a lap...

Page 128: ...of the sun and moon and stop at a given time date The button to the left animates the sun and moon on the screen The center button animates more rapidly showing the phases of the moon The right button...

Page 129: ...t and Fish Page 3 To view the predictions for a different location highlight the Location field and press ENTER to show the New Location options menu Choose Use Map to select a point on the map using...

Page 130: ...ress ENTER to view the list of messages By default all messages are shown 3 Use the ROCKER to highlight the message Press ENTER to view detailed information about that message 4 To clear the page of o...

Page 131: ...elocity 0 05 meter sec steady state Dynamics Performs to specifications to 6 g s Interfaces NMEA 0183 version 2 3 RTCM SC 104 for DGPS corrections and RS 232 and USB for PC interface Data Storage Life...

Page 132: ...ection during transport of the unit Auto Navigation Kit allows installation on a vehicle dash and includes Garmin MapSource City Select North America v 6 CD ROM Marine Mount Kit allows installation on...

Page 133: ...to a map chart or other reference the map datum in the GPS unit should be set to the same datum as the map or chart to ensure the most accurate navigation What is Position Format Your current locatio...

Page 134: ...e information Go To http gps faa gov Programs WAAS waas htm What is Differential GPS DGPS The U S and Canadian governments among others have set up Differential GPS DGPS stations to transmit correctio...

Page 135: ...t the field press ENTER select or enter the setting then press ENTER 6 When finished highlight Save and press ENTER Loran TD Setup Page If the active GRI Chain secondary stations or offsets have been...

Page 136: ...page 104 of this manual The input output lines on your GPSMAP 96 96C are RS 232 compatible allowing easy interface to a wide range of external devices including PC s differential beacon receivers mari...

Page 137: ...s necessary for downloading of detailed map from Garmin MapSource and Jeppesen Map Data CDs You can also save routes waypoints and tracks from the GPSMAP 96 96C to MapSource Refer to the MapSource Use...

Page 138: ...ve the unit repaired Detail Maps Don t Support Routing maps that are loaded on the data card do not support automatic route calculation Dragging Anchor the distance set in the Anchor Drag Alarm is exc...

Page 139: ...ing a turn that requires a bank angle in excess of 25 degrees to stay on course Sunrise Switching to Day Mode the unit is switching to Day Mode Sunset Switching to Night Mode the unit is switching to...

Page 140: ...e entire distance from beginning to end of a route Distance Next the distance to the next point on a route ETA Destination Estimated Time of Arrival The estimated time you will reach your destination...

Page 141: ...reset Appears as Move Timer Trip Timer Stopped the length of time your vehicle has been stopped since the Trip Computer was reset Trip Timer Total the total time the unit has been tracking since the...

Page 142: ...ture organization and code of the Software are valuable trade secrets of Garmin and that the Software in source code form remains a valuable trade secret of Garmin You agree not to decompile disassemb...

Page 143: ...ty does not cover failures due to abuse misuse accident or unauthorized alteration or repairs THE WARRANTIES AND REMEDIES CONTAINED HEREIN ARE EXCLUSIVE AND IN LIEU OF ALL OTHER WARRANTIES EXPRESS OR...

Page 144: ...er clearly written on the outside of the package The unit should then be sent freight charges prepaid to any Garmin warranty service station A copy of the original sales receipt is required as the pro...

Page 145: ...ich can be determined by turning the equipment off and on the user is encouraged to try to correct the interference by one of the following measures Reorient or relocate the receiving antenna Increase...

Page 146: ...ints 33 Current Route Page 72 Cursor 9 Mode 59 D Data Fields 66 132 Active Route Page 72 Compass 70 Map Page 65 Position Data Page 73 Deactivate 72 Declutter 64 65 Deep Water 117 Defaults 9 Delete Way...

Page 147: ...73 Data Fields 73 Position Format 110 125 Position Mode 59 Power 5 Project Location 34 35 Proximity Waypoints 113 R Ready to Navigate 7 Receive Satellite Signals 5 Registration 134 137 Reset Trip 73...

Page 148: ...View Details 62 View Waypoints on Route 49 VNAV 56 VOR 14 23 W WAAS 126 Waypoint Create 31 33 34 Delete 39 Edit 36 Name 38 Searching 40 Symbol 38 Waypoint Information Page 24 Weight Balance 100 Weigh...

Page 149: ......

Page 150: ...w garmin com 2004 2007 Garmin Ltd or its subsidiaries Garmin International Inc 1200 East 151st Street Olathe Kansas 66062 USA Garmin Europe Ltd Liberty House Hounsdown Business Park Southampton Hampsh...

Reviews: