Photo Size
: Sets the size or pixel dimensions of photos.
Field of View
: Sets the zoom level.
Lens Mode
: Sets which lens or lenses the camera uses while
shooting video.
Mirror
: Allows you to flip or mirror the video.
Rotation
: Allows you to rotate the camera angle.
Adding the VIRB Action Camera Controls to Other
Screens
Before you can control a VIRB action camera with the
chartplotter, you must connect the devices using a wireless
connection (
Connecting a Wireless Device to the Chartplotter
).
You can add the VIRB action camera control bar to other
screens. This allows you to start and stop recording from other
functions in the chartplotter.
1
Open the screen to which you want to add the VIRB action
camera control bar.
2
Select
Menu
>
Edit Overlays
>
Bottom Bar
>
VIRB Bar
.
When viewing a screen that has the VIRB action camera
controls, you can select
to open the full screen view of the
VIRB action camera.
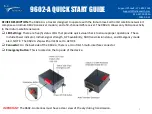
HDMI Video Considerations
NOTICE
To prevent corrosion due to moisture, you must use Garmin
GPSMAP accessory cables when connecting the chartplotter to
the video source or display. Do not connect a media player stick
directly into the back of the chartplotter. Using different cables or
connecting a media player stick into the back of the chartplotter
voids your warranty.
This chartplotter allows video input from HDMI video sources,
such as a Chromecast
™
device or a Blu-Ray
™
player. You can
view protected HDMI content (HDCP content) on the chartplotter
screen. HDMI video is shared across the Garmin Marine
Network, but it is not shared across the NMEA 2000 network.
HDCP content is not shared across the Garmin Marine Network.
Through the HDMI OUT port, you can duplicate the chartplotter
screen on another device, such as a television or monitor. You
cannot view HDCP content on the duplicated screen.
The Garmin GPSMAP HDMI accessory cable is 4.5 m (15 ft)
long. If you need a longer cable, you should use an active HDMI
cable only. You need an HDMI coupler to connect the two HDMI
cables.
You need a Garmin GPSMAP USB OTG adapter cable to power
a media player stick. The USB port can supply up to 2.5 W to
power a media player stick.
You must make all cable connections in a dry environment.
Item Description
GPSMAP 8400/8600 Series chartplotter
Display with an HDMI In port, such as a computer or television
Item Description
GPSMAP HDMI cable (HDMI IN)
GPSMAP USB OTG adapter cable to power the HDMI source, if
possible (2.5 W maximum)
GPSMAP HDMI cable (HDMI OUT)
HDMI source, such as a Blu-Ray player or Chromecast device
Dry environment, protected from moisture
Controlling HDMI Audio
You can control the audio for HDMI video sources.
1
From an HDMI video source, select
Menu
.
2
Select an option:
• To turn off the audio, select
Off
.
The icon appears on the video screen.
• To play the HDMI audio, select
On
.
The
icon appears on the video screen.
• To always play the HDMI audio, even when you are not
viewing the HDMI video, select
Always On
.
The
icon appears on the video screen.
Pairing the GC
™
100 Camera with a Garmin
Chartplotter
Before you can connect a wireless device to the chartplotter
wireless network, you must configure the chartplotter wireless
network.
1
With the camera within an unobstructed 76 m (250 ft.) of the
chartplotter, quickly press three times.
2
On the chartplotter, select
Settings
>
Communications
>
Wireless Devices
>
Garmin Camera
>
Start
.
3
Follow the on-screen instructions.
Device Configuration
System Settings
Select
Settings
>
System
.
Sounds and Display
: Adjusts the display and audio settings.
GPS
: Provides information about the GPS satellites and
settings.
System Information
: Provides information about the devices on
the network and the software version.
Station Information
: Adjusts the setup of the station.
Auto Power Up
: Controls which devices turn on automatically
when power is applied.
Auto Power Off
: Automatically turns off the system after it has
been asleep for the selected length of time.
Simulator
: Turns the simulator on or off and allows you to set
the time, date, speed, and simulated location.
Sounds and Display Settings
Select
Settings
>
System
>
Sounds and Display
.
Beeper
: Turns on and off the tone that sounds for alarms and
selections.
Audio Setup
: Sets up the audio output.
Backlight
: Sets the backlight brightness. You can select the
Auto option to adjust the backlight brightness automatically
based on the ambient light.
Backlight Sync
: Synchronizes the backlight brightness of other
chartplotters in the station.
52
Device Configuration
Summary of Contents for GPSMAP 8600 series
Page 1: ...GPSMAP 8400 8600SERIES Owner sManual...
Page 67: ......
Page 68: ...support garmin com December 2018 190 01978 00_0H...