After installing the cable, you can connect the RCA connectors
to the AUX input of the stereo. The HDMI input is then output to
the stereo.
The cable also provides NMEA 0183 inputs and outputs.
Model
Accessory Part
Number
NMEA 0183 Inputs and Outputs
10 inch
010-12852-00
One differential input and output
port
12 inch
010-12852-00
One differential input and output
port
16 inch
010-12852-00
One differential input and output
port
17 inch
010-12390-21
Four input ports and two output
ports
22 inch
010-12390-21
Four input ports and two output
ports
24 inch
010-12390-21
Four input ports and two output
ports
8700 black
box
010-12390-21
(included)
Four input ports and two output
ports
Touchscreen Controls for a Connected
Computer (MFD models)
NOTICE
To prevent corrosion due to moisture, you must use Garmin
GPSMAP accessory cables when connecting the chartplotter to
the computer. Using different cables voids your warranty.
You can connect the chartplotter to a computer to see the
computer screen on the chartplotter touchscreen and control the
computer using the chartplotter touchscreen. To see the
computer screen, you must connect the computer to the HDMI
IN port. To control the computer, you must connect the
computer to the USB port.
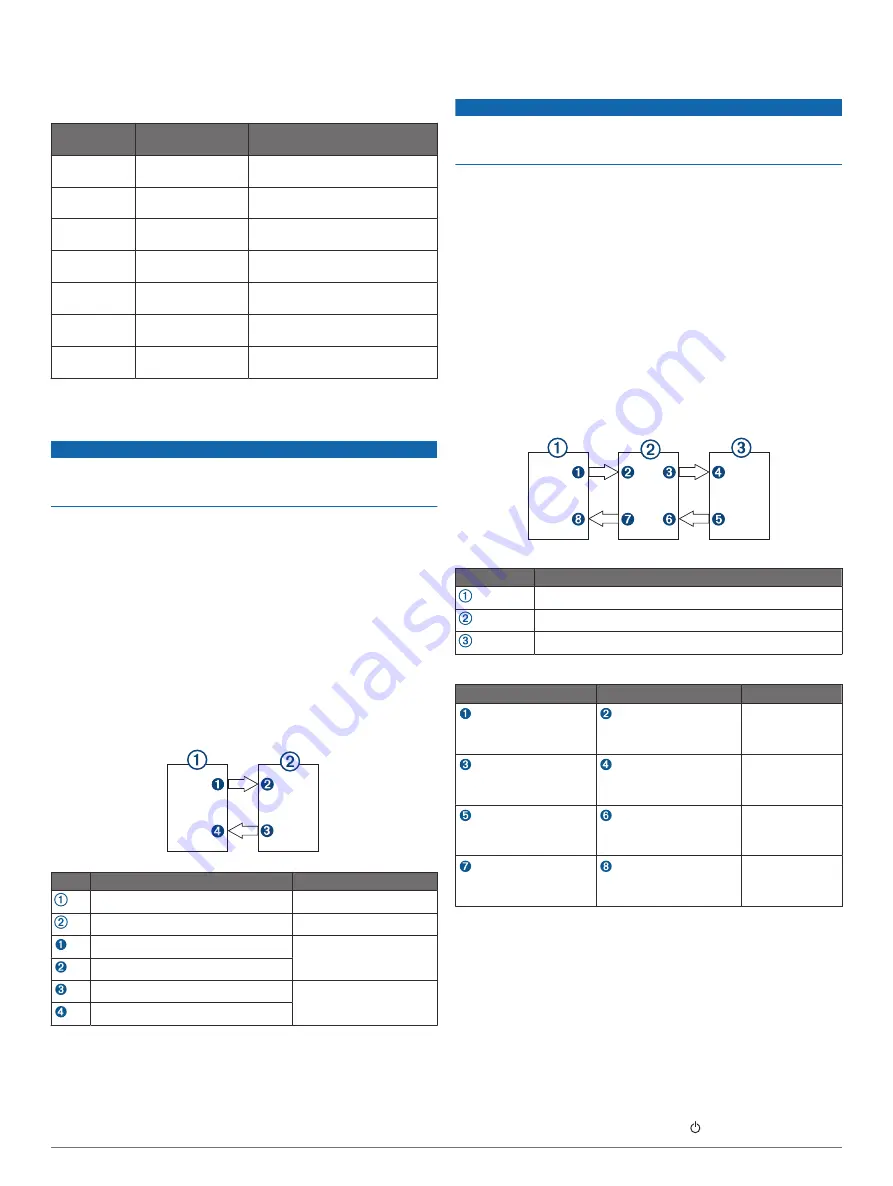
The Garmin GPSMAP HDMI accessory cable is 4.5 m (15 ft)
long. If you need a longer cable, you should use an active HDMI
cable only. You need an HDMI coupler to connect the two HDMI
cables.
The Garmin GPSMAP USB accessory cable is 4.5 m (15 ft)
long. If you need a longer cable, you should use a USB hub or
USB repeater extension cable only.
You must make all cable connections in a dry environment.
Item
Device or port
Cable
Computer
GPSMAP chartplotter (MFD)
Computer's HDMI OUT port
Garmin HDMI Cable
Chartplotter's HDMI IN port
Computer's USB port
Garmin USB Cable
Chartplotter's USB port
Touchscreen Controls for a Connected
Computer (8700 Model)
NOTICE
To prevent corrosion due to moisture, you must use Garmin
GPSMAP accessory cables when connecting the chartplotter to
the computer. Using different cables voids your warranty.
You can connect the chartplotter to a computer to see the
computer screen and to control the computer using a
touchscreen. To see the computer screen, you must connect the
computer to the HDMI IN port and connect the touchscreen to
the HDMI OUT port. To control the computer using the
chartplotter touchscreen, you must connect the computer to the
USB OTG port and connect the touchscreen to the USB HOST
port.
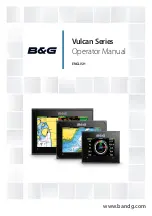
The HDMI Cable (010-12390-20) is 4.5 m (15 ft) long. If you
need a longer cable, you should use an active HDMI cable only.
You need an HDMI coupler to connect the two HDMI cables.
The Garmin OTG Adapter Cable (010-12390-11) is 1.8 m (6 ft)
long and the Garmin USB Cable (010-12390-10) is 4.5 m (15 ft)
long. If you need a longer cable, you should use a USB hub or
USB repeater extension cable only.
You must make all cable connections in a dry environment.
Devices
Item
Device
Computer
GPSMAP chartplotter
Touchscreen monitor
Connections
From
To
Cable
Computer's HDMI OUT
port
Chartplotter's HDMI IN
port
Garmin HDMI
Cable
Chartplotter's HDMI OUT
port
Monitor's HDMI IN port
Garmin HDMI
Cable
Monitor's USB port
Chartplotter's USB HOST
port
Garmin OTG
Adapter Cable
Chartplotter's USB OTG
port
Computer's USB HOST
port
Garmin USB
Cable
Controlling a Computer with the Chartplotter
Before you can control a computer using the chartplotter, you
must connect the chartplotter and computer correctly. See the
chartplotter installation instructions for connection information.
1
Select
OneHelm™, A/V, Gauges
>
Video
.
2
Select the HDMI source for the computer.
3
Select
Menu
>
USB Touch Out
.
You can now control your computer using two-finger touch
gestures on the chartplotter screen.
4
If necessary, select
Menu
>
Full Screen
to view the
computer screen in full screen mode.
TIP:
To exit full screen mode, press .
64
Appendix
Summary of Contents for GPSMAP 8400 series
Page 1: ...GPSMAP 8400 8600 8700SERIES Owner sManual...
Page 8: ......
Page 81: ......
Page 82: ...support garmin com January 2020 190 01978 10_0D...


